Swing Top Stopper Mechanism:
Getting the measurement right
Early in the process, I needed to predict bottle neck diameter at the holes. I measured the gap on all of the ones I have and got an average to work from. Then I 3D printed several iterations of the neck, fired size, and settled on one that enabled being able to snap on the metal stopper fitting without stretching it too much. That being said, the wire assembly is bendable and can be adjusted for size.
This 3D printed test was designed to determine positioning in 3D space for the mounting holes. The ceramic bottle won't have this exact design; they need a thickened section on each side of the neck for the hole.

Related Pictures
v6 Beer Bottle Drawing
Fits standard swing top stoppers.
Available on the Downloads page
This picture has its own page with more detail, click here to see it.
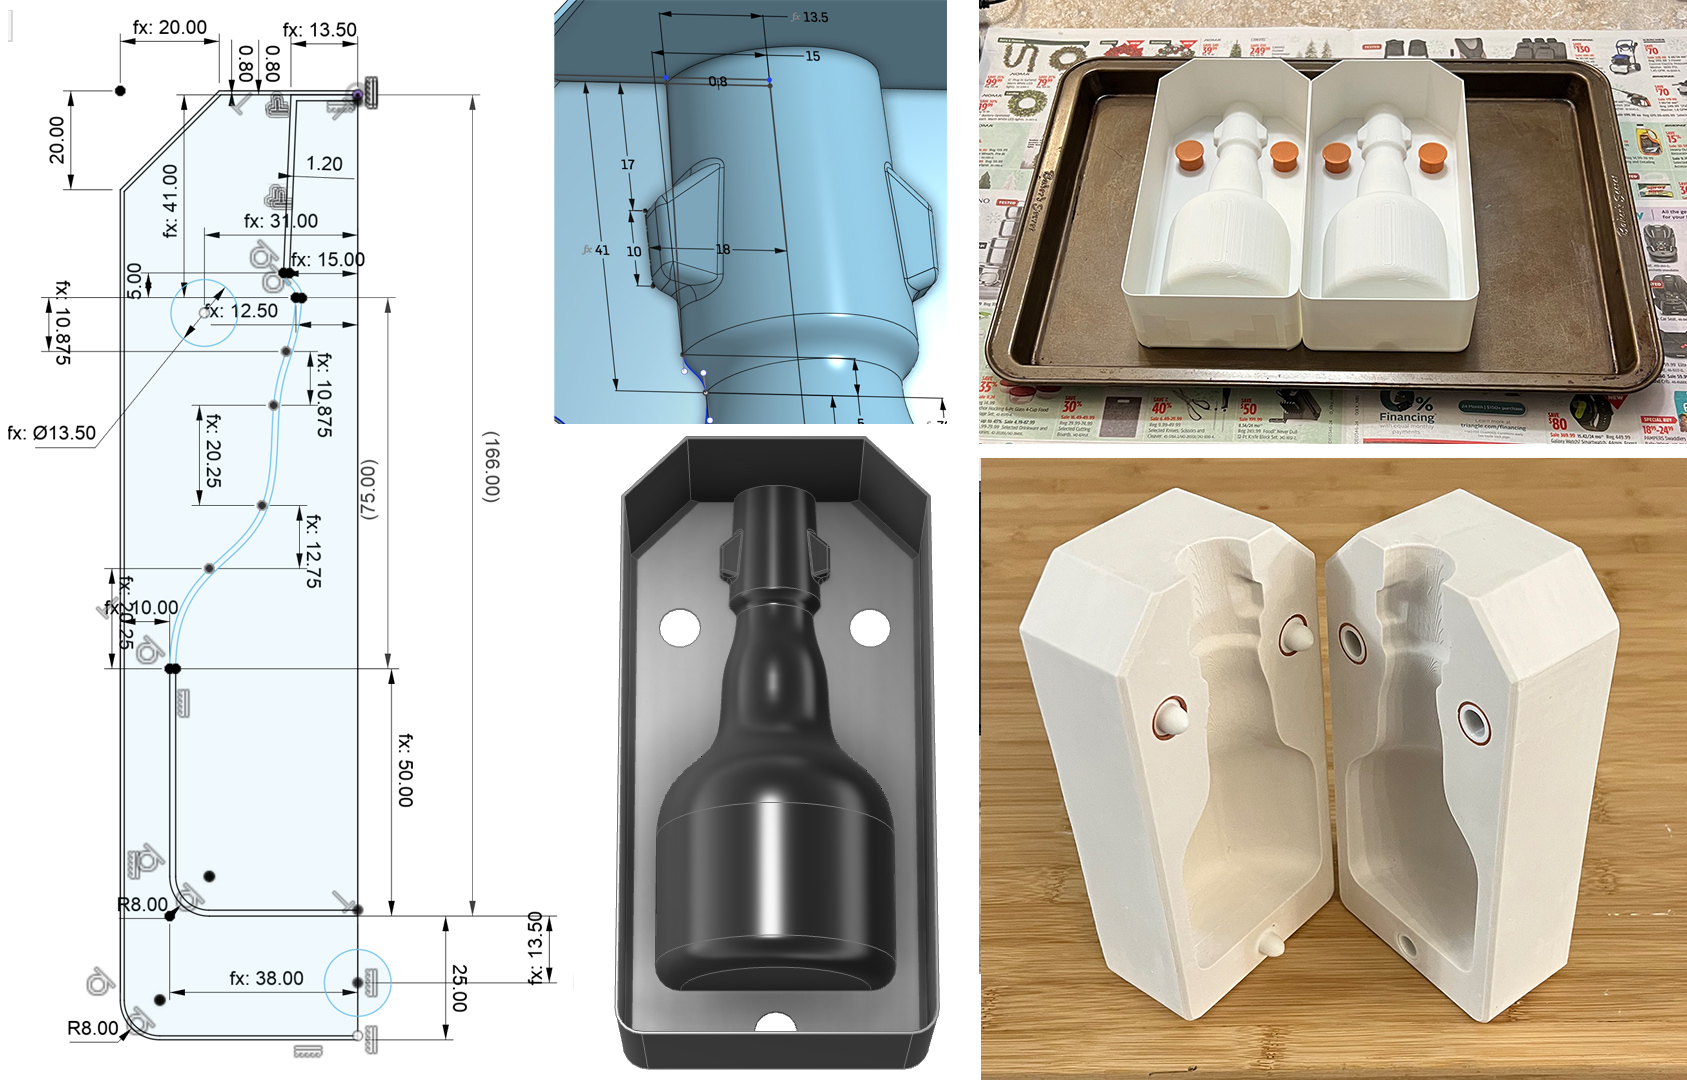
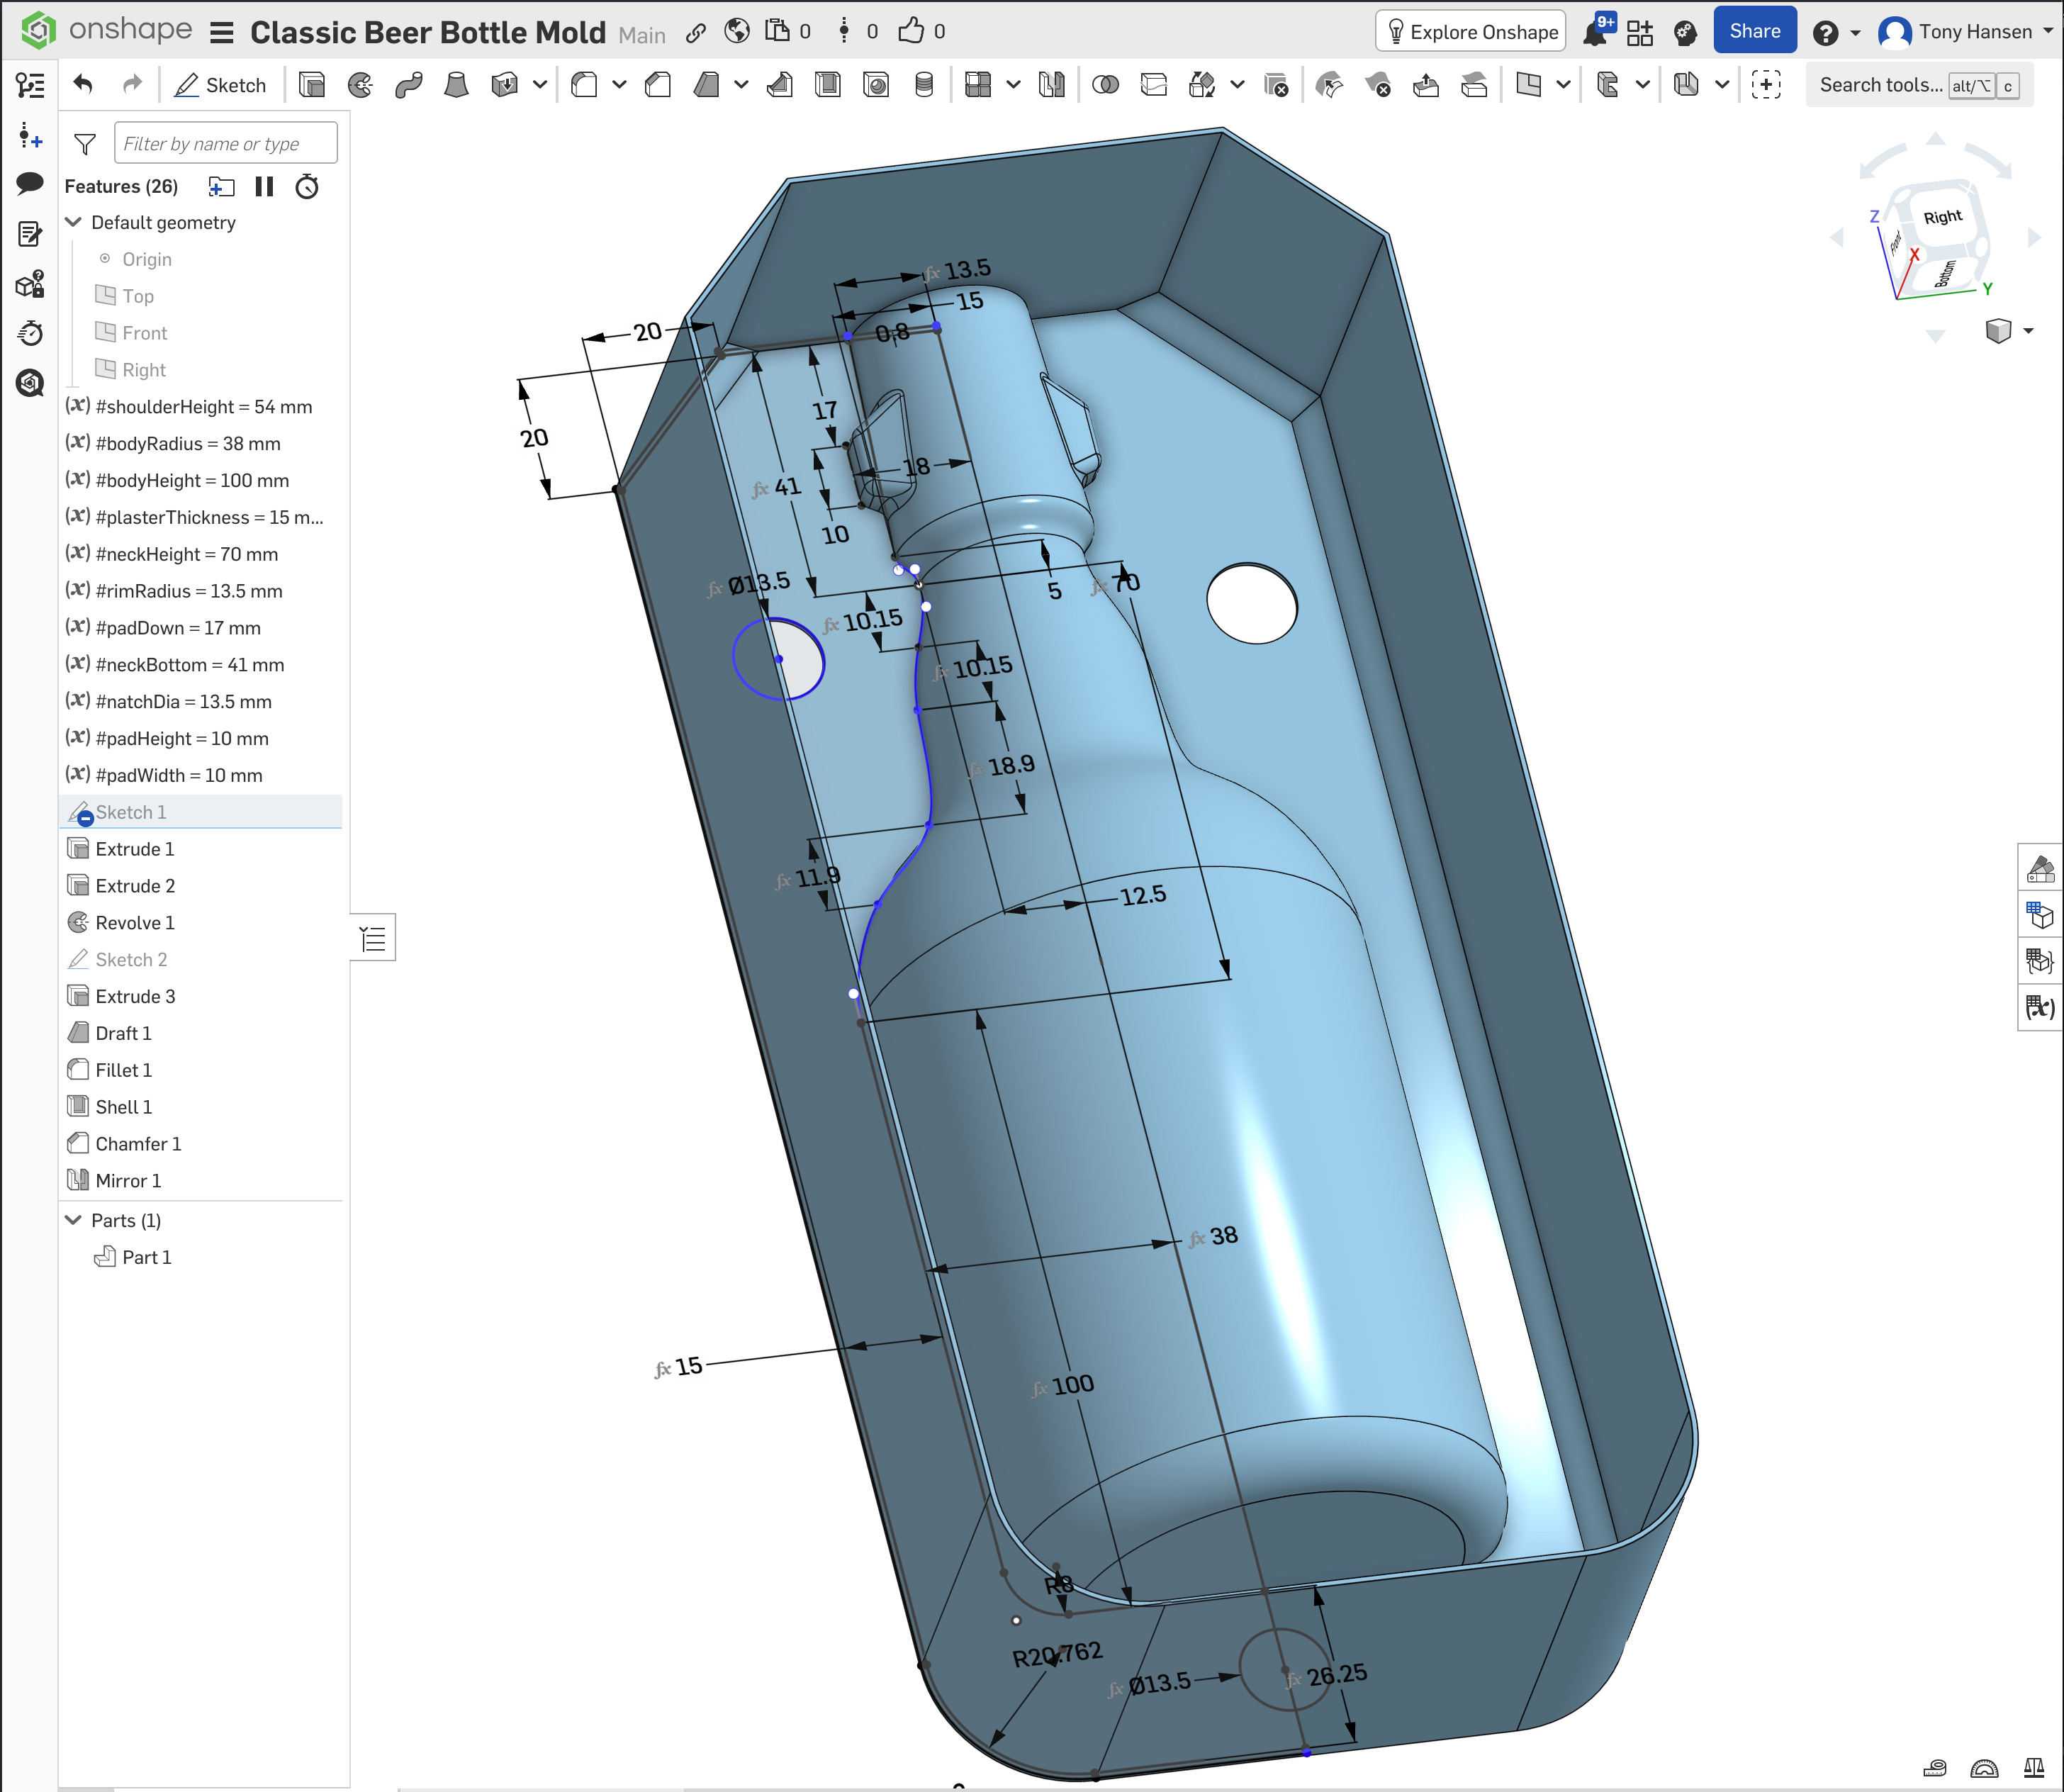
3D print this, pour in plaster to make a slip casting mold! My previous work on this project assumed a smaller 3D printer (making it necessary to print flanged PLA mold sections that clip together). But larger 3D printers are now common, making the CAD work much easier. This OnShape drawing is parametric for height, body diameter, wall and plaster thickness, and neck height (for the full bottle set body=160mm, neck=96). This uses my standard natch system. Neck vertices are proportional to height, so resizing works well. The top end is filleted to permit the longest possible mold on the print bed (diagonally). The bottom inside perimeter is chamfered, strengthening the default 0.8mm side wall junction to the base (that being said, be careful not to flex it too much when removing it from the print bed).
Doing this smaller size is for prototyping and testing. Casting plaster on a 3D print creates artifacts; these were not an issue. This PLA mold prints quickly, it has a hollow back side, permitting easy removal with a heat gun. There is no spare, it employs a pour spout, making the mold shorter and producing a better lip.
Need a stoneware slip casting recipe? L4768E or L4768H are a good choice. A glaze recipe? How about GA6-B (or similar)? Go full DIY with this, you will never turn back.
Calibrating the fit for the swing stopper assembly
Three iterations to derive the measurements

This picture has its own page with more detail, click here to see it.
There is no substitute for firing tests pieces to cone 6 to test the fit for the swing assembly. In Fusion 360 I sliced off the top of the bottle and formed a small box around it to be able to quickly 3D print a test case mold of just the upper neck (I cast two plaster mold halves from them). In the freshly cast leather hard pieces, making a hole in the middle of the lug mounts was easy. Although the wire is 2.8mm dia, testing cycles indicated that an 11/64" (4.3mm) drill bit is required. Simply twisting it to create a hole in the center takes seconds. After two more iterations, I ended up with a pad size at 10x10mm and the flat pad surface at 18mm from center. Of course, your casting body may shrink more or less than mine, so be ready to adjust these values.
The link below links to a step-by-step in Fusion 360 of how to save a temporary copy of the mold drawing and modify it to isolate just the top portion of the neck.
v7 Classic beer bottle mold in OnShape
Make authentic-looking beer bottles that are better than glass
Available on the Downloads page
This picture has its own page with more detail, click here to see it.
The slip casting process is so much more accessible than in the past because of 3D printing. Why not start with this? This bottle has all the same dimensions as my v6 (done in Fusion 360). But, because this is done in OnShape, one click here opens it directly in a browser window with all the power of a professional CAD system. If you have a free account there and are logged in, one more right-click can export it in 3MF or STL format for 3D printing. Or a "Copy Workspace" menu choice will move it to your account to enable editing and setting variables, adjusting the shape, etc. This works in your browser, there is no software to install and OnShape is free for hobbyists. This mold works with my pour spouts (no spare is needed) and natch system (no registration keys are needed). So just insert the clips and embeds, pour in plaster, remove the PLA plastic with a heat gun and you have a working mold. When dry, glue in the natches, attach a spout (using slip) and fill the mold with casting slip.
Need a stoneware slip casting recipe? L4768E or L4768H are a good choice. A glaze recipe? How about GA6-B (or similar)? Go full DIY with this, you will never turn back. Need a guided help to make this happen? Sign up for an Insight-live.com group account and we can work together to make this happen for you.
Links
| URLs |
https://torontobrewing.ca/products/swing-top-replacement-lids-12-pack
Swing top stoppers at Toronto Brewing Also called "Swingtop Grolsch Style Glass Bottle Replacement Cages". |
 PayPal | No tracking, No ads, No paywall, No transient content! Just organized, concise information constantly updated and improved. Was this helpful? Consider supporting me. |
Got a Question?
Buy me a coffee and we can talk 

https://digitalfire.com, All Rights Reserved
Privacy Policy