3D Design
3D Design software is used to create dimensionally accurate objects by sketching 2D geometry and transforming it using tools to rotate, extrude, sweep, etc. The software generates the polygon surface.
Key phrases linking here: solid modelling, step format, 3d drawing, 3d design, sldprt, cad, f3d - Learn more
Details
It is important to understand the difference between CAD (solid modelling) and 3D modelling (surface modelling). Solid modelling (e.g. SolidWorks, Fusion 360, OnShape, etc.) is used in engineering, it is about carefully editing, dimensioning and constraining sketches and then extruding, revolving, sweeping and lofting them into 3D geometric shapes - the software then generates surface models (e.g. STL, 3MF, OBJ) that printing equipment needs). Surface modelling, by contrast, provides tools to push and pull polygon surfaces (Blender, Maya, ZBrush, Cinema 4D). Why solid modelling is about managing constraints and a timeline, surface modelling does not even need them (or parameters). A solid modeller may never even see a polygon until printing something.
Surface modelling is used in art and entertainment, especially for sculpting organic shapes for use in animation - that makes it ideal for sculpture and free form work by ceramic right-brained. CAD drawings are built by taking simple steps that accumulate in a design history (the timeline). Steps are usually parametric. CAD drawings are like fully functional "blueprints" with all their history detail intact. Potters, hobbyists and ceramic technicians are almost never mechanical engineers or special effects artists. That being said, CAD software is very useful in ceramics (especially for mold making and 3D printing clay). Until now, the price, computing power and educational resources needed for CAD were far beyond individuals, but that has completely changed. These packages are now accessible to hobbyists or small businesses, and there are tons of YouTube videos on using them.
The biggest hurdle to adopting 3D printing is deciding on which 3D CAD package to use and then learning it. The processing power, multi-function mouse, connectivity and screen of a desktop computer are all needed for this (a desktop computer is generally needed to handle the 3D slicer software anyway). And 3D design software has decades of maturity on the desktop. That being said, iPad products are showing up also.
Common File Formats:
.DWG is primarily a 2D/3D geometry file format used by AutoCAD and similar software. It contains the final geometric data of the design, such as lines, arcs, surfaces, and solids. It does not store parametric relationships, feature trees, or a timeline of design changes.
.STEP (ISO 10303) is a standardized format for exchanging 3D CAD data between different software systems. It captures precise geometric and structural information about a model, including solids, surfaces, and assemblies. While STEP can include metadata and some constraints, it does not typically store the feature tree or parametric history from CAD software like SolidWorks or Fusion 360.
.F3D: Fusion 360 native format.
.SLDPRT and .SLDASM: SolidWorks native format.
Related Information
3D mechanical design software 2025:
Which is the best for mold making in ceramics?

This picture has its own page with more detail, click here to see it.
CAD software and 3D printing are a potential revolution in vessel mold-making for ceramics (3D modelling is another topic). But there are two big problems: There is no way a potter, hobbyist or even small manufacturer can afford the typical software cost. While it is true most have free or low-cost trial or hobby versions, the strings attached are deal breakers. The second problem is the complexity of learning - that can be a bigger obstacle than cost.
Until the recent price increase, Fusion 360 seemed to be exactly what was needed. A great way to on-board the CAD world, using the free version and its great learning resources and best-in-class user interface. It is new and modern, a YouTube star. It is fully parametric, supporting constraints and a timeline. True, it can choke on more complex drawings on consumer computers, but we don’t need to do those. But, for commercial use, it costs $700/yr. But that is cheap compared to some others! Upon discovery of the capability, the cost might be doable for you.
Here are the ones you likely cannot afford (and maybe don't want):
-OnShape runs in your browser and on iPad; in our testing, it looks really good. Free-version drawings are public (but no other restrictions). Going private costs $1500/yr.
-Rhino is usable for CAD but is polygonal and targeted at modelling. It is not fully parametric and does not have a traditional timeline (however, Rhino+Grasshopper is life-changing for geeks, both for CAD and modelling). $1000 to buy, but upgrading is $500+.
-Solidworks is a long-time proven product, it is fully parametric with editable history. Runs on Windows only (or the xDesign product runs in a browser like OnShape). It is low cost for hobby use (but the restriction of not being able to save or open the commercial SolidWorks file format is a potential deal-breaker for hobbyists). For commercial use: $2600/yr in 2025.
Some upcoming possibilities:
-FreeCAD is becoming more viable. It is parametric, has constraints and exports and imports popular formats (but with lots of issues). Its model tree is equivalent to the Fusion 360 timeline, but more clunky and depends on careful setting of constraints. The learning curve right now puts it out of reach of most. But a capital injection, like Blender got, is coming.
-Shapr 3D costs $299/yr, also works on iPad (which Fusion 360 does not), and uses the Parasolid engine like OnShape and SolidWorks. But it seems to be targeted at being intuitive for conceptual modelling and quick prototyping for drawings that are finalized in other products (limited support for accurate feature placement, constraints, parametrics and boolean operations).
This drawing of a beer bottle demonstrates parametrics

This picture has its own page with more detail, click here to see it.
This is Fusion 360. The profile was drawn and various measurements parameterized (shown in the listbox on the lower right). That means the measurements were given names (e.g. body_diameter, thickness). This makes it possible to change aspects of the geometry of this shape by just editing the parameters. If you are experienced in 3D CAD you will be able to see this drawing is actually beginner-level, I have not fully defined and constrained it. For example, I cannot change the height or width and have it maintain the shape when it redraws (to do the z-axis value of the vertical center-points of the curves need to be defined as a percentage of the neck height, and the neck vs body height proportion also needs to be set). I should also have placed the center of the lip at the origin. Further, it does not need to be hollow, it should be a solid body enclosed by the desired profile.
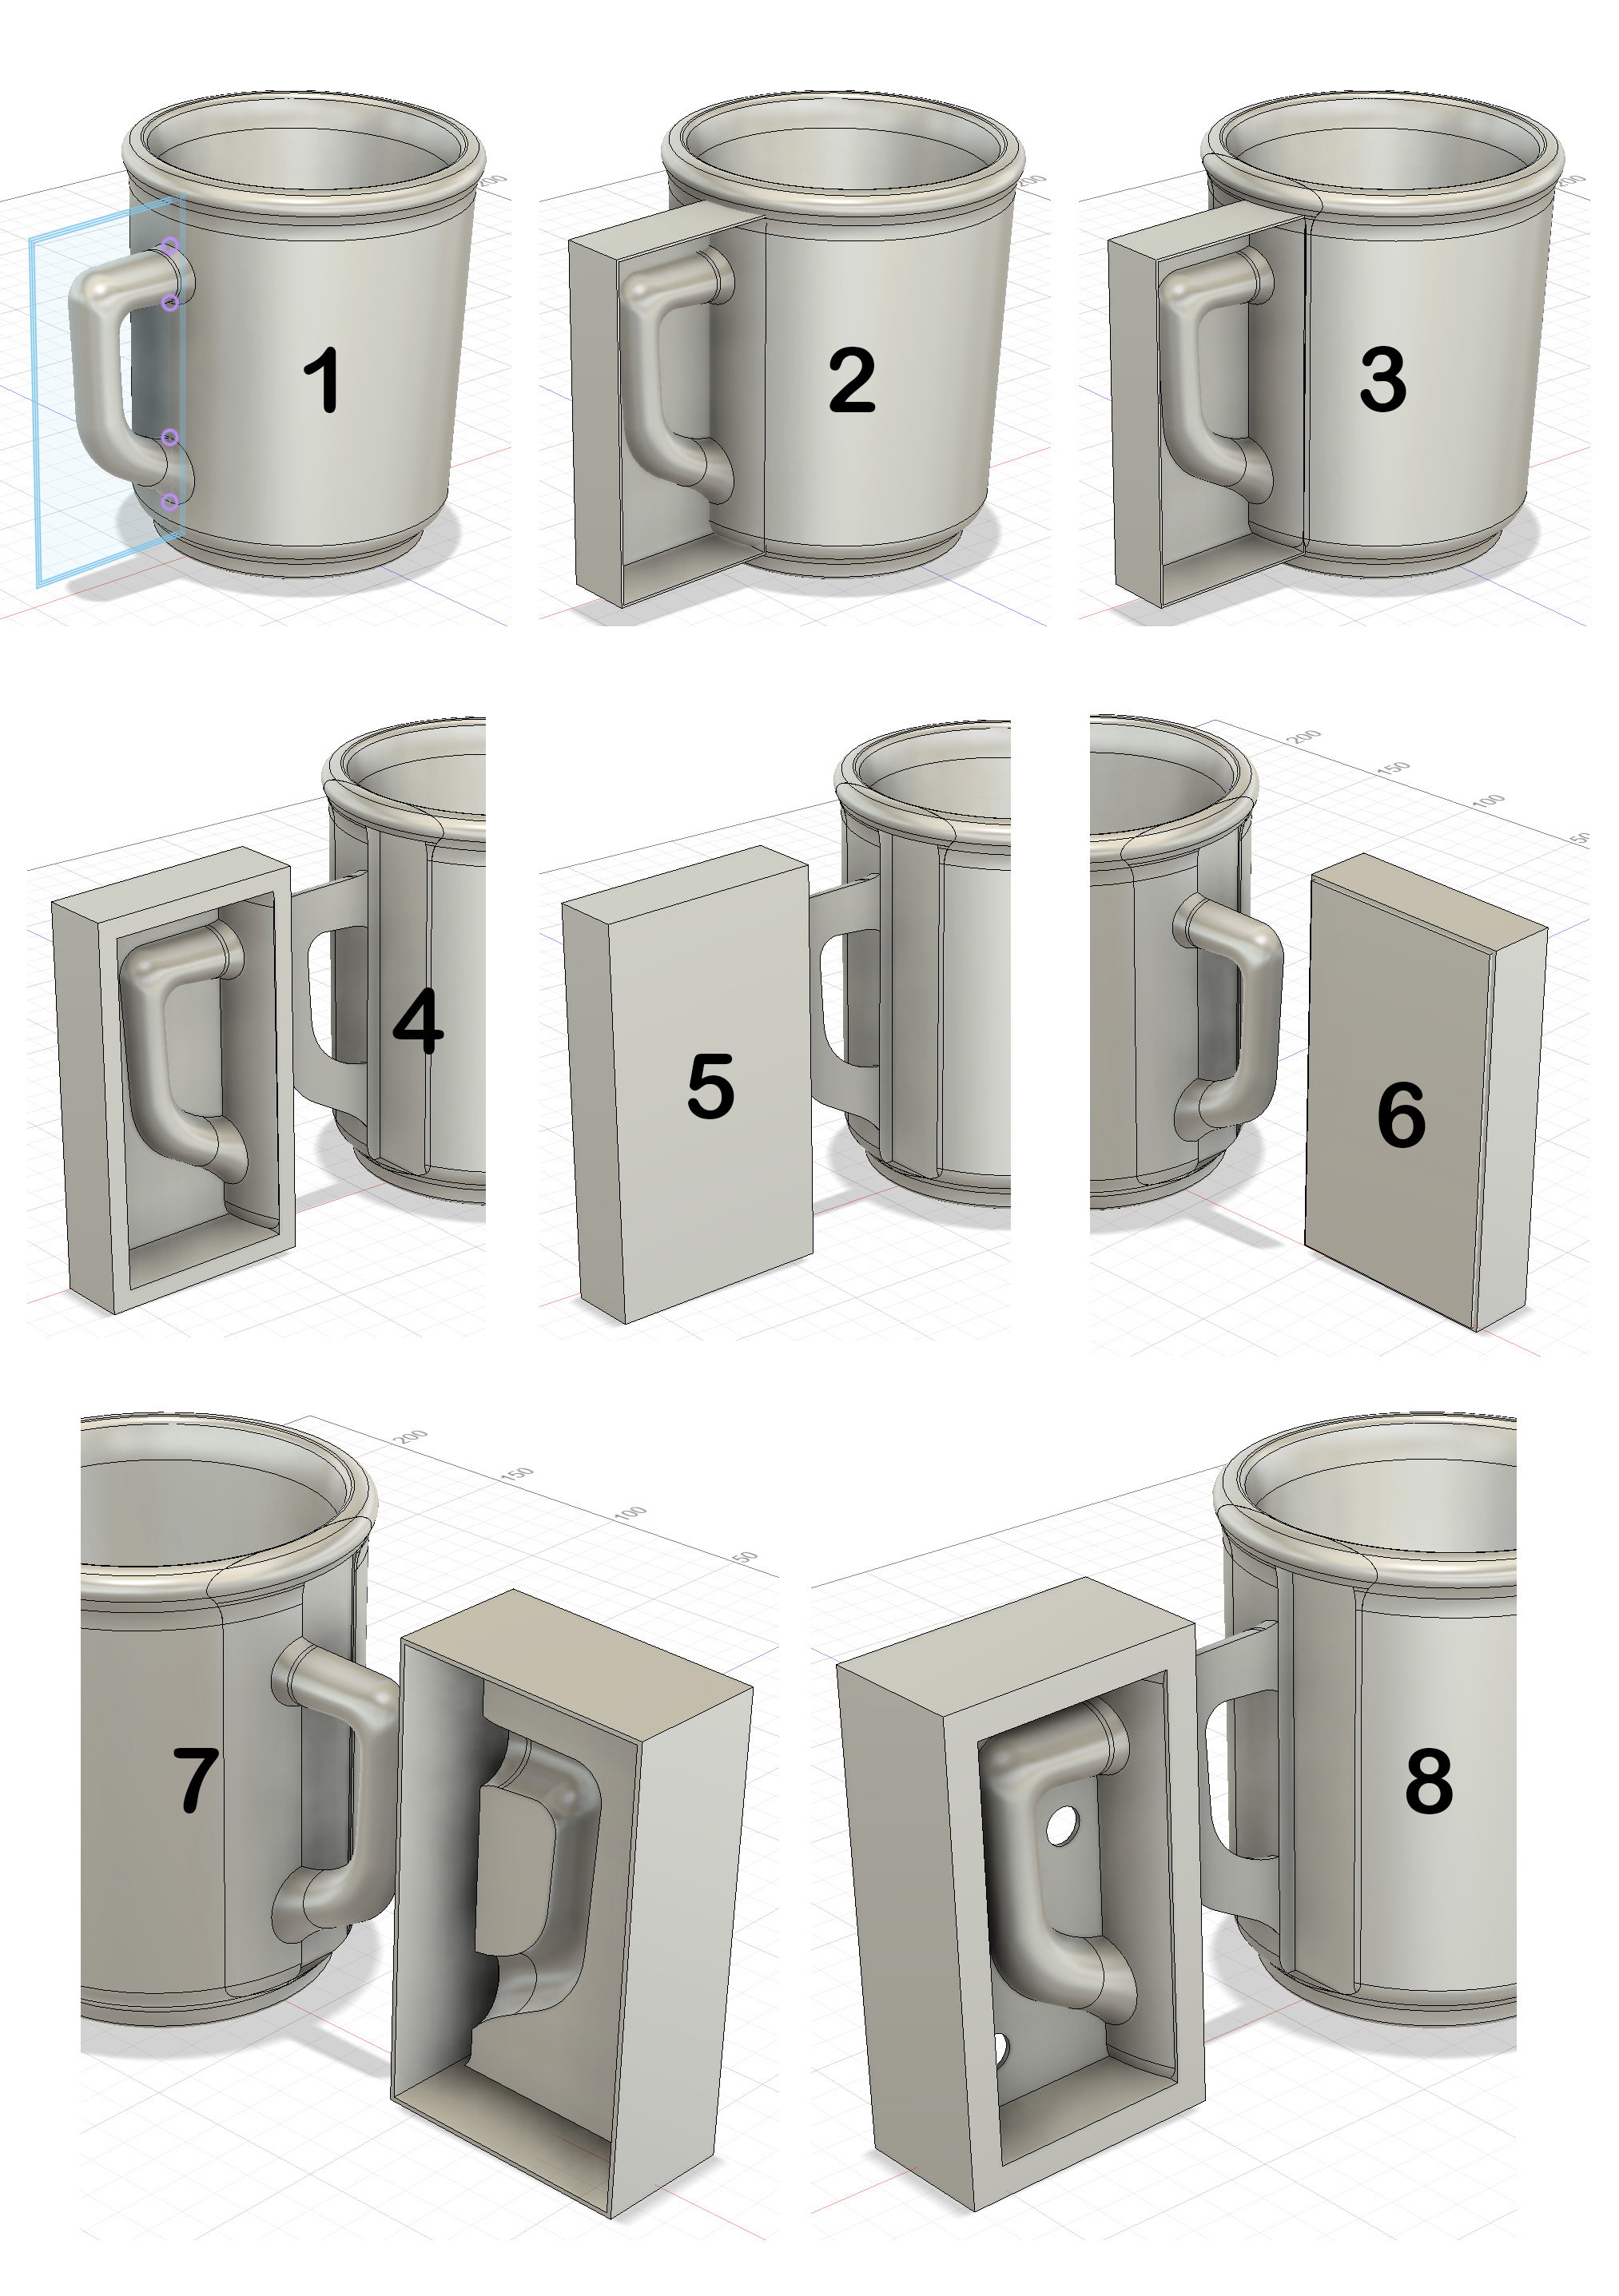
CAD steps for a 3DP block mold to make a rubber case mold
This picture has its own page with more detail, click here to see it.
The objective was to make a rubber master case mold for the production of working plaster molds. 3DP is a great solution. This drawing was done in Fusion 360.
1: A make a sketch of a box, around the handle, on the XY plane. Offset that outward by 1.2mm (my printer prints 0.4mm wide, three passes give good strength).
2: Extrude to create box 1: The base backward by 1mm and the sides forward by 20mm.
3: Use five sides of the box as cutting planes to slice it out of the mug.
At this point I could print this in PLA filament, pour plaster into and then use a hair drier to peel it off. But let’s make rubber molds instead.
4: Move the box-with-handle away from the mug. Pull the four sides out by 5mm to thicken them.
5 & 6: Create box 2 around the outside of it, as a new body, 1.2mm wider and taller, 1mm more frontward and 1mm less backward.
7: Use box 1 as a cutter to remove material from box 2 and then pull the outer 1.2mm sides 5mm backward.
8: Shell out the back side to 1.2 wall thickness and make two 9.4mm holes (to accommodate natch clips).
To make side 2 mirror-image a new body using the front or back as the reflexion plane. The back side is then filled with PMC-746 rubber to make the block mold. Plaster is poured into that to make each working mold.
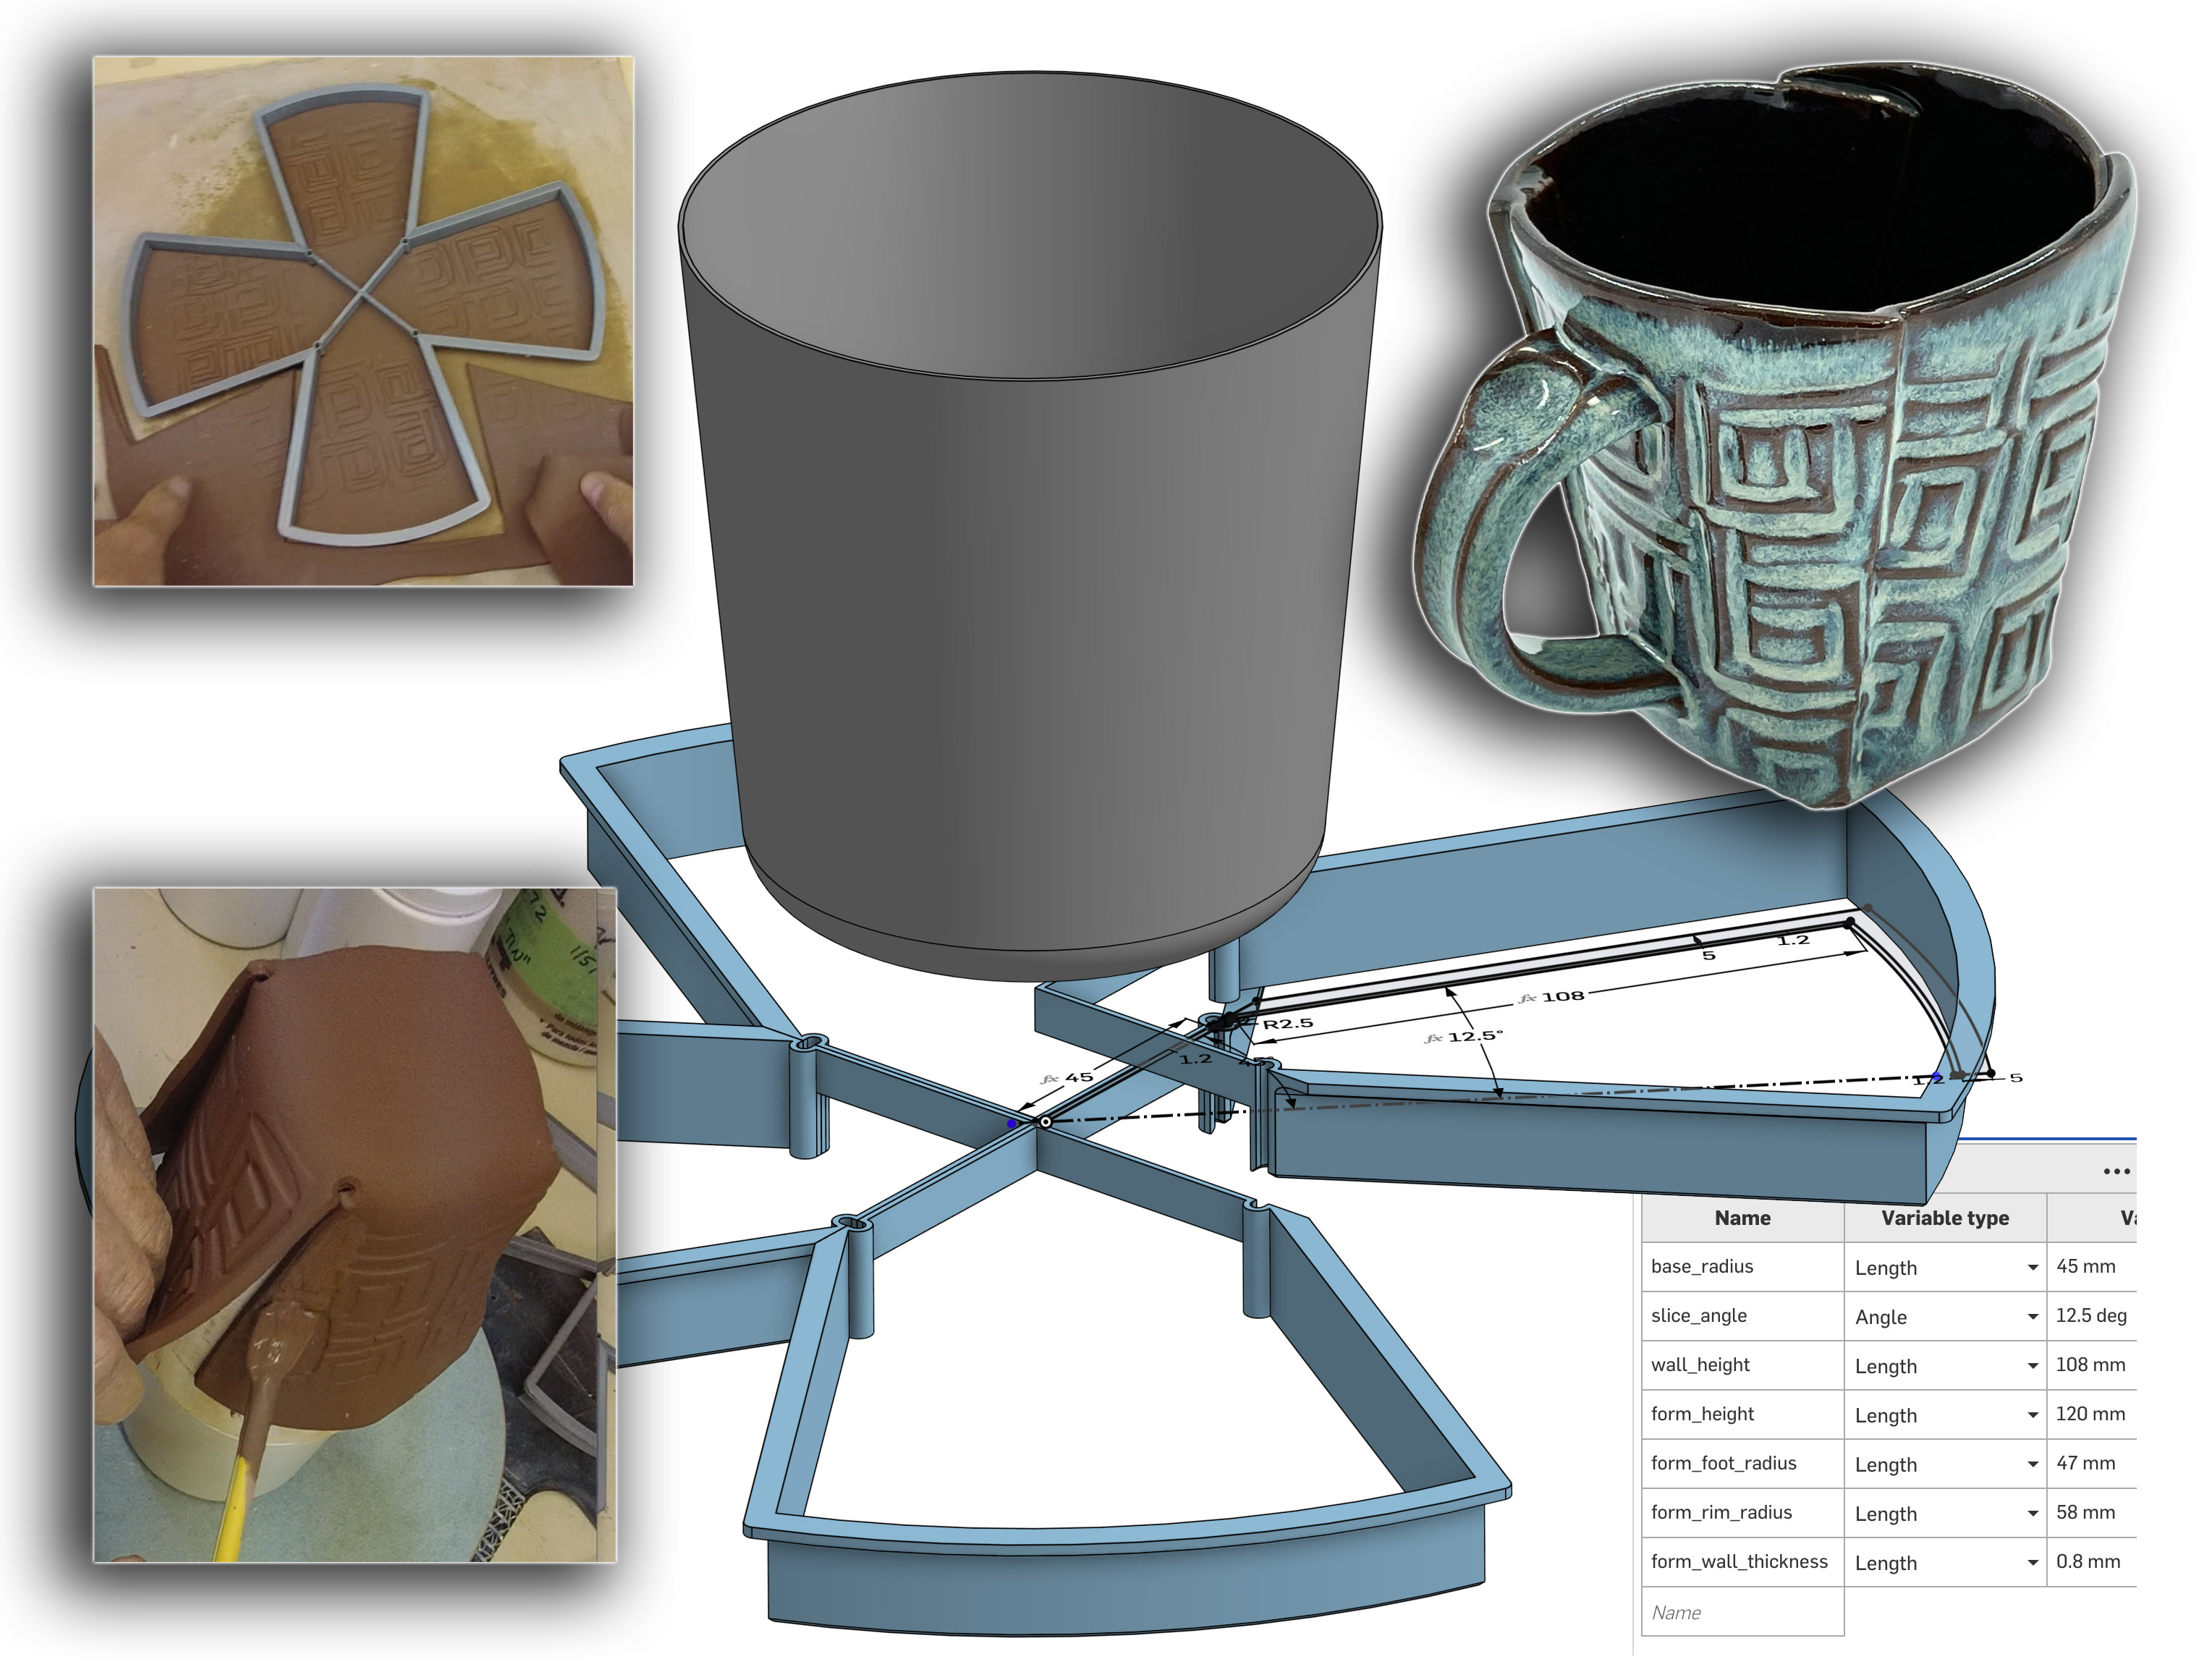
A giant cookie-cutter for slab built mugs
View and print it now using the Downloads page link
Available on the Downloads page
This picture has its own page with more detail, click here to see it.
3D print four of these and glue them together to make a large cookie cutter for producing slab-built mugs. 3D print the cup, fill it with plaster and remove the PLA using a heat gun. Roll out a thin slab of clay, press the cutter into it using a round wooden batt, make sure it is not sticking to the board and flip it over onto the plaster form. Handles can even be attached while it is on the form. If clay is plastic it can be used quite stiff. Experiment, adjust sizing and dimensions and reprint to fine-tune.
This has been drawn "parametrically" with OnShape. I only had to draw half of one of the quarters (I mirrored that, extruded and then did a circular pattern of 4). The downloads page (link above) has a free link to view this drawing at OnShape.com. To 3D print, right-click the part (from the list on the lower left, "Quarter 1" and "Cup"). Choose the Export option and select 3MF as the file type (it should go to your downloads folder). Open it with your slicer and print (turn the quarter over and make four). You can even export in formats that other CAD software can open. Better yet, import it into your OnShape account to see the design history and change multiple aspects of the geometry in the variables panel (the drawing will adjust automatically). Other dimensions (e.g. cut depth) can be edited manually. Parametric design is revolutionary and it is now accessible even to hobbyists; it fits my try-it, adjust-it and try-it-again way of working.
Bringing an old mechanical drawing of a crock lid back to life

This picture has its own page with more detail, click here to see it.
This is 1937 mechanical drawing of a 1-gallon Medalta crock lid. Medalta Potteries manufactured crocks, on a large scale, from the 1920s on. In this example, I first imported the drawing as a canvas into Fusion 360, sized it and then positioned it so the center of the knob was at the origin point. I then traced the lid outline to create a sketch. Finally, I revolved that sketch to create the 3D lid. This was part of a project to enable a potter to make lids to fit the old crocks.
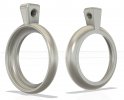
Shimpo Jigger attachment drawing
Available on the Downloads page

This picture has its own page with more detail, click here to see it.
Made from 1/2" x 3" flat steel, this frame is heavy and very strong and solid. The two larger 3.5" long bolts are custom-made from 5/8in-11 threaded rod, they have a 45-degree cone tip and locking nuts. The small vertical stopper-bolt is made from 3/8" rod. It is 2" long with 1" dia washer welded on top and a locking nut. The small bolt setting determines the bottom point of arm travel. The pivot sockets on the jigger arm are 1" long and made from 1" steel rod, each has the 45-degree recess machined into it. The arm can be moved left or right and its tension set by adjusting the two larger bolts. The weighted collar on the back of the arm employs two pieces of 1" thick flat steel, it is heavy (important for convenience-of-operation). The triangular notch enables the arm to be lifted higher. The weight colar needs some sort of set screw to hold it in place. A number of corners need to be rounded or rubber-padded for safety reasons.
Magic tile assembles organically, never creating a pattern
Available on the Downloads page

This picture has its own page with more detail, click here to see it.
This is the most complex shape known that can fit together organically, without a pattern (dubbed the Einstein tile, it was discovered by mathematicians in 2023). It has six sides of 1 unit length, six of 1÷1.73205080757 and one side measuring twice the latter. Placing the tiles is tricky because it is only logical to seek a pattern, but there is none. One method is to start with a center tile and move outward in a spiral, being ready to backtrack and place them upside down when a piece cannot be fit. The tile shape is a product of connecting four identical irregular pentagons - each made by cutting a regular hexagon into three pieces. To achieve the maximum precision, 3D print multiple cookie cutters and let them stiffen and shrink in the cutters. To round the upper corners use stretch wrap) when stamping (print cutters in both orientations if doing this). Tiling a floor or wall will present issues with the number of edge tiles that need to be cut. However, cutting at least some custom edge shapes is practical because only 90 and 120 degree angles are needed.
3D design, printing and use of a casting slip test bar mold
Available on the Downloads page

This picture has its own page with more detail, click here to see it.
This is for making test bars of slip casting clays bodies for use in the SHAB test (to measure drying shrinkage, firing shrinkage and fired porosity). I designed it in Fusion 360 and 3D printed the light-duty rails and case mold. I poured plaster into that to make the two plaster working mold halves (top right). The funnels provide a reservoir so the bars be cast solid. This mold can produce a set of three bars in less than an hour.
3MF vs STL vs OBJ files for 3D printing

This picture has its own page with more detail, click here to see it.
Shown here are Creality Slicer, Prusa Slicer and Simplify 3D. Each of these can import STL, OBJ and 3MF files. Each permits resizing, rotating, reflecting and duplicating individual items and can efficiently place and space multiple items and groups. Each saves or exports as 3MF files. On the right is the Fusion 360 print dialog where I can choose which slicer and which format to send.
OBJ files were introduced in 1980 for visual rendering (e.g. animation, gaming, special effects). Files store surface geometry as interconnected triangles and define surface textures, materials and colors. These features were overkill for early 3D printers.
STL (Stereolithography) files were developed in 1987 by 3D Systems specifically for CAD and 3D printing, having a single focus on geometry. They were simple and computationally efficient (and also unitless like OBJ, assuming mm). STLs permitted only one object. They dominated early 3D printing processes (FDM, SLA, SLS), where color or texture was irrelevant and provided a simple standard for industry growth. However, modern printers can now do color, texture and multi-material, thus...
3MF (3D Manufacturing Format) files were introduced in 2015 specifically for more advanced 3D printing. To OBJ they add object orientation, units, printing instructions and meta information. Objects in 3MF files can be manipulated separately in the slicer.
All three formats are generated by modern CAD software (for handoff to a slicer app). 3MF is the preferred one.
Inbound Photo Links
 The Prusa Slicer generates G-Code for 3D-printing |
 Make your own pyrometric cones? Why not! |
 Draw a triangular plate press mold in Fusion 360 |
 Airtag Holder: A CAD exercise in precision |
Links
| Glossary |
3D Slicer
A slicer is software that can cut a 3MF, OBJ or STL 3D model file into hundreds or even thousands of layers and then control a printer to print them layer-by-layer. |
| Glossary |
3D-Printing
Standard 3D printing technology (not printing with clay itself) is very useful to potters and ceramic industry in making objects that assist and enable production. |
| Glossary |
3D Printer
Standard 3D printers (not clay 3D printers) are incredibly useful in ceramic production and design, bringing difficult processes within reach of potters and hobbyists. |
| Glossary |
3D Modeling
3D surface modelling tools enable the creation of objects by starting with a basic shape having polygon surfaces and then subdividing, pushing and pulling the quadrilateral or triangle polygon meshes to form shapes. |
| URLs |
https://www.omnicalculator.com/math/right-triangle-side-angle
Right triangle calculator Useful to calculate angles and lengths when drawing 3D geometry from a model. |
| URLs |
https://fablab.aalto.fi/
Fab Academy is a hands-on rapid prototyping course. Participants learn a true full stack of skills to be able to create high quality proof-of-concept prototypes. |
| Projects |
Beer Bottle Master Mold via 3D Printing
A project that took several years of failures and blind allies and is finally coming together - so much simpler than expected! |
| Projects |
Cookie Cutting clay with 3D printed cutters
We are finding more and more applications for this simple process of cookie-cutting shapes in ceramics. You won't believe whats possible and how easy it is to get started. |
| Projects |
A cereal bowl jigger mold made using 3D printing
A new way to 3D-print your way to making jigger molds and templates. The molds are encased in a 3D printed shell that makes them fit perfectly into the cuphead. And the template is precise and very effectivwe. |
| Projects |
Medalta Ball Pitcher Slip Casting Mold via 3D Printing
A project to make a reproduction of a Medalta Potteries piece that was done during the 1940s. This is the smallest of the three sizes they made. |
| Projects |
Coffee Mug Slip Casting Mold via 3D Printing
A potter can now use AI, 3D CAD, 3D printing and custom clay bodies to slip-cast beautiful quality stoneware pottery mugs. It is efficient and practical. |
| Typecodes |
Mold making using 3D printing
An ordinary consumer 3D printer has many exciting possibilities for making many types of molds, it is a place where people having both artistic and mechanical abilities can get a double the dopamine! |
 PayPal | No tracking, No ads, No paywall, No transient content! Just organized, concise information constantly updated and improved. Was this helpful? Consider supporting me. |
| By Tony Hansen Follow me on        |  |
Got a Question?
Buy me a coffee and we can talk 

https://digitalfire.com, All Rights Reserved
Privacy Policy