
Contact MeLet's have a Other ways to Support My WorkSubscribe to Insight-Live.com. It is about DIY testing and development, not letting information slip away. Help Me on Social

Login to your online account Chemistry plus physics. Maintain your recipes, test results, firing schedules, pictures, materials, projects, etc. Access your data from any connected device. Import desktop Insight data (and of other products). Group accounts for industry and education. Private accounts for potters. Get started. 
Download for Mac, PC, Linux Interactive glaze chemistry for the desktop. Free (no longer in development but still maintained, M1 Mac version now available). Download here or in the Files panel within your Insight-live.com account. What people have said about Digitalfire
What people have said about Insight-Live
| Monthly Tech-Tip from Tony HansenI will send practical posts like these (from thousands I maintain). No ads or tracking. The first email will provide one-click unsubscribe. Signup is being email-bombed by bots. For now, please subscribe inside your insight-live.com account. BlogCeramics producers may have dodged a bullet:The demise USG plaster products!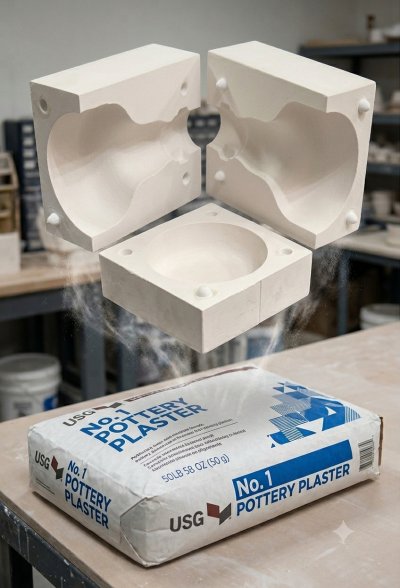
The ceramic industry depends on some surprisingly specialized materials made by very few companies. When one of those companies exits the market, we need to notice. Consider how much of ceramics depends on plaster: slip casting of pottery and sanitaryware, jiggering, RAM pressing, mold making and countless studio processes. Yet plaster is so inexpensive and familiar that we tend to forget how technologically specialized—and indispensable—it actually is. USG #1 Pottery Plaster has been an industry standard for generations. The Bad NewsUSG is closing its historic Southard, Oklahoma gypsum operation, apparently ending production of #1 Pottery Plaster, Hydro-Stone, Ultracal and other specialty gypsum products. This is a potentially seismic event for ceramics.The Good NewsFortunately, there is another major North American producer: Georgia-Pacific. Its K-59 Pottery Plaster is a remarkably close counterpart to USG #1, having essentially the same normal water/plaster ratio and density, with similar strength and expansion. Without products like these from Georgia-Pacific, the USG withdrawal could have been a genuine supply-chain earthquake for ceramics. Instead, it should be a wake-up call.Cautious OptimismGeorgia-Pacific has a long-established Industrial Plasters division with dedicated sales managers covering both the U.S. and Canada. GP already manufacture pottery and tooling plasters, ceramics is one of the industries they explicitly target. If they decide to embrace the opportunity, they would become the primary North American supplier of specialty ceramic plasters. The biggest uncertainty is whether they can produce enough to replace what USG has historically supplied. And whether ceramic suppliers will begin stocking much larger inventories.Context: Plaster, Beer Bottle Master Mold.. Thursday 30th July 2026 Color variation in wall tile:Why are these edges darker?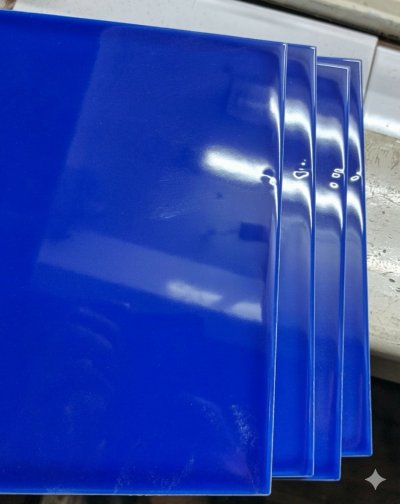
Look carefully along the edges of these wall tiles. A band of darker blue appears around the perimeter. At first, it might seem that the cause is pooling at the edges during glaze application. But tile factories know all about even application (by bell, waterfall, disc, or spray). Instead, this is probably happening during firing - this is a fluid melt and likely flows slightly, with surface tension causing it to accumulate a little thicker at the edges. While this cobalt blue glaze is somewhat transparent, the thicker layer absorbs more light and appears darker. While potters often value color variation like this, ceramic tile manufacturers work hard to control “edge darkening” by adjusting glaze viscosity, application thickness, and firing conditions to achieve a more uniform surface. If they fail, here is what can happen: When thousands of tiles are laid side-by-side, those darker edges line up and visually create a grid pattern across the entire installation. And they can also make the grout lines appear stronger and the surface less uniform. Context: In pigmented glossy transparent.., Ceramic Tile Sunday 26th July 2026 Can bone-dry ware be glazed too thickly?Yes! When the specific gravity is 1.7.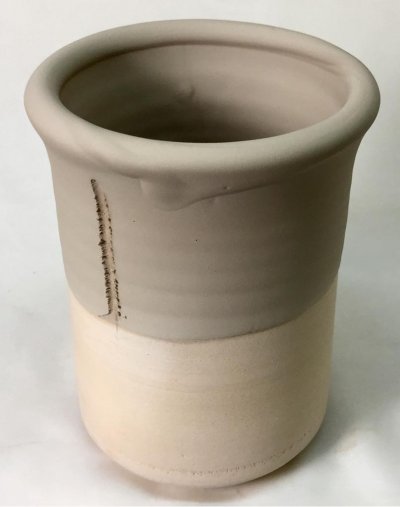
In testing to determine the best specific gravity (SG) for this Darvan-deflocculated glaze slurry (G2926B), I arrived at what I thought would be great: 1.7. For 2.5kg of glaze powder only 1100g (1100ml) of water is needed, half the normal amount. And the slurry flows well. There appears to be enough water to form a good bond with the body. But a one-second dip of a bone dry piece produces twice the desired thickness, it dries too slowly and it is running. So, what should the SG be? I'll keep increasing the water until I can induce some thixotropy to hold it in place (using Epsom Salts), and it goes on thinner in a quick dip. If thixotropy is difficult, I’ll add 1% bentonite to increase particle surface area. And, I'll document the results at each step for future reference (in my Insight-Live account). Of course, these are going to need help drying, either by preheating the ware or putting the pieces in a drier. Context: Drip glazing and bare.., Specific gravity, Once-Fire Saturday 25th July 2026 This surprised me about calcia matte glazes:Most are highly melt fluid.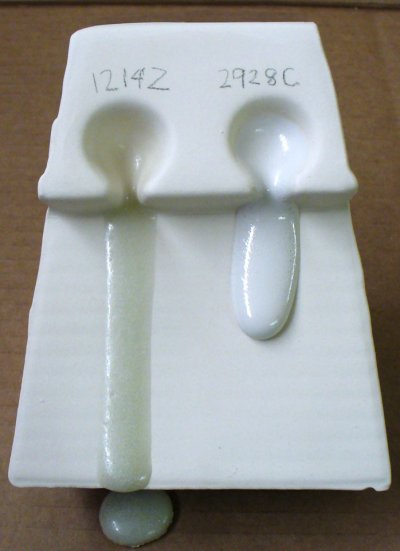
Unfortunately, many matte glazes are such simply because they are not melted enough. That is not the case with cone 6 G1214Z tested here. When applied as a thin layer on pottery, it seems normal. But this GLFL test demonstrates that it fires highly melt fluid, much more than one might expect from a matte glaze. A quick look at its oxide chemistry reveals the reason: It is a calcia matte. It has high CaO, so as the melt cools, it combines with SiO2 and even Al2O3 to form calcium silicate crystals (instead of staying in the glass). Context: G1214Z1, G2928C, Calcia vs Magnesia matte.. Saturday 25th July 2026 Secret #4 of crystalline glazes: They contain little clay.So without help, they don't suspend or harden on drying.
Potters used to working with dipping glazes that contain plenty of clay are shocked when they see what crystal glazers have to work with: Slurries that contain very little clay because the Al2O3 contributed impedes crystal growth. They end up with dipping glazes conditioned with gum and bentonite that are bummers to work with. But here is a way to mix as a gelled brushing glaze that works surprisingly well. This requires two gums. Let's mix 500ml. Context: Fan Brushes - The.., Secret 3 of crystalline.., Glaze large bowls inside-and-out.., Crystalline glazes, Glaze laydown Monday 20th July 2026 Trap a crystalline using a catcher glaze.Stop the crazing using a custom body.
This small vase was quick-cooled so crystals did not grow. But it was fired to the full temperature and held to give the glaze opportunity to run as much as possible. But no "glaze catcher" was needed because I used a "catcher glaze" instead. The upper has a typical high-zinc and high-sodium fritted crystalline glaze. The lower half is just a functional melt-stable cone 6 transparent, G2926B, (having the same amount of cobalt). Notice how it arrests the flow of the runny one. Context: Secret 5 of crystalline.., Crystalline glazes Monday 20th July 2026 A magnesia speckle matte at cone 6 oxidation:The road toward a cone 10R look-a-like is clearer
I am getting closer to reduction speckle in oxidation. I make my own speckle by mixing the body and a glossy glaze 50:50 and adding 10% black stain. Then I slurry it, dry it, fire it in a crucible I make from alumina, crush it by hand and screen it. I am using G2934 cone 6 magnesia matte as the glaze on this mug on the left. To it I added 0.5% minus 20 mesh speck. Right is a cone 10R dolomite matte mug. Next I am going to screen out the smallest specks, switch to a matte glaze when making the specks (they are too shiny here), switch to dark brown stain. Later we will see if the specks need to bleed a little more. The next step is to tune the degree of matteness in the glaze and add a tiny amount of blue stain. I am now pretty well certain I am going to be able to duplicate the reduction look in my oxidation kiln. Methodical testing with good records are the key to fine tuning the color, speckle density and size distribution and glaze surface character. Context: Making your own crucibles.., Reduction speckle a product.., Oxidation fired speckled glaze.., Blue stain in a.., Reduction Speckle, Magnesia Matte Friday 17th July 2026 Permeability of Texas and Montana talcs:Larger round particles vs tiny platelet particles
Texas talc (left) quickly absorbs all the water poured on it. Montana talc (right) resists whetting of the particles much more, the water is just sitting on top and has not penetrated at all. Context: Pioneer 2661 Talc, Talc, Natural Talc C-98, Permeability Wednesday 15th July 2026 Does bisque ware need washing for glazing?These pieces demonstrate why not.
A light coating of ordinary ceramic dust is made of the same minerals as the ware and glaze itself. During dipping, the incoming water instantly penetrates and incorporates surface dust. Glaze are dust mixed with water! However, washing trades a tiny and often harmless surface contaminant for a more serious problem: partially saturated pores. Bisqueware is a porous ceramic sponge. Its job during dip glazing is to suck water out of the slurry quickly and evenly, leaving behind a stable layer of particles on the surface. If the bisque is damp from washing, the suction is weakened. Of course, there are common-sense exceptions, but compressed air, a soft brush, or a barely damp sponge used sparingly are better cleaning solutions to preserve the essential dryness. Context: Should I glaze the.., Bisque, Crawling Sunday 12th July 2026 Fitting a brushing engobe to a porcelain:Three things are very important.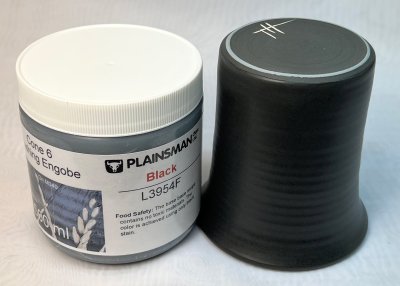
First, the black engobe must be tuned to have the same degree of vitrification as the porcelain (using EBCT test). Second, to brush like a paint onto leather-hard ware, it needs CMC gum. Third, it needs a low water content so one coat covers. Here's how I made a pint: Context: Here s how I.., The best way to.., Is porcelain engobe good.., Engobe Thursday 9th July 2026 |


https://digitalfire.com, All Rights Reserved
Privacy Policy