v1 DIY Four-Part Mold Natch System
Essential for 3D mold-making in ceramics
Available as a Product on the Downloads page
Plastic natches are used in traditional mold making for slip-cast ceramics (instead of registration keys). They are cast into plaster molds to provide durable and good-fitting interlocks between pieces. They are self-interlocking, a popular size is the 3/8" or 9.5 mm (nipple diameter) natch. However, these have not proven suitable for the mold making process described on this site. The Digitalfire four-part system accommodates 3D printing (usually using PLA filament) case molds for pouring plaster, block molds for pouring rubber case molds and even hybrid solutions. Here are some features of our system:
-13.5mm holes in 3D printed case molds are all that is needed to adapt to these.
-3D printing case and block molds necessitate pouring plaster and rubber into shells with planar mating surfaces downward that must sit flat on the work table (traditional natches don’t work in this setting).
-Casting an embed into a mold enables gluing (or friction fitting) a natch or a spacer inside.
-The use of embeds permits flat mating surfaces, these can be sanded (for better flatness and fit). They also allow replacing natches if they get broken.
-A set of four interlocks (4 embeds, 4 clips, 2 spacers, 2 natches) weighs 8.7g.
Consider starting with a 0.1mm allowance (e.g. 4.8mm nipple inside a 4.9mm space). Print all four to check for fit. Then do cycles of adjusting the allowances and printing again until they fit.

Available as a Product on the Downloads page
Related Pictures
DIY natches, spacers and embeds in a plaster handle mold

This picture has its own page with more detail, click here to see it.
This is our third-generation alternative to the use of traditional mold natches (like the red ones in the photo). Here is what you are seeing:
Right: A 3D-printed case mold for a mug handle. Clips (retainers) have been inserted from the bottom side. An embed has been pushed down over the one in the rear.
Center: The plaster mold created from it. The embed at the rear is ready for inserting a spacer (the nipple of the other half will it into that). A natch has also been inserted into the embed in the front. These fit tight enough in the hole that glue was not needed here.
Left: Spacers have been inserted into both embeds. A standard natch fits into the one in the rear and one of our natches fits into the one in the front.
Soon the CAD drawing for these (natches, spacers, embeds, clips) will be available on digitalfire.com.
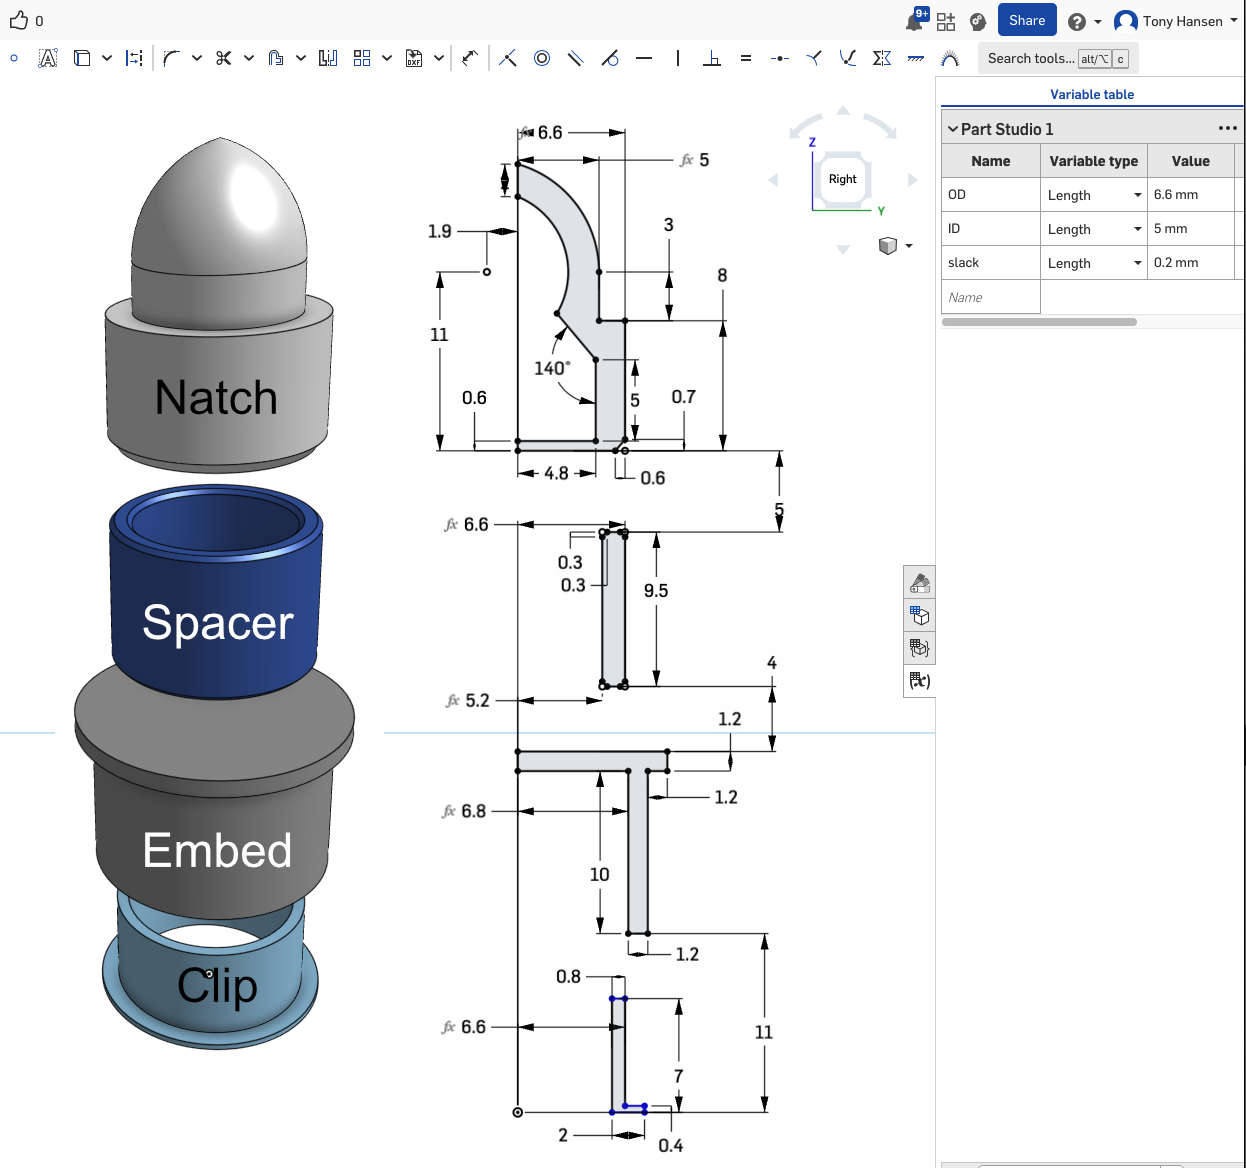
v2 Digitalfire Mold Natches in OnShape
These are even better than before
Available on the Downloads page
This picture has its own page with more detail, click here to see it.
Until now, I have done these in Fusion 360. But in OnShape and my new dimensioning method they are even better. If you are a hobby maker like me, then OnShape is free. This updated design only has three parameters: ID (inside diameter), OD (outside diameter), and slack (addition or subtraction for a good fit).
Print all four of these at the same time. Repeat cycles of adjusting the slack parameter and printing again until they fit into and over each other well (the better quality your printer to smaller the "slack" dimension can be). Print them in multiples of seven: Two natches, two embeds, two clips and one spacer (these are the proportions in which you will be consuming them).
An advantage of OnShape is that it enables sharing; the link is below. To 3D-print it select all four, right-click on one of them, export to 3MF format, open that file in your slicer software, position (and replicate/orient items), then print or export to a G-Code file.
Standard 3/8 inch Self-Interlocking Mold Natch
We can 3D print these and improve them
Available on the Downloads page

This picture has its own page with more detail, click here to see it.
Once you try these you will never go back to the use of registration keys in traditional mold making. Unfortunately, these natches are not easy to get in North America. Or even online. But you can 3D print them yourself (I use PLA filament, but TPM would be a good option). This design interlocks with standard 3/8" natches used in industry. There are more aspects to printing and using these than meets the eye. Here are some things we noted (and changed):
-The base can be widened for better sticking on the build plate.
-Glue the build plate on your 3D printer to make sure these stick well.
-The inner edge is chamfered to ensure better insertion of the nipple.
-Print without infill for better strength.
-These are hollow; no print support is needed.
-The bottom can be widened to stick better to the build plate.
-The ribs can be moved.
-A 9.8 mm hole is needed in the mold.
Once we moved to the use of CAD and 3D printing of block and case molds, these were abandoned in fovor of a four-part system.
Links
| Projects |
Mold Natches
Natches are an interlocking mechanism using in plaster molds for ceramics. They enable quick and accurate registry when assembling multiple pieces of a mold. |
| Glossary |
Casting Slip
Casting slips are among the easiest clay bodies to make yourself. The ability to make and tune your own will open many doors in your production process. |
| Glossary |
Mold Natches
At digitalfire we are big fans of slip casting and want to help people and companies (even hobbyists) to integrate it into their production. |
 PayPal | No tracking, No ads, No paywall, No transient content! Just organized, concise information constantly updated and improved. Was this helpful? Consider supporting me. |
Got a Question?
Buy me a coffee and we can talk 

https://digitalfire.com, All Rights Reserved
Privacy Policy