| Monthly Tech-Tip | No tracking! No ads! |
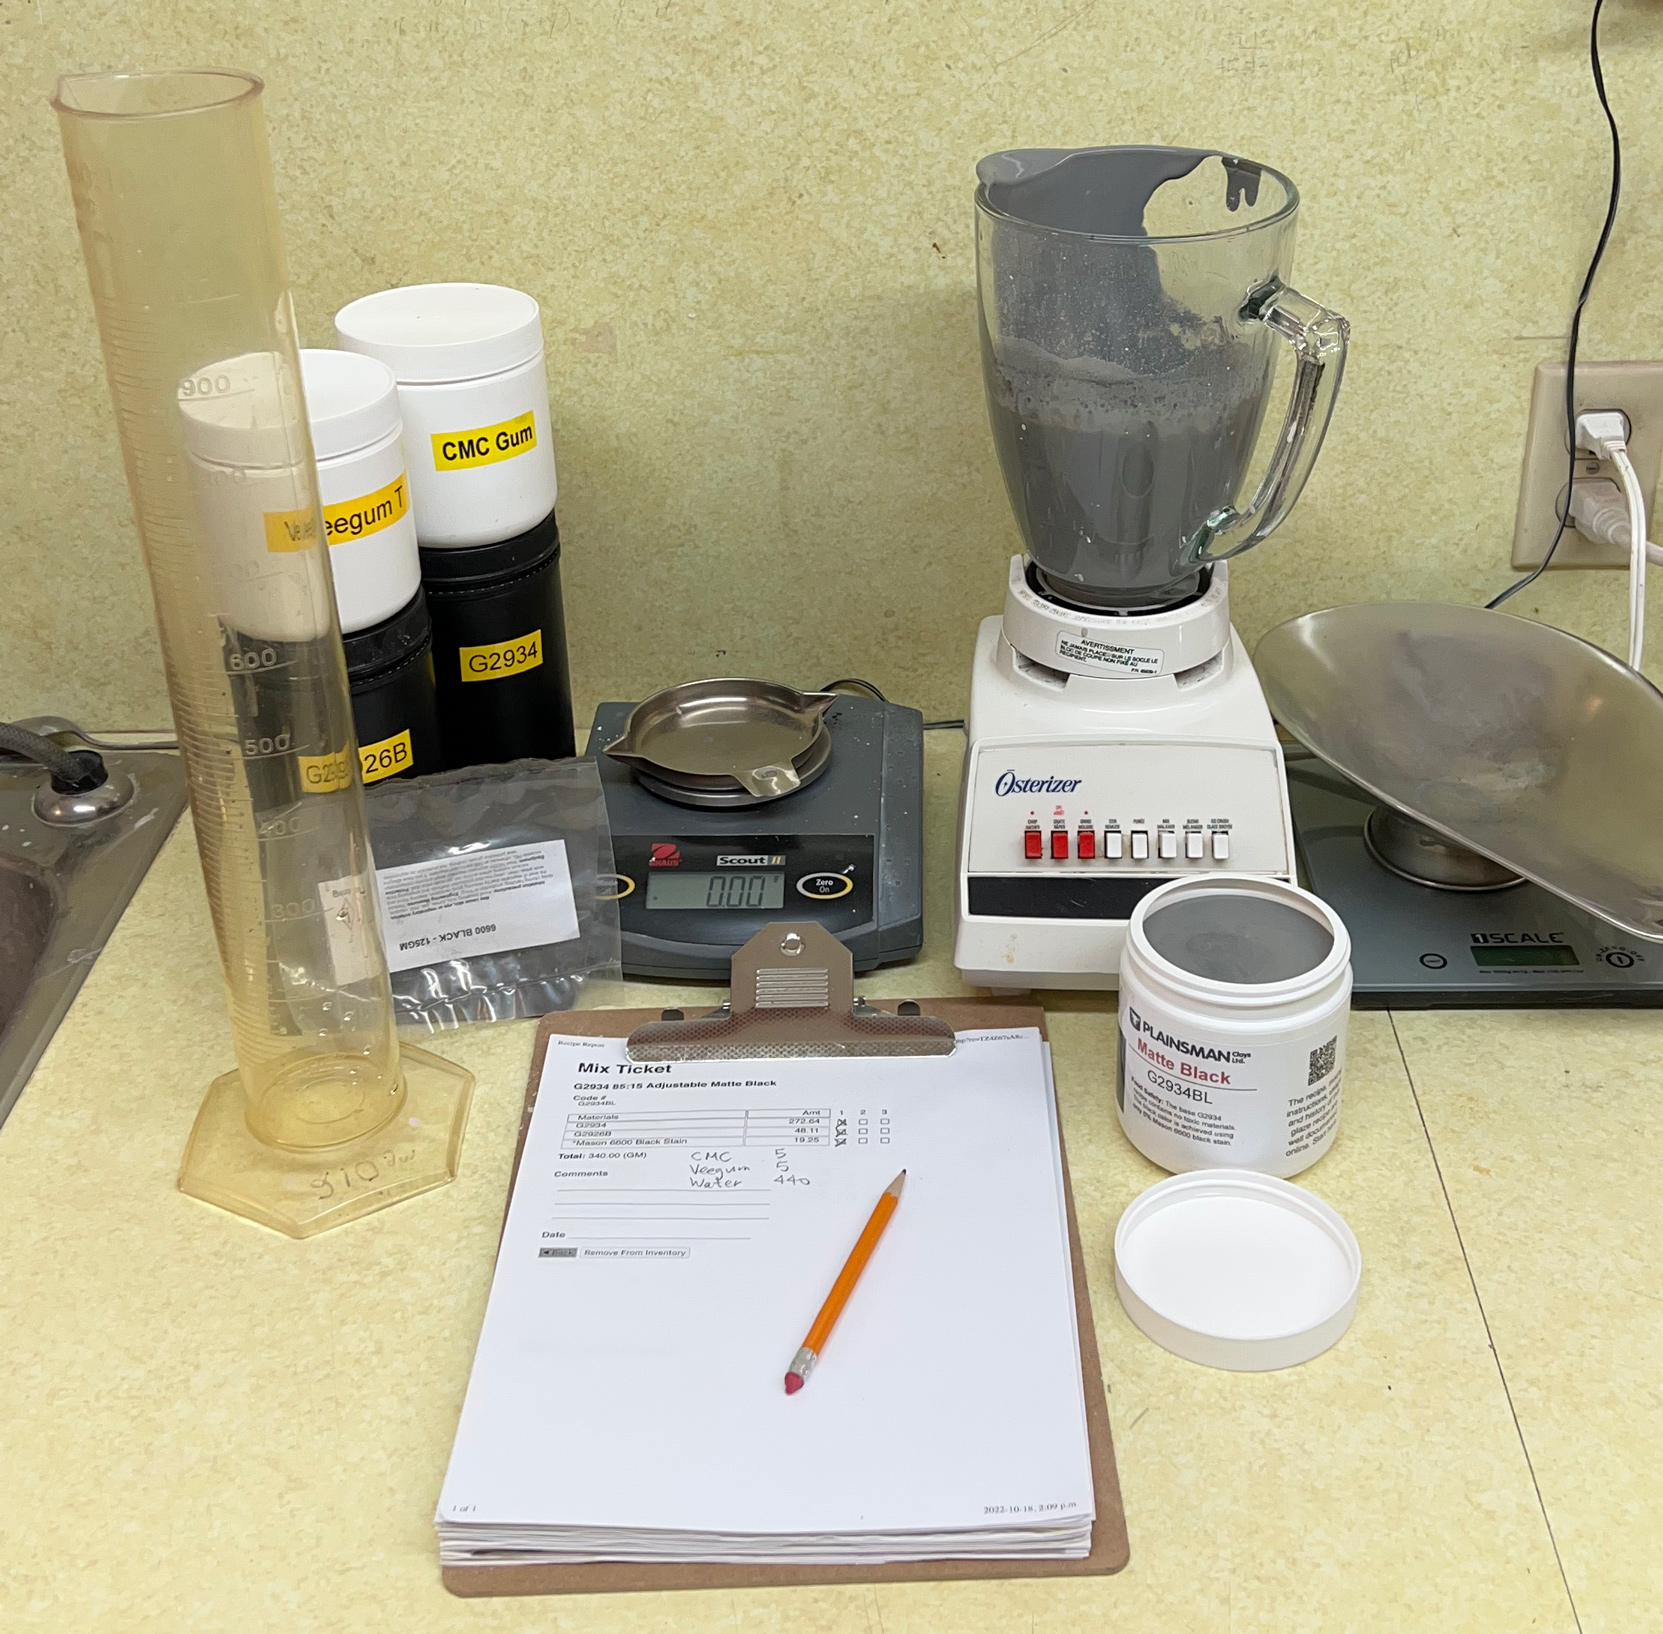
Here is my setup to make brushing glazes and underglazes by-the-jar
Although I promote DIY dipping glazes, you can also make DIY brushing glazes. Let's make a low SG version of G2934BL. Weigh out a 340g batch of dipping glaze powder. Include 5g Veegum (to gel the slurry to enable more than normal water) and 5g CMC gum (to slow drying and impart brushing properties). Measure 440g of water initially (adjusting later if needed). Shake-mix all the powder in a plastic bag. Pour it into the water, which is blender mixing on low speed, and finish with 20 seconds on high speed. This just fills a 500ml jar. In subsequent batches, I adjust the Veegum for more or less gel, the CMC for slower or faster drying and the water amount for thicker or thinner painted layers. Later I also assess whether the CMC gum is being degraded by microbial attack - often evident if the slurry thins and loses its gel. Dipping glaze recipes can and do respond differently to the gums. Those having little clay content work well (e.g. reactive and crystalline glazes). If bentonite is present it is often best to leave it out. Recipes having high percentages of ball clay or kaolin might work best with less Veegum. Keeping good notes (with pictures) is essential to reach the objective here: Good brushing properties. We always use code-numbering (in our group account at Insight-live.com) and write those on the jars and test pieces. This is so worthwhile doing that I make quality custom labels for each jar!
Related Pictures
Two low fire transparent highly fritted glaze recipes for pottery

This picture has its own page with more detail, click here to see it.
These work well from cone 04 up, they are better than any commercial transparent brushing glaze we have used. And far better than glazes made using raw sources of boron (like ulexite, colemanite, Gerstley Borate). These glazes have lower thermal expansion and do not craze on any body we have tried (yet are ultra gloss and ultra-clear). They are G1916QL1 and G3879C. We developed them for use on the dolomite-based (rather than talc-based) L4410L low-temperature art clay body. These are a good demonstration of the technical and economic sense it makes to use highly fritted glazes at low temperatures. Having a good base glaze is the key to adopting low temperatures for your production. You would likely agree that no stoneware glaze has melting patterns like these shown in this melt fluidity test! These recipes and all details about their development and adjustment are openly available.
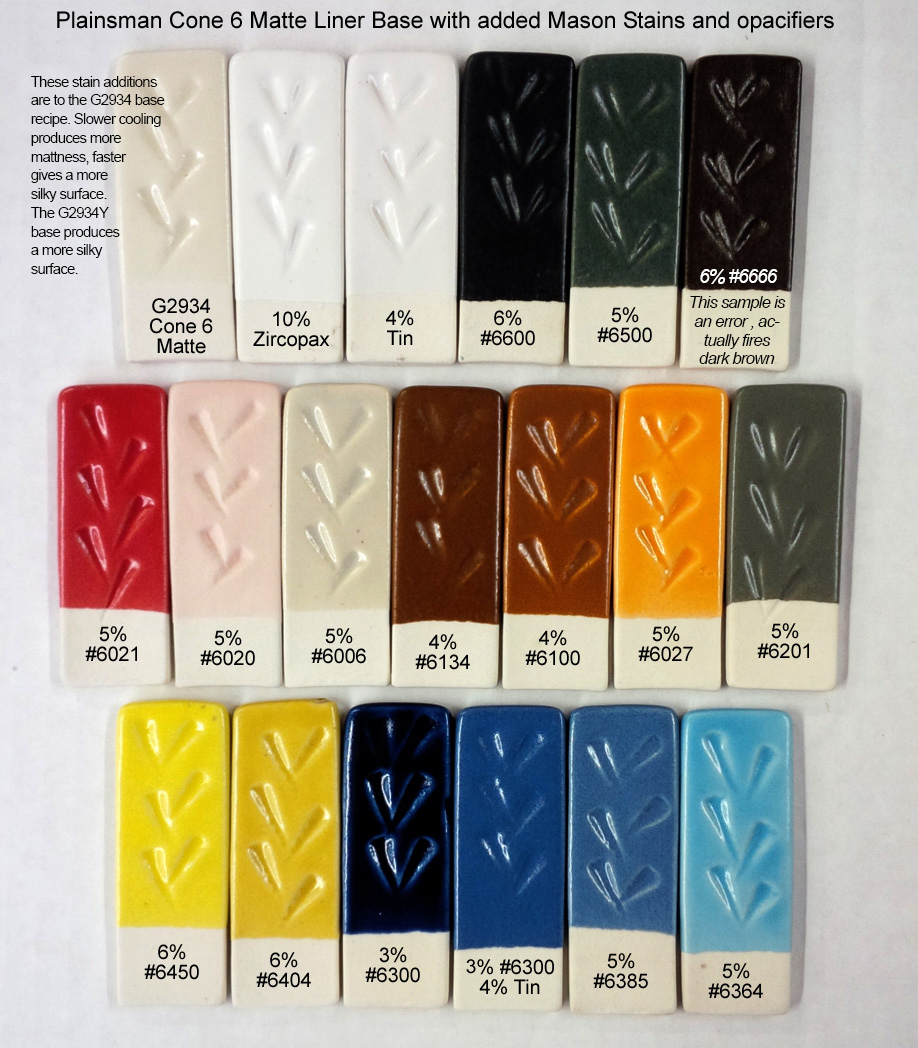
Mason stains in the G2934 matte base glaze at cone 6
This picture has its own page with more detail, click here to see it.
Stains can work surprisingly well in matte base glazes like the DIY G2934 recipe. The glass is less transparent and so varying thicknesses do not produce as much variation in tint as glossy bases do. Notice how low many of the stain percentages are here, yet most of the colors are bright. We tested 6600, 6350, 6300, 6021 and 6404 overnight in lemon juice, they all passed leach-free. The 6385 is an error, it should be purple (that being said, do not use it, it is ugly in this base). And chrome-tin pink and maroon stains do not develop the color (e.g. 6006). But our G1214Z1 CaO-matte comes to the rescue, it both works better with some stains and has a more crystal matte surface. The degree-of-matteness of both can be tuned by cooling speed and blending in some G2926B glossy base. You can mix any of these into brushing or dipping glazes.
The Floating blues we should have manufactured
The closest we got was labels

This picture has its own page with more detail, click here to see it.
This is not sold in jars, I make my own labels to demonstrate that DIY brushing glazes are not only possible, but can be better. The G2917 glaze is less melt-runny than typical floating blues. It contains the standard rutile/iron addition but adds a little cobalt to ensure a good blue color no matter how the kiln cools. The L4655 Alberta Slip floating blue (left), contains no rutile, iron or even cobalt - it employs titanium dioxide (using iron available in the body and slow cooling as the mechanism of the blue). Both have a big advantage over the original G2826R recipe from 50 years ago: they don't contain any Gerstley Borate, so the slurries don't turn to jelly in the bucket, both mix naturally as thixotropic dipping glazes.
Medium fire white bodies used at cone 04. Is that smart?
This picture has its own page with more detail, click here to see it.
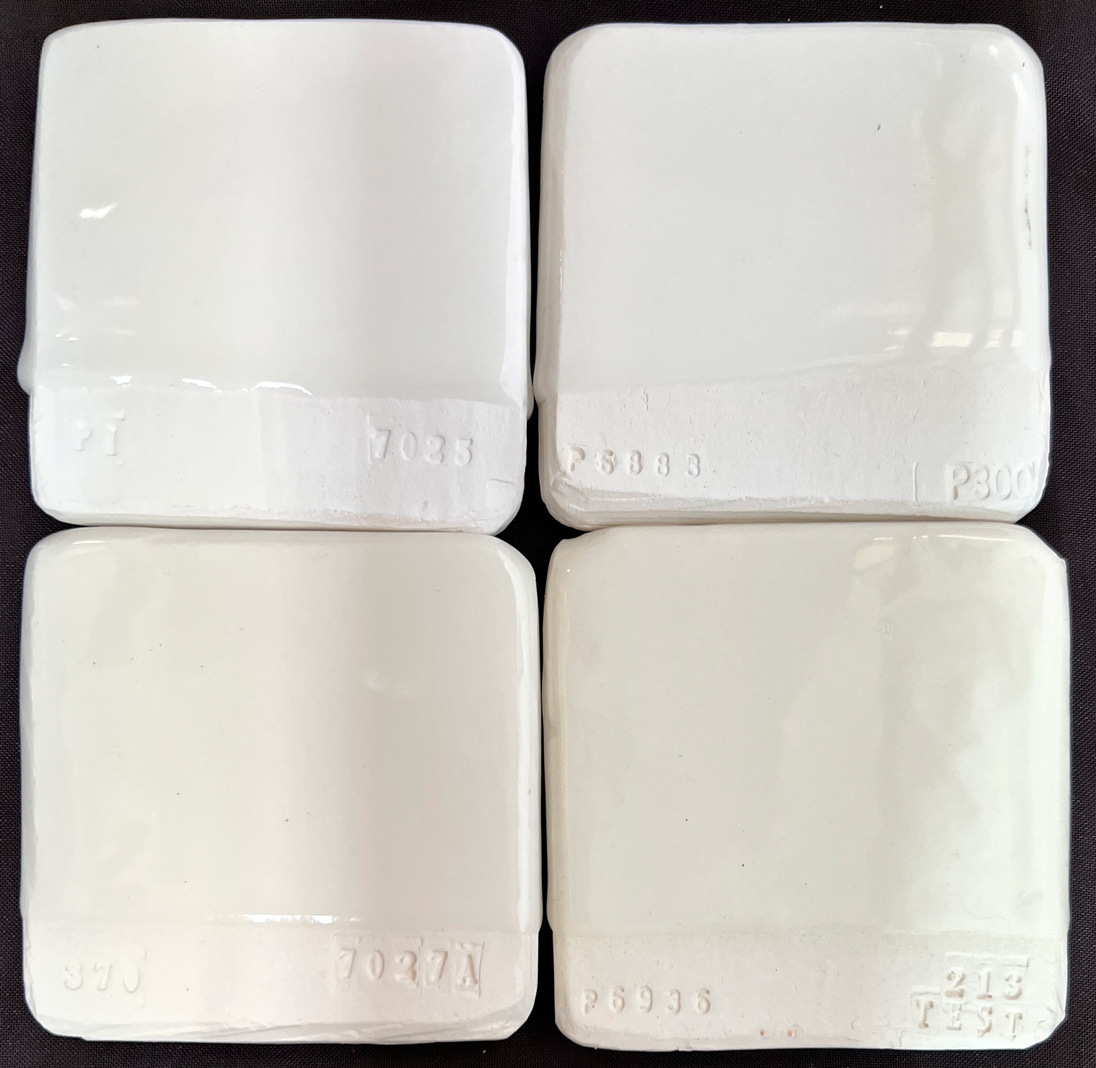
Low-temperature white talc casting bodies have always been porous, 10-12% absorption is typical - pieces are basically just bisque-fired. People just pretend everything is fine! A stoneware potter might be horrified by this - until he/she sees the bright colors and brilliant glazes! If a dolomite body alternative is not available to you or your supplier is making a talc body that is no longer white there is an alternative: Use a middle-temperature white burning body. Why is this even possible? Their porosity at cone 05 is also 10-12% - but won't commercial glazes craze? Yes. So just make your own. This is G1916QL1 applied thickly on Polar Ice, P300, M370 (and L213 talc body), these are all plastic bodies but they can be adjusted for casting (removal of the bentonite). None crazed out of the kiln or after a BWIW test. I did this again with a thinner glaze application and at cone 03 (100°F hotter) and the results were even better. G1916QL1 can be mixed as a dipping or brushing glaze. But how can you guarantee no crazing? Fire even hotter, perhaps cone 02. Lower the thermal expansion further (as per instructions on its web page). And increase the silica in the body recipe at the expense of kaolin or ball clay (compensate with whatever bentonite is needed to get good casting properties). For a good cone 6 porcelain recipe for casting try L3778G. All of this can also be done with a plastic body, for that try L3778D.
Two methods to make your own low SG brushing glaze.
This picture has its own page with more detail, click here to see it.
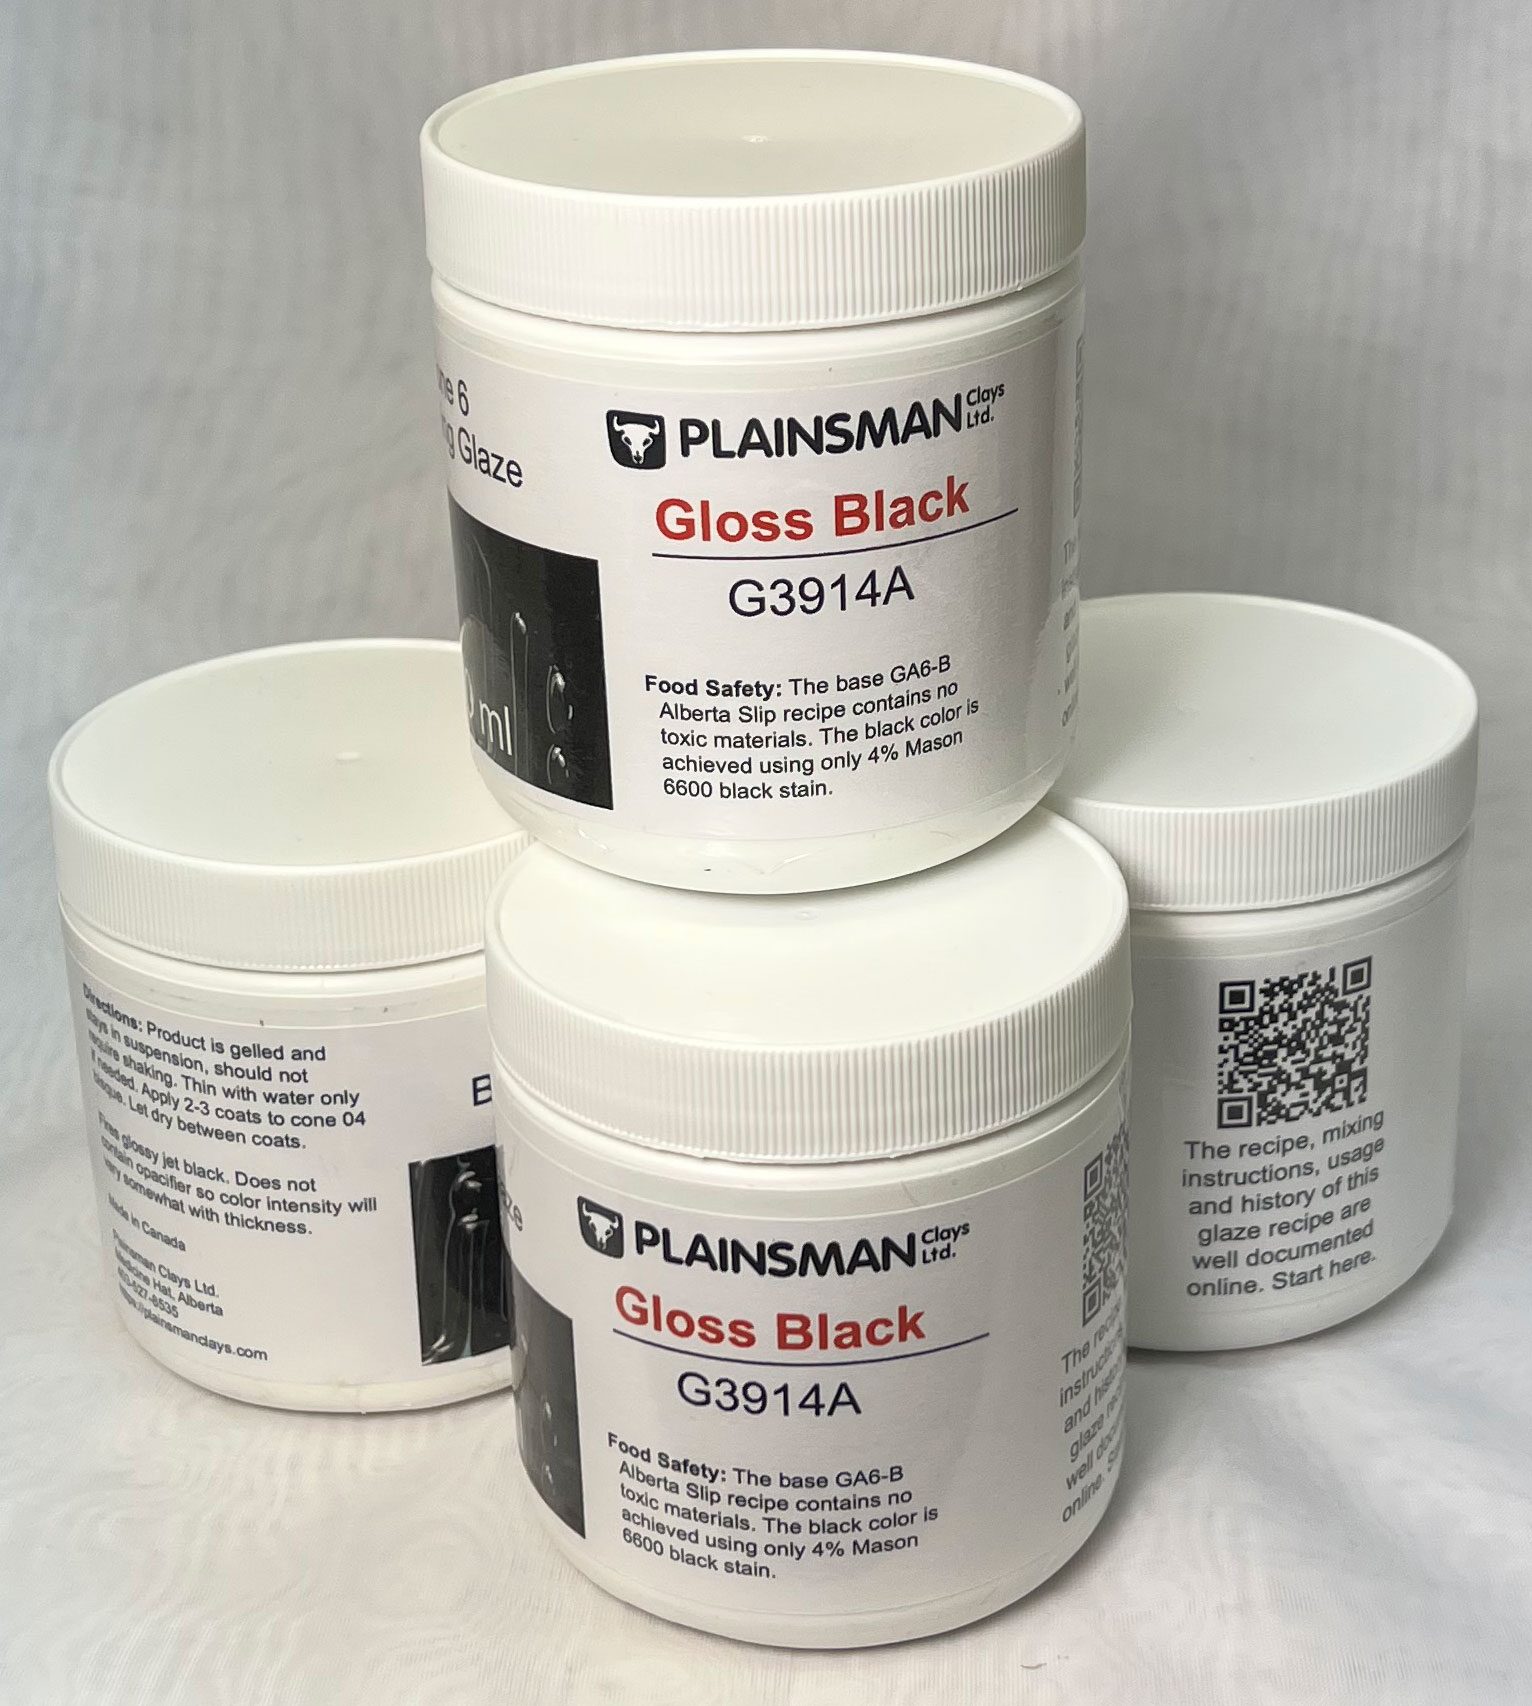
Dipping glaze applies and dries in seconds. Brushing glazes dry slowly and dry hard. Brushing glazes simply have gum in the recipe, dipping glazes typically do not. This is the Alberta Slip cone 6 base, made jet black with 4% black ceramic stain (our code G3914A). We normally mix this as a dipping glaze but I have made a 500ml jar of low SG brushing version using both of the following methods. These methods will work for almost any glaze recipe (for those having exceptionally high clay content less Veegum is needed).
1) Shake together, in a plastic bag, 340g of mixed glaze powder with 5g of Veegum and 5g of CMC gum. Add that to 440g of water in a kitchen blender and mix on high speed until it gels (the gums resist mixing so the highest speed for at least 30 seconds is needed to prevent lumps).
2) Take 680g of dipping glaze (assuming it is about 50:50 water:powder you get 340g of dry), put that in the blender with another 80g of water and proceed as in method 1. Less total water is being used because the dipping glaze might not be exactly 50:50 water:powder. During mixing, if it gels too much add the extra 20g of water.
Learn to mix any of your glazes for these three application methods

This picture has its own page with more detail, click here to see it.
Potters are used to making dipping glazes that they weigh out and mix from recipes. Hobbyists commonly use bottled commercial brushing glazes. Did you know that a dipping glaze can be turned into a brushing glaze by the addition of Veegum (or Veegum CER) and water? Do you know what a base-coat dipping glaze is? Here is a quick overview: Dipping glazes need to go on to bisque ware evenly, be thixotropic enough to hold on at thickness and drain and dry quickly. But they don't need to dry hard. Brushing glazes need a cohesive slurry that dries slowly and hardens well on drying. They also must adhere to the body really well so that multiple layers can be applied (individual layers go on thin). Base-coat dipping glazes are in between, they need to dry fast enough and gel well enough to make application by dipping possible (although less practical) and they need to adhere well enough to tolerate another layer without letter go of the body.
Control gel using Veegum, brushing properties with CMC gum
This picture has its own page with more detail, click here to see it.
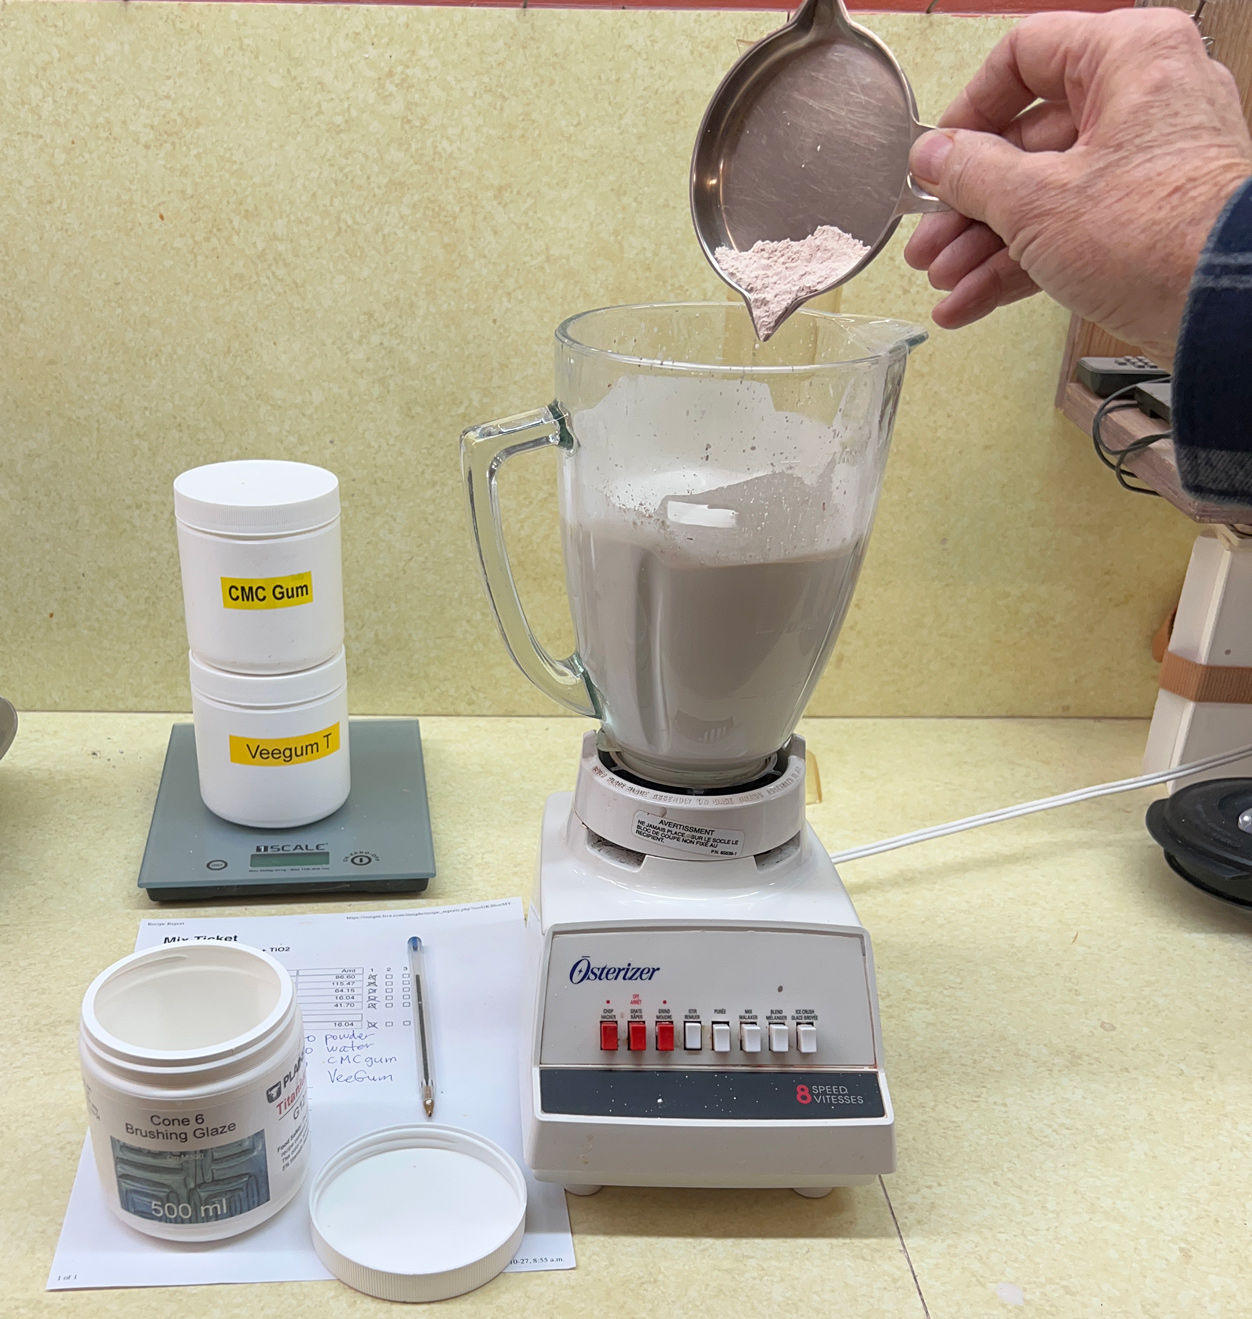
This is G1214Z1 brushing glaze (with 5% titanium added). For a 340g powder batch (to get a pint) my initial target is 5g CMC gum and 5g Veegum. CMC controls drying speed and Veegum the amount of gelling. I first mix the CMC with the powder and shake the whole batch in a plastic bag. Then I add it all to 440g of water in the blender jar and mix it well (making sure no agglomerates remain (stage 1). Stage 2 is adding the VeeGum slowly, while high-speed blender-mixing, this is important because it enables tuning the degree of gel (which cannot be predicted). Because this recipe has little clay, it took all 5g of Veegum without overgelling (the entire mass moved freely in the mixer jar). But it did gel overnight (so 4g would be better next time). By contrast, it is the brushing behavior that demonstrates whether the amount of CMC is right. Not enough and coats dry too fast and go on too thick. Too much and it dries too slowly and too many coats are needed.
Here’s how we make a base brushing engobe

This picture has its own page with more detail, click here to see it.
This brushing engobe is thick and gooey (because it contains CMC gum), so it is practically impossible to sieve. Our regular propeller mixer is not able to break up the tiny agglomerates of New Zealand kaolin. But 30 seconds of blender mixing makes it as smooth as silk. To make this liter of brushing engobe we use 800g of powder and 10g of CMC gum in 800g of water. Because of the very high clay content this does not require Veegum to gel it. The CMC gum greatly improves the brushing properties. It also thins the slurry enough to enable its lower-than-normal water content, making it more suitable for painting onto leather-hard ware, minimizing the number of coats needed.
A 2oz jar of underglaze dries down to 21g of powder. That is bad and good!

This picture has its own page with more detail, click here to see it.
Only a part of that 21 grams is actual stain powder, it is mixed into a medium. A 16oz jar of another color yielded 190g, a slightly better percentage of powder-to-water. The high water content is actually a benefit, they condition it with a clay that causes it to be thixotropic (gels). In one scenario we calculated a 1500% saving in making your own underglaze vs. buying these jars, that is a more feasible idea than you might think. With out setup we can weigh and make a 1 pint jar of brushing glaze/underglaze in ten minutes.
Make and sell your own jars of glaze at your teaching studio

This picture has its own page with more detail, click here to see it.
Your studio or workshop can save a lot of money making and even selling your own glazes to students (at least for common colors and types). The supplies shown here enable printing quality labels on ordinary paper and applying them to jars that cost less than $2. We make the labels by ink-jetting onto regular paper, cutting them 62mm wide (2 7/16") and holding them securely in place using 2 7/8" transparent packing tape.
What about the glazes themselves? Just do what glaze companies do: Add stains to a base transparent glossy or matte glaze (for example G1916Q for cone 04 or G2926B for cone 6). Each 16oz jar needs 350g powder, 450g water, 5g CMC gum and 5g Veegum (leave out the Veegum and use less water for thicker coats). Stains are expensive (5-20 cents/gm here in 2024), at 7.5% (25g) that is $1-5 per jar. The materials for the G1916Q base cost $10/kg, and for G2926B $4/kg. Thus each jar costs $3.33 and $1.33 respectively. Making recipes of 5000g at a time would enable making 15 jars. A best-case is thus about $5/jar, worst case about $10/jar (compare that with commercials that are about $15-70). Of course, you can save money by looking for deals on materials and stains and recycling jars. Consider other advantages of making your own: You can tune the rheology and adjust recipes to fit your clay bodies (to prevent crazing or shivering).
Are you worried about labelled, testing and SDSs? Take a look at ASTM D-4236 and see if you still need to worry.
Blending an engobe and a glaze to produce an underglaze
This picture has its own page with more detail, click here to see it.
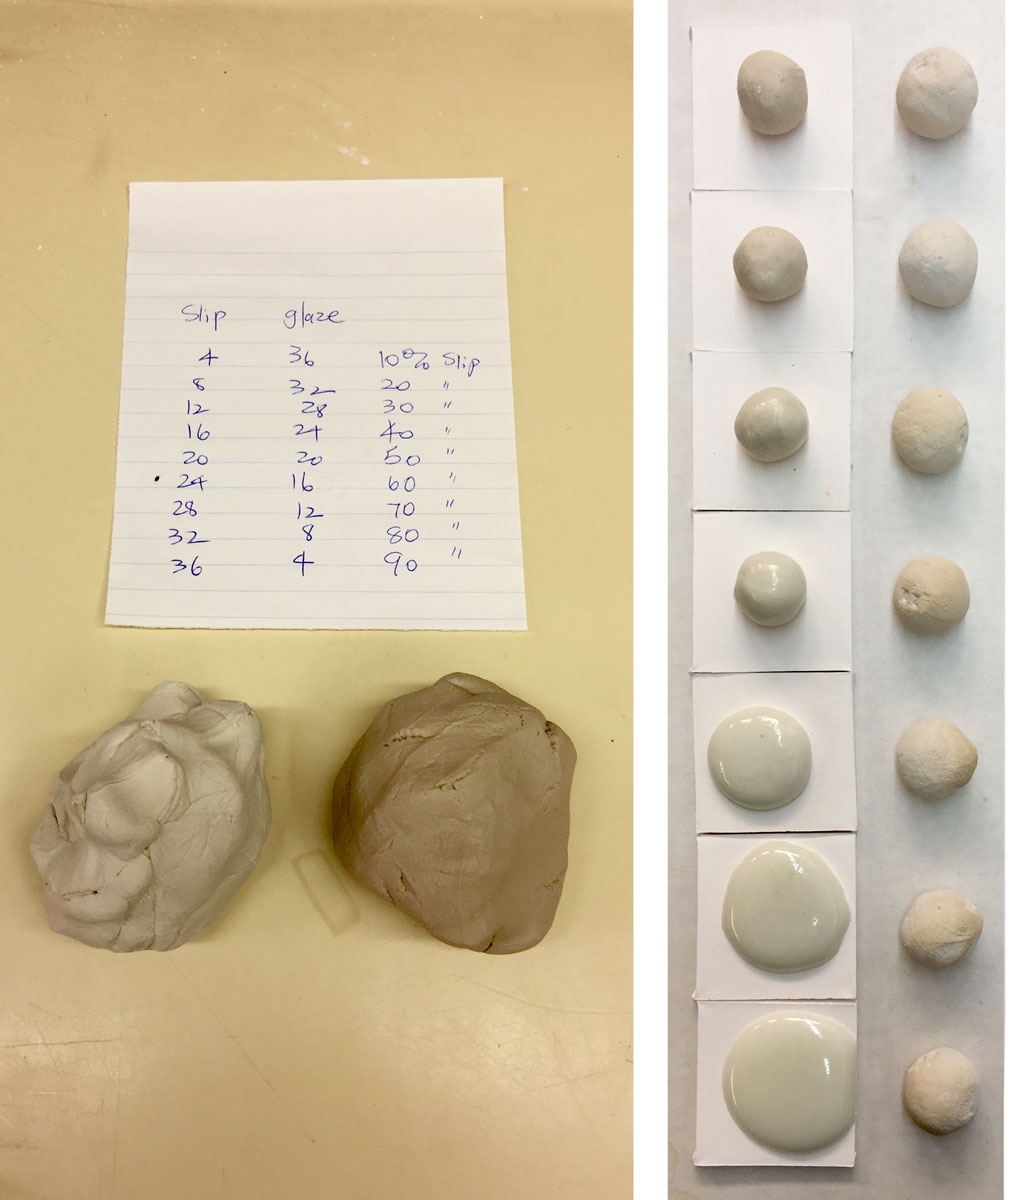
These fired samples demostrarte how you could develop your own Stroke & Coat glazes. I made these blends by dewatering an engobe (L3954B) and glaze (G2926B) and then hand-mixing line blending them. The left column is the fired blends (cone 6), the right one the unfired ones (showing the increase in soluble salts as the percentage of glaze increases). The right one shows the increase in melt fluidity. The top ones are 30:70 glaze:engobe and the bottom ones are 90:10 glaze:engobe. Notice the big change in melt fluidity between 60 and 70% glaze (third and fourth from bottom). And that the 70% one is quite glossy even though it has very low melt fluidity. Somewhere between 60 and 70 we could isolate a glaze-like product having underglaze stability. Stains could be incorporated and the proportion of glaze:underglaze adjusted according to its effect on melt fluidity. Doing this yourself enables targeting an exact melt fluidity for each color at the target temperature. The commercial product does not do that. You can also use more stain then they do to get more vibrant color for thinner applications.
Brushing glazes on large pottery items is surprisingly practical

This picture has its own page with more detail, click here to see it.
I applied this transparent inside and out on both bisque and bone-dry ware using only a small brush (of course a larger one or a fan brush would be better). I have done up to 35 lb bowls this way. This is not a commercial brushing glaze, it is a dipping glaze that we mix ourselves: G1947U. We add 10g CMC gum powder to one liter of a water-reduced version of the slurry. Blender mixing makes it possible to mix in the powdered gum and tune water content for the best brushing experience. The gum slows down the drying speed dramatically so there is plenty of time to brush it into place (while the wheel is turning). The gum also greatly increases the cohesion, enabling pouring it without drips, even in a long thin stream. Many pieces were done like this in recent kiln loads (including application onto a leather-hard 40-inch tall vase), the evenness of coverage was the best I have ever gotten (of any technique).
Glazing large bowls inside-and-out using brushing glaze

This picture has its own page with more detail, click here to see it.
This wheel-thrown bowl is large, heavy and thick walled. There are pouring techniques to apply different colored dipping glazes to the inside and out but they are cumbersome and slow. It turns out that the hobbyist way of glazing is actually better - by brushing. I make these 500ml jars of brushing glaze and tune the percentage of gums to get the painting consistency and drying time best for me. Applying multiple coats by brush took only a few minutes and no wax resist or any other tools were needed. And it was easy to meet the two glazes in a straight line at the rim using the brush. The inside glaze is G2936B and outside is G2926B.
Mason stains in the G2926B base glaze at cone 6
This picture has its own page with more detail, click here to see it.
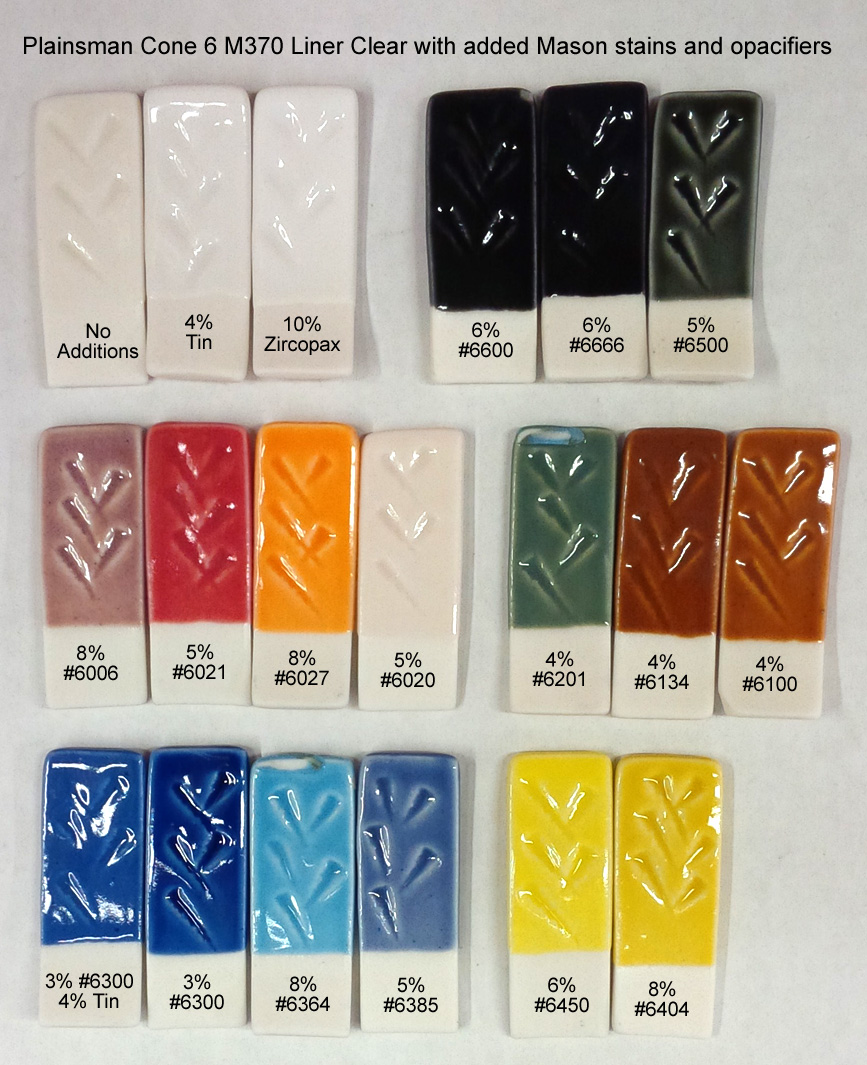
This glaze, G2926B, is our main glossy base recipe. Stains are a much better choice for coloring it than raw metal oxides. Other than the great colors they produce here, there are a number of things worth noticing. Stains are potent; the percentages needed are normally much less than for metal oxides. Staining a transparent glaze produces a transparent color, it is more intense where the laydown is thicker - this is often desirable in highlighting contours and designs. For pastel shades, add an opacifier (e.g. 5-10% Zircopax, more stain might be needed to maintain the color intensity). The chrome-tin maroon 6006 does not develop well in this base (alternatives are G2916F or G1214M). The 6020 manganese alumina pink is also not developing here (it is a body stain). Caution is required with inclusion stains (like #6021). Bubbling, as is happening here, is common - this can be mitigated by adding 1-2% Zircopax. And it’s easy to turn any of these into brushing or dipping glazes.
Layer slayers and jar junkies
 AI generated picture and text to a prompt asking about the type of ware commonly made by potters and hobbyists who do layering of commercial bottled glazes (and some terms describing the trends).
This picture has its own page with more detail, click here to see it.
Commercial brushing glazes have made it possible for hobbyists to glaze pottery on the kitchen table. But, the layering craze has seen these bottled products migrate into pottery studios and schools. In the minds of most, the glitter of layering trumps all of the advantages of DIY glazes. The "glam" of multiple layers often makes even the ugliest pot saleable. Here is the kind of pots an AI ChatBot told me it thinks we are making now:
- "Brush 'n Buffs" rely on lots of brush-on glaze layers for visual effect rather than technical finesse in form or glazing.
- "Gloss-Bosses" lean heavily on glossy, vibrant finishes to draw attention, often brushing up the prices to match.
- "Glaze Blazers" blaze a trail through high-end glazes to make a statement piece without much focus on craftsmanship.
- "Layer Slayers" layer glazes for that ‘artistic look’ rather than achieving mastery of the basics.
- "Jar Junkies" depend on store-bought, premixed jars to give their work aesthetic appeal.
- "Shelf Shockers" make pottery that looks striking on the shelf but might lack structural or functional finesse.
- "Costly Coaters" coat basic pieces in costly glazes, inflating prices as if each layer adds value.
- "Glitz Potters" put emphasis on glittery, glamorous finishes over solid craftsmanship.
- "Kiln Thrillers" focus looks alone, with beginners banking on decorative glazes for appeal.
- "Palette Pushers" pile on color layers as if painting rather than carefully curating glazes for effect.
DIY glazes can do something commercial ones cannot:
Go on evenly, in one coat and dry in seconds.

This picture has its own page with more detail, click here to see it.
Commercial brushing glazes are laced with CMC gum to make them paint on thin and dry slowly. Why would anyone want that? Layering. Brushing on layers takes time and it is difficult to get even coverage, but it justifies brushing up the prices also!
What if you are not a "layer slayer" and want the opposite of all of that: Go on thick enough at one go, dry in seconds and apply super even. DIY potters have that ability by making thixotropic dipping glazes. You cannot buy these because the gum kills thixotropy. Thixotropic glazes are fluid in the bucket but gel after a few seconds of standing. This enables really good dipping properties - the gelling enables the glaze to stay in place upon extraction from the bucket. This picture demonstrates how such glazes hang on to even a non-absorbent and wet surfaces.
Bottom: Extreme thixotropy. The spatula is held vertical by gelling only. Yet when this slurry is put in motion, it is fluid!
Top left and right: These spatulas were slowly extracted and the engobe and glaze just hang on in a perfectly even layer. On a bisque surface, the glaze dries quickly, within seconds. And the engobe hangs on to leather hard ware for perfect coverage, even around sharp contours.
Videos
Links
| Glossary |
Blender Mixing
An ordinary kitchen blender does a better job of mixing a ceramic slurry than any industrial machine. It even reduces clay particle size and hyper ages it. |
| Glossary |
Brushing Glaze
Hobbyists and increasing numbers of potters use commercial paint-on glazes. It's convenient, there are lots of visual effects. There are also issues compared to dipping glazes. You can also make your own. |
| Materials |
CMC Gum
CMC gum is indispensable for many types of ceramic glazes. It is a glue and is mainly used to slow drying and improve adhesion and dry hardness. |
| Articles |
Where do I start in understanding glazes?
Break your addiction to online recipes that don't work or bottled expensive glazes that you could DIY. Learn why glazes fire as they do. Why each material is used. How to create perfect dipping and brushing properties. Even some chemistry. |
Got a Question?
Buy me a coffee and we can talk

https://digitalfire.com, All Rights Reserved
Privacy Policy
