Glaze laydown
Refers to the quality of the dried ceramic glaze layer and how this affects the fired result: e.g. density, hardness, evenness, thickness, freedom from defects, etc.
Key phrases linking here: glaze laydown, laydown - Learn more
Details
In industrial ceramics, the quality and evenness of the dried glaze layer are considered very important in quality control and to the suitability of the final product. Industrial glaze application techniques and machines are highly tuned to apply an even, dense and defect-free dried laydown. This is of paramount importance with many types of manufactured products where even a single pinhole or crawl site can reject an entire item (for recycle, refire or discard).
Potters, on the other hand, think little about this. They just assume that since the glaze will be melting, surface irregularities will even out in the firing. Of course, they do try to minimize drips, pinholes and cracks.
Laydown quality is best on porcelain and worst on heavily grogged bodies. Best on thin applications, and worse on thicks. Better with thixotropic slurries, and worse with inadequately suspended ones. Better when they dry quickly, and worse when they dry slowly. Better with glaze slurries having adequate fine-particled clays in the recipe, worse with slurries low in clay content. Gummed slurries potentially give the best quality laydown but require equipment and process expertise to get a dense even layer that dries quickly (slow drying causes multiple issues, especially on porous bisque). While it might seem that brushing glazes are potentially difficult to laydown evenly, commercial products having low specific gravities must be applied in multiple layers, this enables achieving satisfactory laydown for hobby ware. Brushing likewise offers the advantage of making applications thicker or thinner on specific areas of an object. Spraying likewise has the potential for high-quality laydown (in the hands of the experienced).
As already noted, glaze surface defects (e.g. unhealed blisters, crawling, pinholes), that can send potters looking for another recipe, are often solved in industry by changes in how the slurry is prepared, what additives are used, what rheology is targetted and how it is applied.
Related Information
The the glaze laydown is not even, it could affect the fired surface

This picture has its own page with more detail, click here to see it.
Dried glaze layer on a lightly grogged middle temperature stoneware (Plainsman M325). Notice how the bubbling that occurs during the drying of the glaze has disrupted the laydown. This is a glossy transparent and will likely level out, but if it were a matte or glaze having a stiffer melt, this texture would be evident in the fired piece.
Crawling on sanitary ware. Laydown is the first suspect.

This picture has its own page with more detail, click here to see it.
This is glaze crawling and it underscores the need for attention to the details of all production parameters. This one small glaze defect makes this pedestal sink either a refire, a second or unsaleable. This is most common on abrupt surface contours but that is not the case here. The cause of this is likely several factors combining. The glaze is opaque white because it contains a high percentage of zircon opacifier. Zircon glazes tend to do exactly this so their successful use is doubly dependent on minimizing the percentage added and on attention to other details to compensate. This glaze has been applied thickly to ensure good coverage (thicker laydowns bring more crawling problems). The glaze is likely low in clay and thus the physical bond of the dried glaze layer depends on the binders being used, their percentages, the integrity of the way they were mixed in, and their shelf life. The ability of the glaze laydown to dry-bond with the body depends on the condition of the surface (e.g. water content, dry or bisque fired, smoothness, dustfreeness, quality of materials used in the body and integrity of body preparation, etc), the presence of surface contaminants (e.g. soluble salts) and the way in which it was applied and its thickness. The glaze melt's ability fire-bond and form an interface with the body that produces a smooth surface is dependent on its melt fluidity and ability to form an interface with the body.
There is another way to look at this problem: The process runs along crawling multiple tipping points: A viscous glaze melt, glaze application to dry rather than bisque ware, a thick glaze application, a large surface area intolerant of any defects and a glaze application technique (spraying) prone to irregularities of thickness. Rather than trying to identify the specific problem it might be better to simply make changes to move the process back from the tipping points.
Why do gummed dipping glazes do this as they dry? How to fix it.

This picture has its own page with more detail, click here to see it.
Gummed glazes dry slowly and on porous, dry bisque this often happens. The one on the top left was dipped for three seconds, and the ones on the top right and bottom right for five seconds. Thus, the thicker the application the worse this is. A complicating factor is that this is a base-coat dipping glaze, it has enough gum to slow down drying significantly, providing plenty of time for escaping air, displaced by the water being absorbed, to create these holes. If these tiles were much thinner the problem would obviously be much less. But the thickness also enables a simple solution: The bottom left tile was dipped into water first. An extra benefit of the water is that the glaze penetrates into recesses in the surface better.
A glaze is showing unwanted streaking. Why?
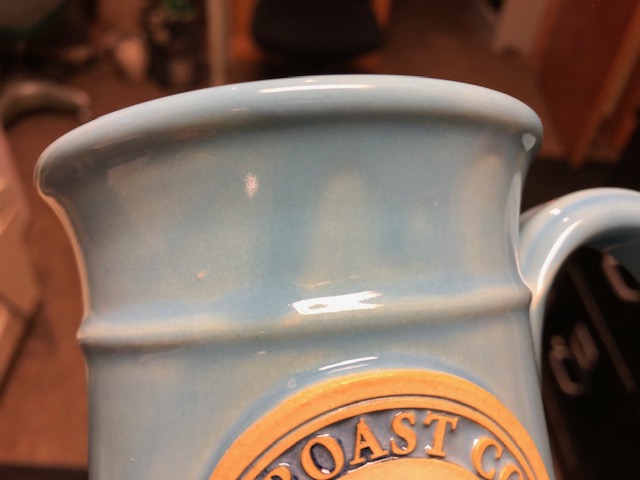
This picture has its own page with more detail, click here to see it.
This is a fluid melt cone 6 glaze with colorant added and partially opacified. It runs into contours during firing, thickening there (notice the darkening around the logo), this is a desired visual effect. However, notice that drips and runs coming down from the rim, they are producing darker streaks. This is an application issue. Glazes that fasten-in-place too slowly will drain unevenly on extraction from the bucket (after dipping). This can be solved by making a thixotropic slurry. If bisque ware is too dense, glazes have a more difficult time fixing-in-place in an even layer, especially if they have no thixotropy. If glazes lack clay (e.g. less than 15% kaolin) they do not gel as easily. Slurries containing too much gum dry slowly and drips are almost unavoidable. If the problem is too much melt fluidity, choose a more stable base glaze can really help. Just because melt fluidity is less does not mean that it will be less glossy.
What an engobe does for even glaze laydown

This picture has its own page with more detail, click here to see it.
This stoneware jar is made from a large particle size body with grog added. It was engobed on the inside and over the lip at the leather hard stage and bisque fired. Now it has been dip-glazed inside and out. Because the clay is so porous, lots of air must escape from inside the wall as the matrix soaks up water from the freshly applied glaze. But the air is being channeled into pathways and concentrated into surface irregularities created by the coarse particles in the matrix. At each of the escape sites a bubble appeared (then healed into a depression when it burst). But the engobe on the inside creates a homogeneous surface that distributes air escape uniformly, it does not have a single blister.
A hazard of using titanium opacifier in a glaze
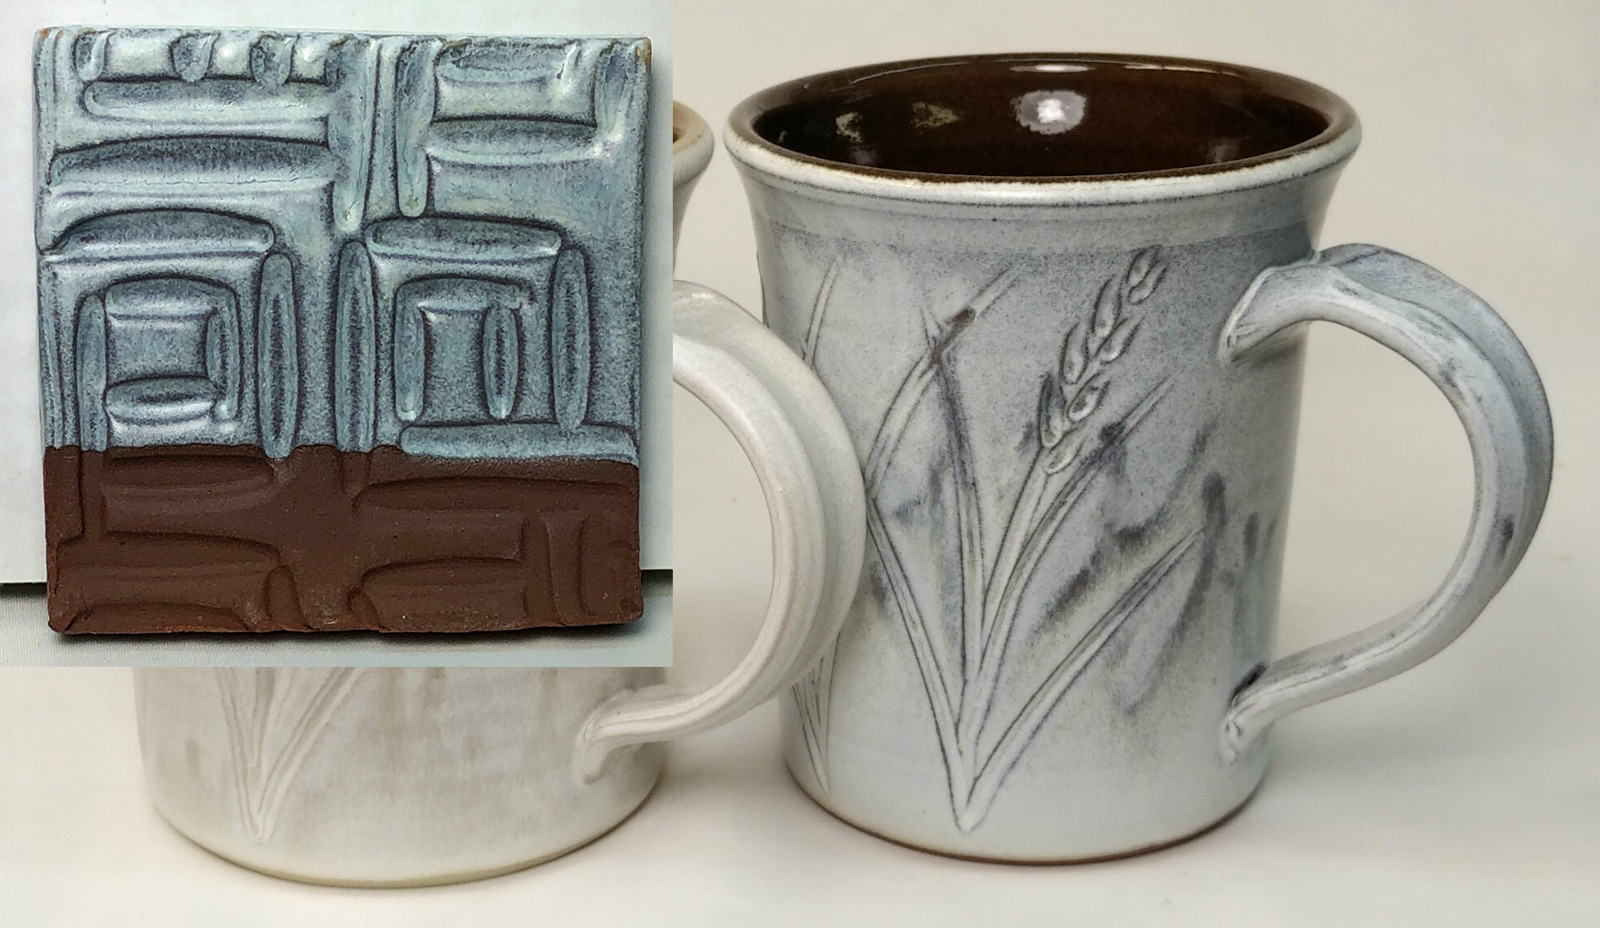
This picture has its own page with more detail, click here to see it.
On a clay test tile this titanium opacified cone 6 oxidation glaze, G1214Z1, looks great. But it is important to recognize that its variegated fired appearance is a combination multiple factors: The chemistry of the glaze, the titanium, quality laydown, the PLC6DS firing schedule, the red M390 clay body and variations in the thickness-of-application. However, the last four of those factors changed with the mug on the right! It is made from buff-burning M340! There are drips from uneven drainage during glazing. The slow cool C6DHSC firing schedule. Notice how it is actually going transparent where very thick. An even laydown was not achieved since the slurry was not properly mixed, it contains calcined kaolin and requires special attention to achieve a thixotropy.
This crystalline glaze has zero clay yet brushes well. Here is why.

This picture has its own page with more detail, click here to see it.
A 500ml jar of this was made using 340g powder, 440g water, 5g CMC gum and 6g of Veegum. This is the most VeeGum that would likely ever be used in this type of glaze. But it suspends and gels the slurry well. This glaze must be gelled because it contains no clay to suspend it. But there is a problem: The amount of gel needed means it is impossible to remove the agglomerates of CMC and VeeGum by blender mixing (the slurry simply won't move enough in the jar to expose all of it to the propeller). That means either ball milling for an extended period or creating an initial batch that only includes the CMC gum and mixing that in the blender very thoroughly first. Then, on high speed, slowly pour in the VeeGum until it gels enough to suspend everything (don't add too much or it will over-gel immediately or overnight). Regular brushes won't load the gelled glazes. But a fan brush like this works surprisingly well and creates and even laydown (very important with crystal glazes). If you have only used commercial brushing glazes you may take the CMC gum they contain for granted. Dipping glazes made by potters normally contain no gum. After dipping the bisque typically absorbs the water quickly and the glaze dries to the touch in seconds. Trying to brush such a glaze would be impossible. But adding gum slows the drying dramatically and enables it to flow beautifully for brushing.
 PayPal | No tracking, No ads, No paywall, No transient content! Just organized, concise information constantly updated and improved. Was this helpful? Consider supporting me. |
| By Tony Hansen Follow me on        |  |
Got a Question?
Buy me a coffee and we can talk 

https://digitalfire.com, All Rights Reserved
Privacy Policy