| Monthly Tech-Tip | Feb 14-15, 2026 - Major Server Upgrade Done | No tracking! No ads! |
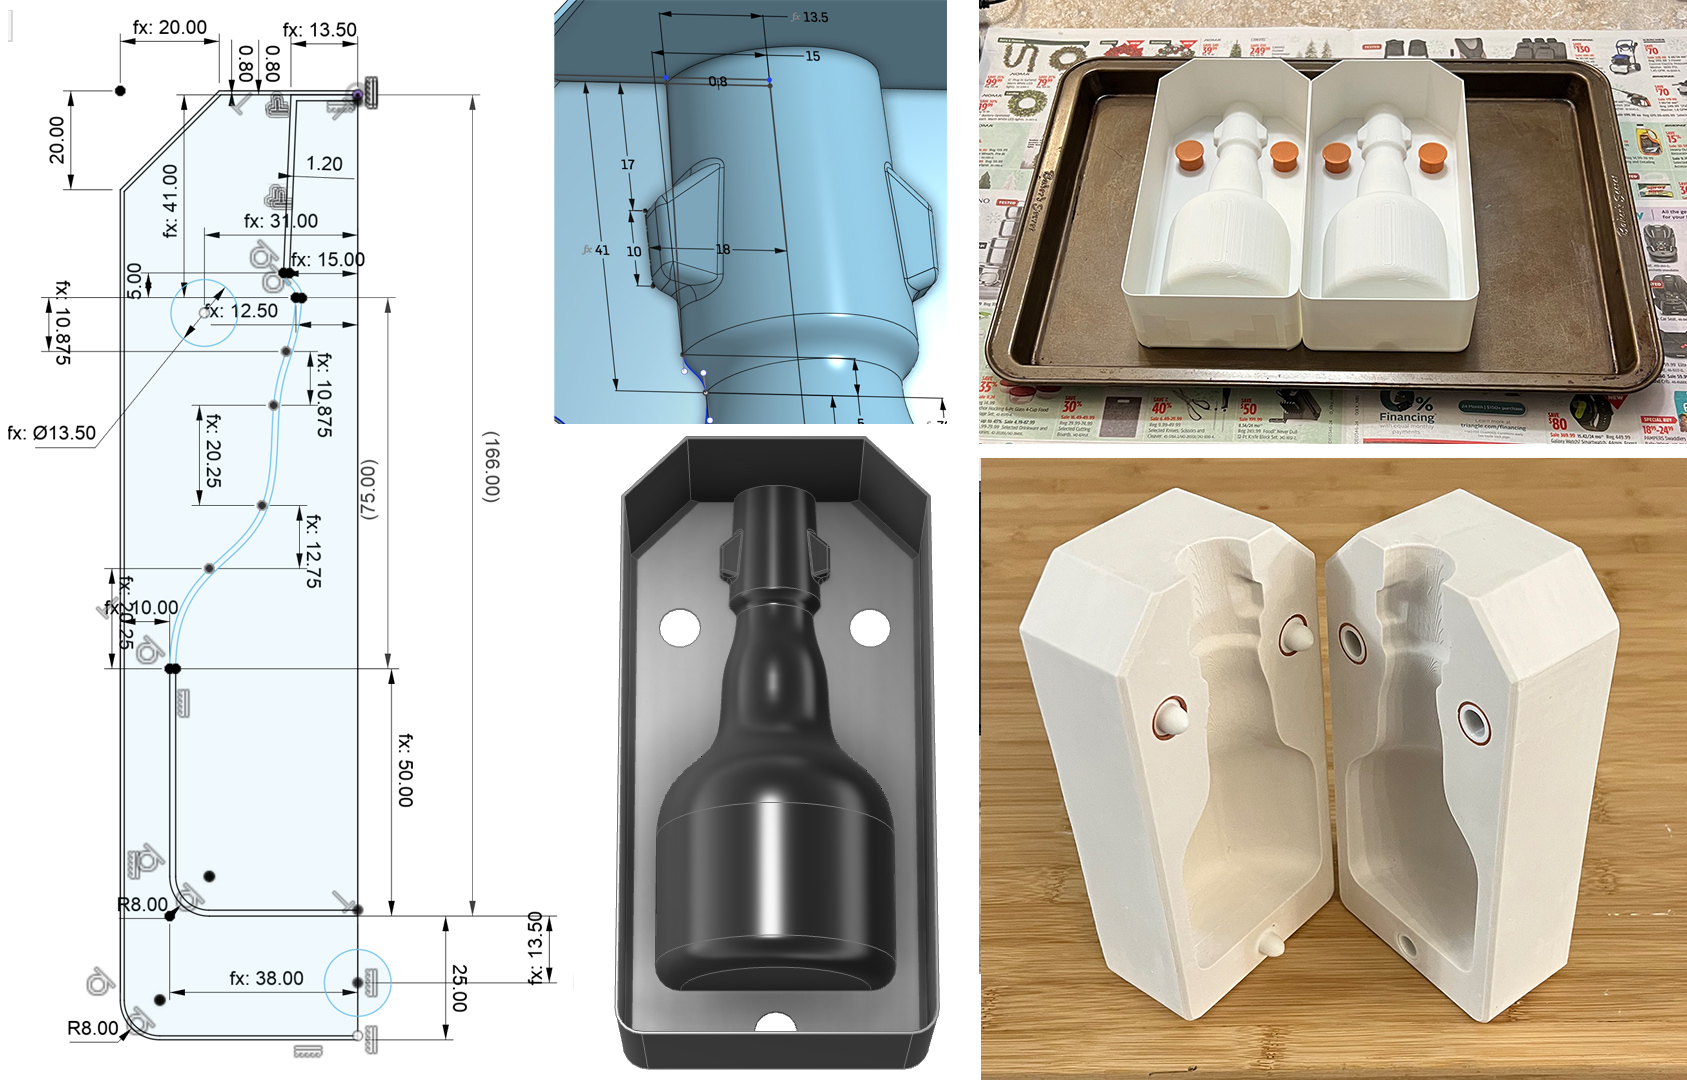
v6 Beer Bottle Drawing
Fits standard swing top stoppers.
Available as a Product on the Downloads page
3D print this, pour in plaster to make a slip casting mold! My previous work on this project assumed a smaller 3D printer (making it necessary to print flanged PLA mold sections that clip together). But larger 3D printers are now common, making the CAD work much easier. This OnShape drawing is parametric for height, body diameter, wall and plaster thickness, and neck height (for the full bottle set body=160mm, neck=96). This uses my standard natch system. Neck vertices are proportional to height, so resizing works well. The top end is filleted to permit the longest possible mold on the print bed (diagonally). The bottom inside perimeter is chamfered, strengthening the default 0.8mm side wall junction to the base (that being said, be careful not to flex it too much when removing it from the print bed).
Doing this smaller size is for prototyping and testing. Casting plaster on a 3D print creates artifacts; these were not an issue. This PLA mold prints quickly, it has a hollow back side, permitting easy removal with a heat gun. There is no spare, it employs a pour spout, making the mold shorter and producing a better lip.
Need a stoneware slip casting recipe? L4768E or L4768H are a good choice. A glaze recipe? How about GA6-B (or similar)? Go full DIY with this, you will never turn back.
Available as a Product on the Downloads page
Related Pictures
A 3D Printed Mold Spout
Better Than a Spare for Slip Casting
Available on the Downloads page

This picture has its own page with more detail, click here to see it.
Glue one of these on top of your slip casting mold (using slip) and enjoy the many benefits. These are intended for people who make their own molds using the 3D printing techniques taught on this website. Among the advantages are the following:
-Less mess.
-Smaller, simpler molds (they don't need a spare).
-Overhung lips, more precise lips.
-Visible indication of casting progress.
DIY natches, spacers and embeds in a plaster handle mold

This picture has its own page with more detail, click here to see it.
This is our third-generation alternative to the use of traditional mold natches (like the red ones in the photo). Here is what you are seeing:
Right: A 3D-printed case mold for a mug handle. Clips (retainers) have been inserted from the bottom side. An embed has been pushed down over the one in the rear.
Center: The plaster mold created from it. The embed at the rear is ready for inserting a spacer (the nipple of the other half will it into that). A natch has also been inserted into the embed in the front. These fit tight enough in the hole that glue was not needed here.
Left: Spacers have been inserted into both embeds. A standard natch fits into the one in the rear and one of our natches fits into the one in the front.
Soon the CAD drawing for these (natches, spacers, embeds, clips) will be available on digitalfire.com.
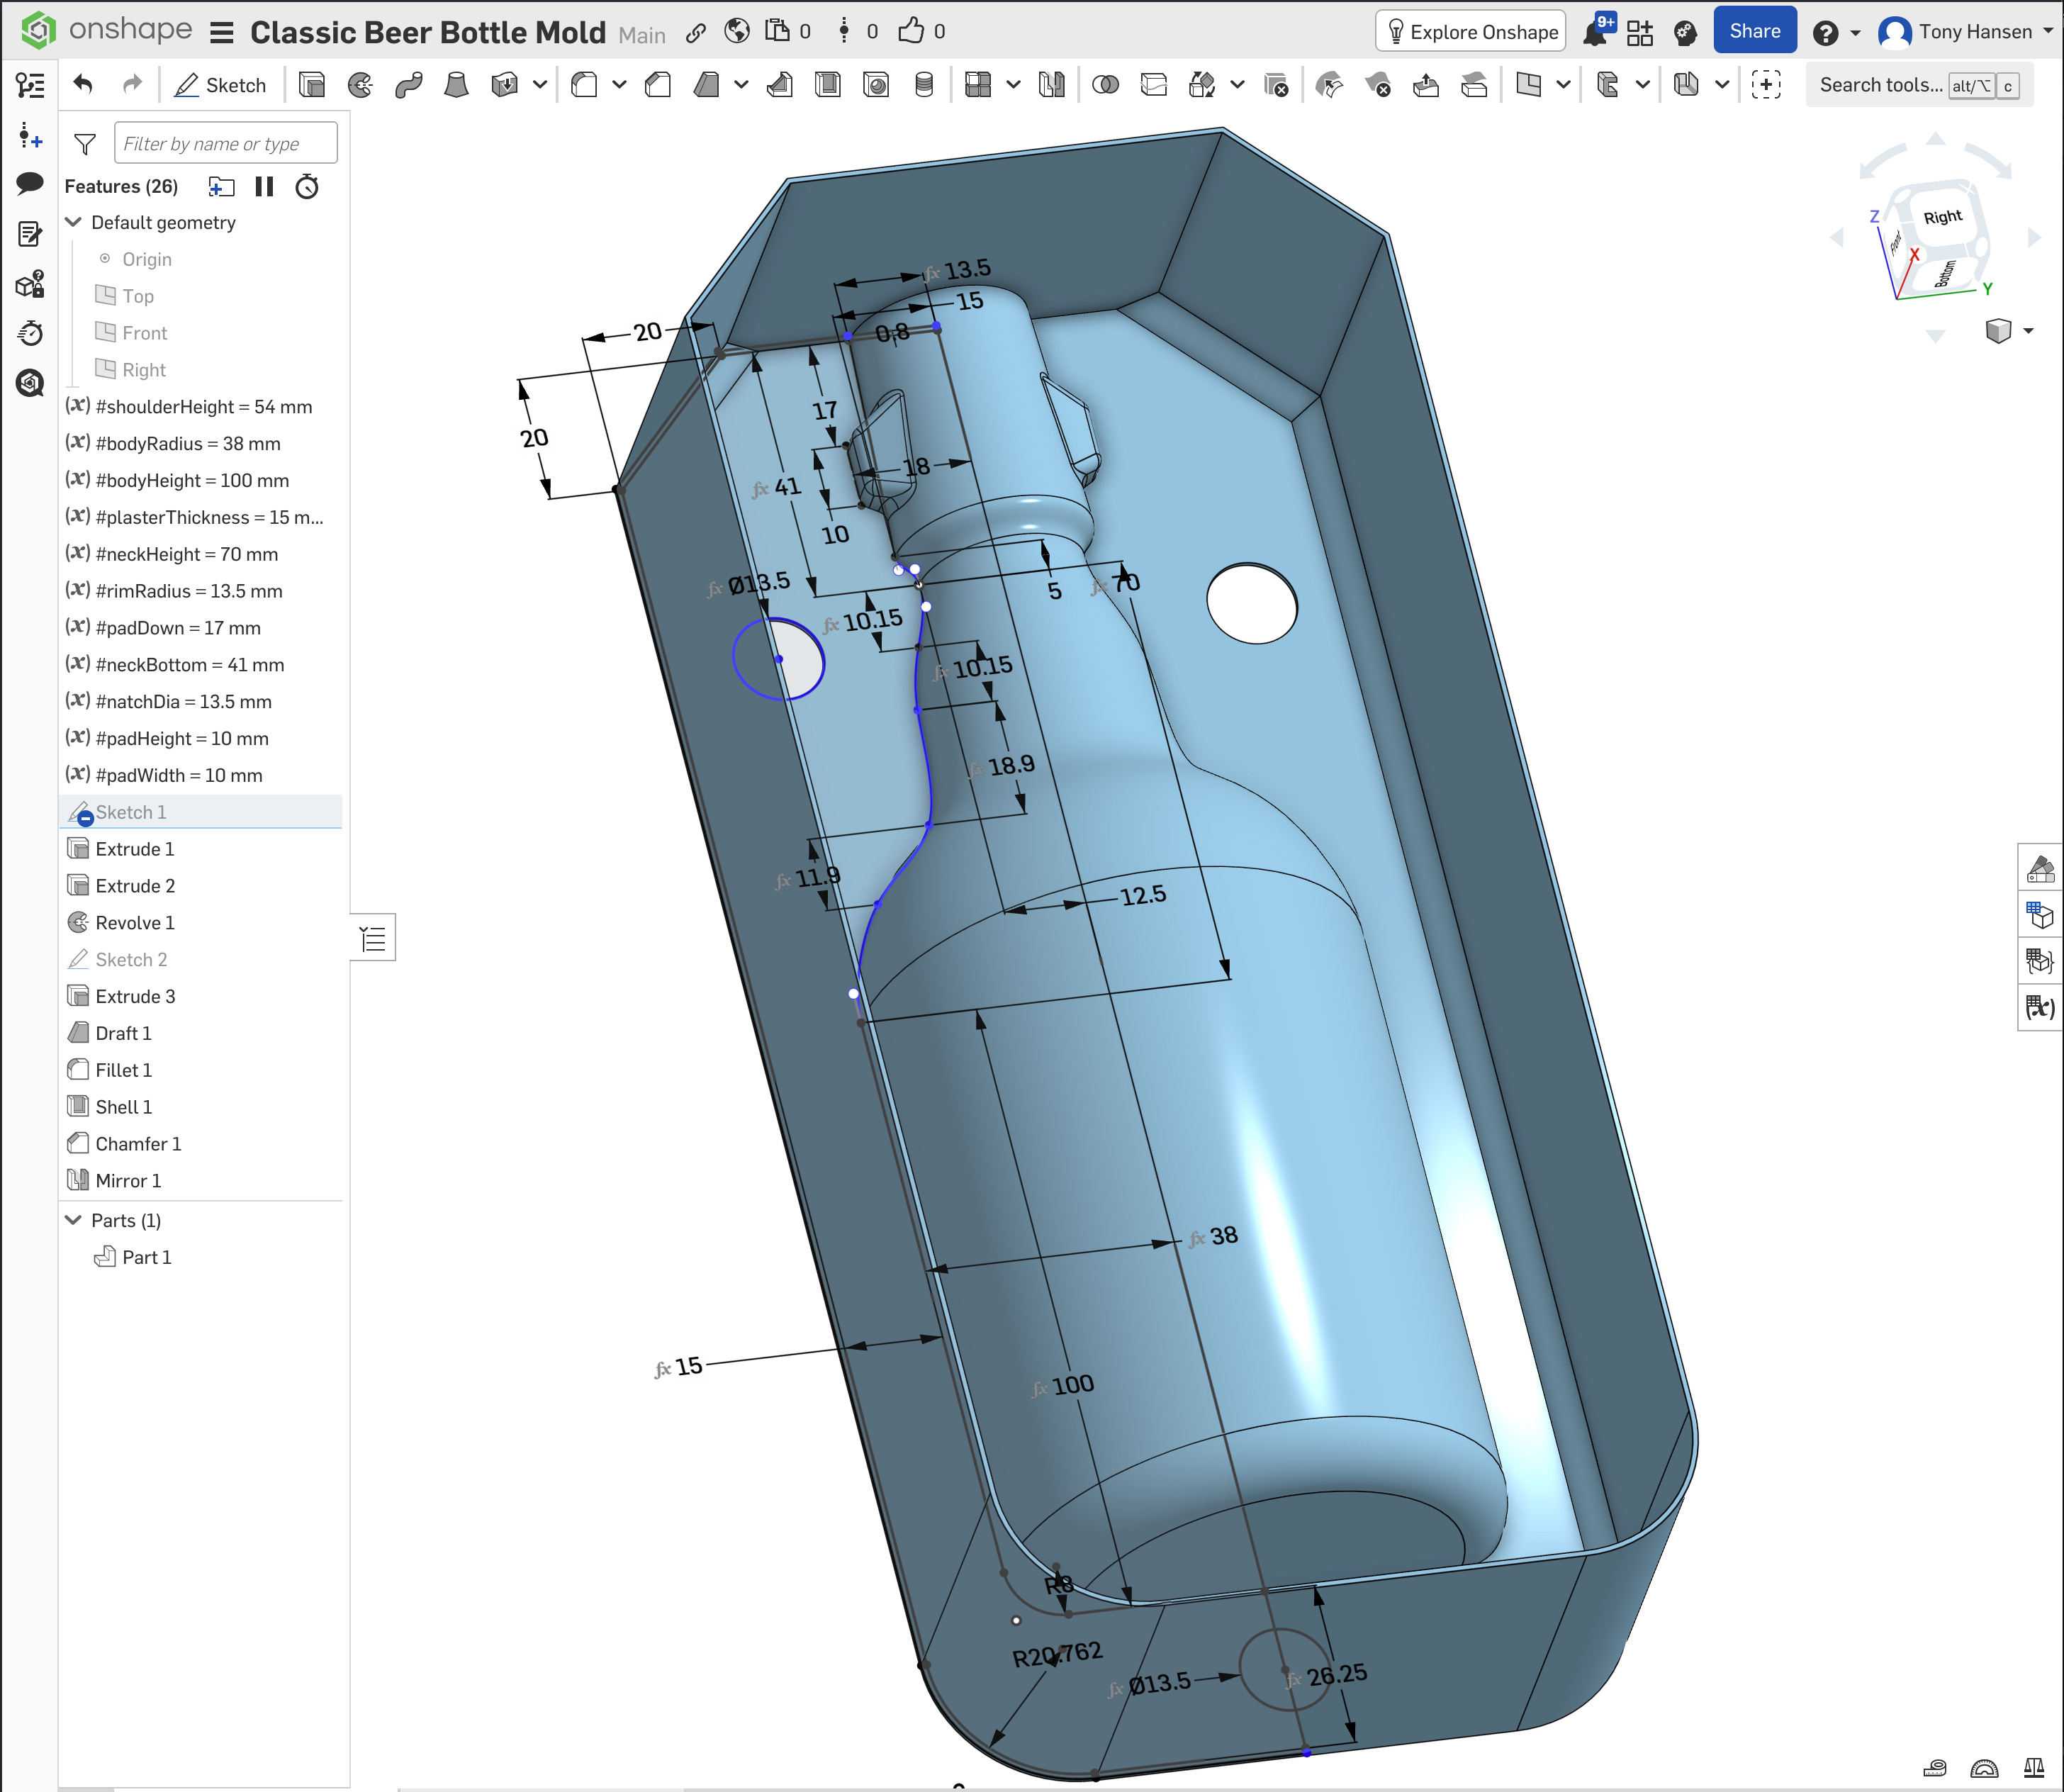
v7 Classic beer bottle mold in OnShape
Make authentic-looking beer bottles that are better than glass
Available on the Downloads page
This picture has its own page with more detail, click here to see it.
The slip casting process is so much more accessible than in the past because of 3D printing. Why not start with this? This bottle has all the same dimensions as my v6 (done in Fusion 360). But, because this is done in OnShape, one click here opens it directly in a browser window with all the power of a professional CAD system. If you have a free account there and are logged in, one more right-click can export it in 3MF or STL format for 3D printing. Or a "Copy Workspace" menu choice will move it to your account to enable editing and setting variables, adjusting the shape, etc. This works in your browser, there is no software to install and OnShape is free for hobbyists. This mold works with my pour spouts (no spare is needed) and natch system (no registration keys are needed). So just insert the clips and embeds, pour in plaster, remove the PLA plastic with a heat gun and you have a working mold. When dry, glue in the natches, attach a spout (using slip) and fill the mold with casting slip.
Need a stoneware slip casting recipe? L4768E or L4768H are a good choice. A glaze recipe? How about GA6-B (or similar)? Go full DIY with this, you will never turn back. Need a guided help to make this happen? Sign up for an Insight-live.com group account and we can work together to make this happen for you.
Swing Top Stopper Mechanism:
Getting the measurement right

This picture has its own page with more detail, click here to see it.
Early in the process, I needed to predict bottle neck diameter at the holes. I measured the gap on all of the ones I have and got an average to work from. Then I 3D printed several iterations of the neck, fired size, and settled on one that enabled being able to snap on the metal stopper fitting without stretching it too much. That being said, the wire assembly is bendable and can be adjusted for size.
This 3D printed test was designed to determine positioning in 3D space for the mounting holes. The ceramic bottle won't have this exact design; they need a thickened section on each side of the neck for the hole.
Here’s my setup for pouring plaster in the kitchen!

This picture has its own page with more detail, click here to see it.
Because of the ease of 3D printing case molds at home I can now pour plaster in them also. Of course, I am not in production; this is about creating prototype molds. This technique makes it possible to be precise in the amount of plaster used, so there is almost no waste. My tools are simply a good propeller mixer, and a scale and a 3-D printer (and a cooperative wife). Here is my procedure:
-Counterbalance a plastic container.
-Fill the mold with water and pour into the plastic container to get the weight in grams (and thus cc's).
-Plug that weight into https://plaster.glazy.org, set it to use centimenters and get the USG recommended weights for plastic and water.
-Put that amount of water in the flexible plastic container and tare it.
-Dump in the plaster needed (no need to sprinkle it, I have a good mixer).
-Set the timer for 4 minutes and let it soak.
-Put it under the mixer (at an angle as shown), set the speed to create a whirlpool just shy of pulling in any air (thus avoiding adding bubbles). Mix for 4 minutes and then pour it into the molds.
-Clean the mixer blade and shaft in a container of water (and throw that away outside). Let the plaster harden in the plastic container (it breaks away cleanly later).
-Let it set overnight and use a heat gun and pliers to carefully remove the PLA from the plaster.
Videos
Links
| Projects |
Beer Bottle Master Mold via 3D Printing
A project that took several years of failures and blind allies and is finally coming together - so much simpler than expected! |
Got a Question?
Buy me a coffee and we can talk 

https://digitalfire.com, All Rights Reserved
Privacy Policy