| Monthly Tech-Tip | No tracking! No ads! |
v2.0 3D-printed flanged rail to cast working plaster jigger molds
Available as a Product on the Downloads page
This enables casting a plaster mold that drops down in our aluminum jigger wheel cuphead. The critical measurement is the 73mm radius of the step where the mold sits inside the cuphead (this must be adjusted to your cuphead). To use, turn this upside down and center it over a plaster or 3D printed form of the inside shape of the vessel. The outfacing flanges enable this shell to open enough to release from the jigger mold being cast. Using paper clamps it is held together, and held down to, a clamping baseplate (having 86.2mm radius, it is a separate drawing). To assure that the mold seats well into the cuphead and rotates true, adjust the inner radius of the spacer ring and print it.

Available as a Product on the Downloads page
Related Pictures
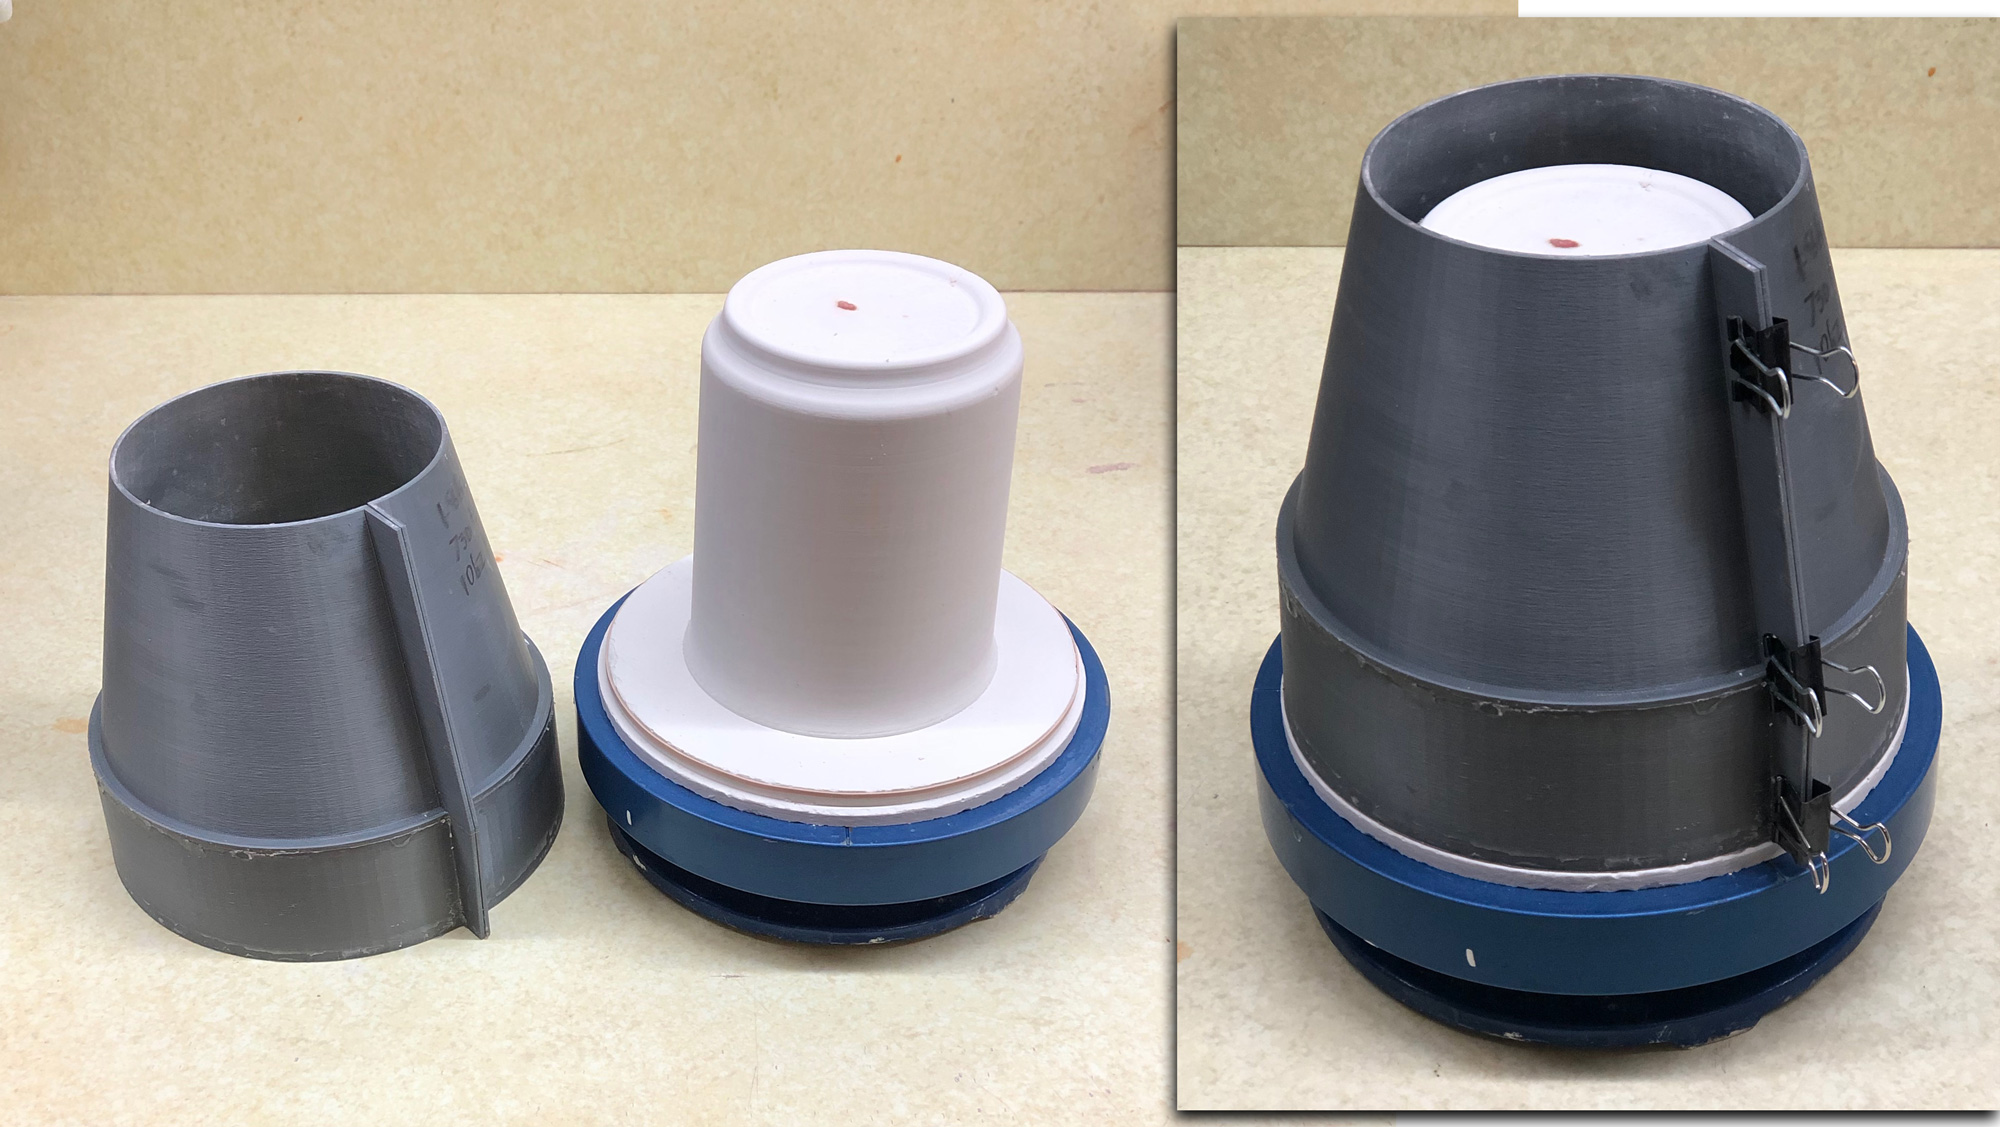
v1.0 3D-printed flanged rail to cast working plaster jigger molds
This picture has its own page with more detail, click here to see it.
The multi-use grey outer rail on the left was printed in two parts and glued together at the shoulder (to avoid the printing of support). The wall thickness is 1.6mm, actually too thick for fast printing. For v2.0 we went to 1.2mm and printed it upside down, in one piece, on a flange (this generated support but new printers to that so well that the step disconnects well and is not rough). The vertical split enables opening the shell a little after the plaster has set, quickly releasing it. The center model, of the inside contour of the mug, is integrated into a two-step base, it was made by casting the plaster inside another two-piece 3D-printed form. After removing that using a heat gun, I smoothed the plaster surface using a metal rib and trimming tool and then soaped it to ready for a pour. The mold shell is held securely in place by stretching a wide rubber band around the first step and clamping the shell into place around it. The assembly is then ready to be filled with plaster to make a jigger mold. Doing this on a turntable is also a good idea - it enables rotating it while filling and agitating after full to dislodge any air bubbles.
A 3D-printed pour spout on a mug jigger-casting mold

This picture has its own page with more detail, click here to see it.
I prepare to attach these by simply touching them to the top of the slip (it is sticky and coats the underside evenly). Then it is just a matter of setting it in place and and it glues down in seconds. I make these a little larger diameter than the top of the opening in the plaster mold (e.g. 2mm), producing a small overhang on the cast piece (this one has 0.8mm thick walls and prints quickly). During the time in the mold, the clay slurry creates a thickness against the plaster walls that also extends upward above the top (inside the spout). Shortly after pour-out I put these into the cuphead on the jigger wheel and make a cut and lift the spout away. This leaves an over-hang and over-height that enable finishing the rim using the jigger template.
Cuphead for Shimpo jigger wheel

This picture has its own page with more detail, click here to see it.
This is machined out of aluminum. We also have drawings of a 3D-printable shell-mold for making molds that drop into this. And methodology for printing the outside contour of pieces to be jiggered.
3D printed three-piece jigger case mold complete
Available on the Downloads page

This picture has its own page with more detail, click here to see it.
It is now practical to make true-round, perfect-fitting, all-in-one case molds for jiggering using a consumer 3D printer and PLA filament. This was a one-off test mold to demonstrate the method but these print so fast this is suitable to make dozens of molds. The process: Create the drawing in 3D CAD (e.g. Fusion 360), print the three sections, glue them, turn the assembly upside down, fill with plaster, let it set and peel out the inside two pieces using a heat gun.
Things to note:
-The outside profile can be adjusted to fit your jigger machine or cuphead.
-This is light and prints quickly.
-The shoulder (C) is printed solid and the PLA printed surface from A to D is left in place permanently, this enables precise and durable fit into the cuphead. I print the outside shell upside down, so no printed support is needed.
-The down-pointing flange (A) embeds it into the plaster providing a durable edge against which to fit the pour spout (F). The glue joint connecting A & B breaks when B+E are removed.
-B and E are printed upside down, no support is needed for B (since the top is open).
-The base E has a flange that enables gluing it precisely into B. Debossed logos are practical on the base. It prints upside down for maximum quality.
You can get this on the downloads page.
Videos
Links
| Glossary |
Mold Shell Flange
Learning to create flanges in CAD design enables a new kind of DIY mold-making for ceramics: 3D-printed lightweight reusable molds that clamp together. |
| Projects |
Project to Document a Shimpo Jiggering Attachment
Make your own jiggering attachment for your potter's wheel. Here are the plans and lots of help to get you going with molds and techniques. |
Got a Question?
Buy me a coffee and we can talk 

https://digitalfire.com, All Rights Reserved
Privacy Policy