| Monthly Tech-Tip | No tracking! No ads! | |
Glue-sticking the 3D printer bed for better adhesion
Many objects are unprintable due to plate adhesion issues. Some objects print successfully when done alone, but doing many of simultaneously can fail when one releases mid-print. In these cases, objects can be guaranteed to stick using a hot bed PVP glue stick like this one from Amazon (even a paper glue stick can be used, it sticks pieces even better but does not apply as evenly).
-When applied to a heated bed using long strokes it goes on evenly and dries hard.
-It can be washed off and replaced after several prints.
-The glued surface sticks pieces very well, this enables reducing the area of contact and lightening objects (giving success even when the slicer issues a "low bed adhesion" print stability warning. For example, these spacers and clips would normally release from an unglued plate.
-Objects having a large contact surface may not be removable without damaging them or the plate. Or, pliers may be needed to pull objects off (flat-bottomed pieces giving the most difficulty).
-The ten clips (right) are quite delicate, having 0.8mm walls and 0.4mm thickness base flanges. When adhesion is too great these can be damaged when removed with pliers, when not enough they release during printing. We adjust for this by increasing flange diameter when adhesion is too low and reducing it when it is too high.
Related Pictures
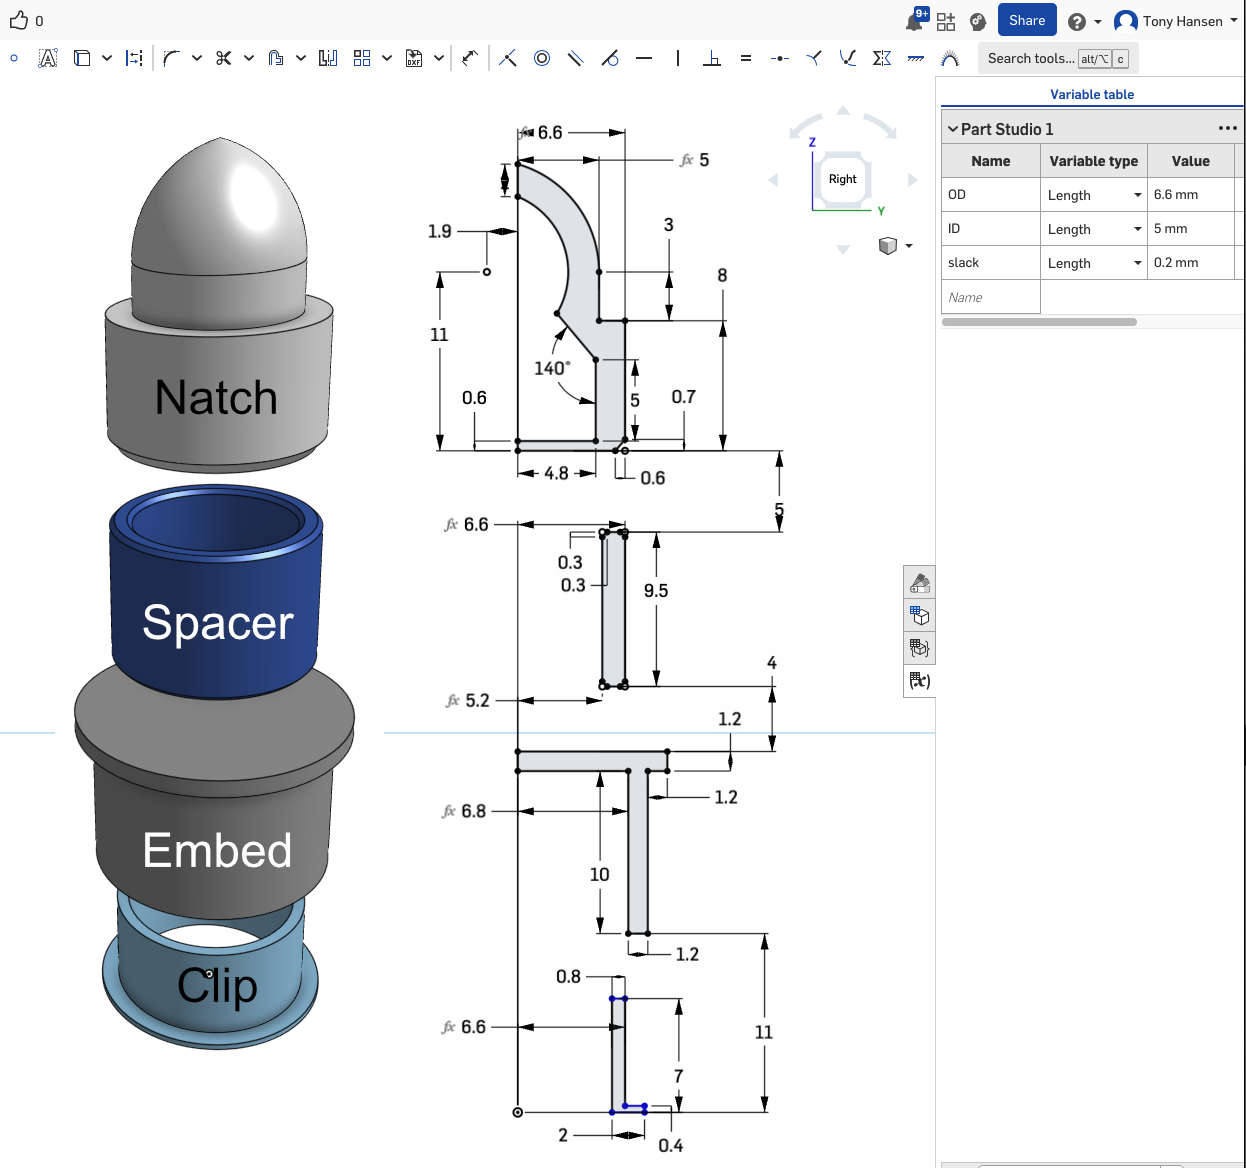
v2 Digitalfire Mold Natches in OnShape
These are even better than before
Available on the Downloads page

This picture has its own page with more detail, click here to see it.
Until now, I have done these in Fusion 360. But in OnShape and my new dimensioning method they are even better. If you are a hobby maker like me, then OnShape is free. This updated design only has three parameters: ID (inside diameter), OD (outside diameter), and slack (addition or subtraction for a good fit).
Print all four of these at the same time. Repeat cycles of adjusting the slack parameter and printing again until they fit into and over each other well (the better quality your printer to smaller the "slack" dimension can be). Print them in multiples of seven: Two natches, two embeds, two clips and one spacer (these are the proportions in which you will be consuming them).
An advantage of OnShape is that it enables sharing; the link is below. To 3D-print it select all four, right-click on one of them, export to 3MF format, open that file in your slicer software, position (and replicate/orient items), then print or export to a G-Code file.
Videos
Links
| Typecodes |
3D printing problems
3D design and printing for mold making in ceramics bring exciting new capabilities. Awareness of the issues and knowing how to mitigate each is a must. 3D is resetting all fabrication industries and engineers are solving every problem, you can too. |
Got a Question?
Buy me a coffee and we can talk

https://digitalfire.com, All Rights Reserved
Privacy Policy

