3D printing problems
3D design and printing for mold making in ceramics bring exciting new capabilities. Awareness of the issues and knowing how to mitigate each is a must. 3D is resetting all fabrication industries and engineers are solving every problem, you can too.
Related Information
Poor plaster release from 3D printed mug handle case molds

This picture has its own page with more detail, click here to see it.
My objective was to continue skipping the making of a rubber case mold and 3D print them directly. Since 3D printed surfaces naturally part well from plaster and the artifacts, although visible, do not show on the final fired pieces, I even wanted to do this whole process without any sanding or oiling. However, despite printing a dozen or more variations, carefully controlling plaster/water ratios and waiting/mixing the recommended time periods, few good plaster molds were extracted without corner-breaking. Even painting the inner surface, oiling over it and beveling corners did resolve this issues. It seems that a combination of the printing artifacts, sharp corners, the handle perpendicular (because of the oval cross-section) and the inside negative shape all enabled the plaster to get a very firm grip on the PLA print. Although I could have resorted to a heat gun to soften the PLA material enough to pull it away I relented and decided to switch to making a block mold (for rubber) rather than a case mold (for plaster).
Warping during a large print - one solution is multiple pieces
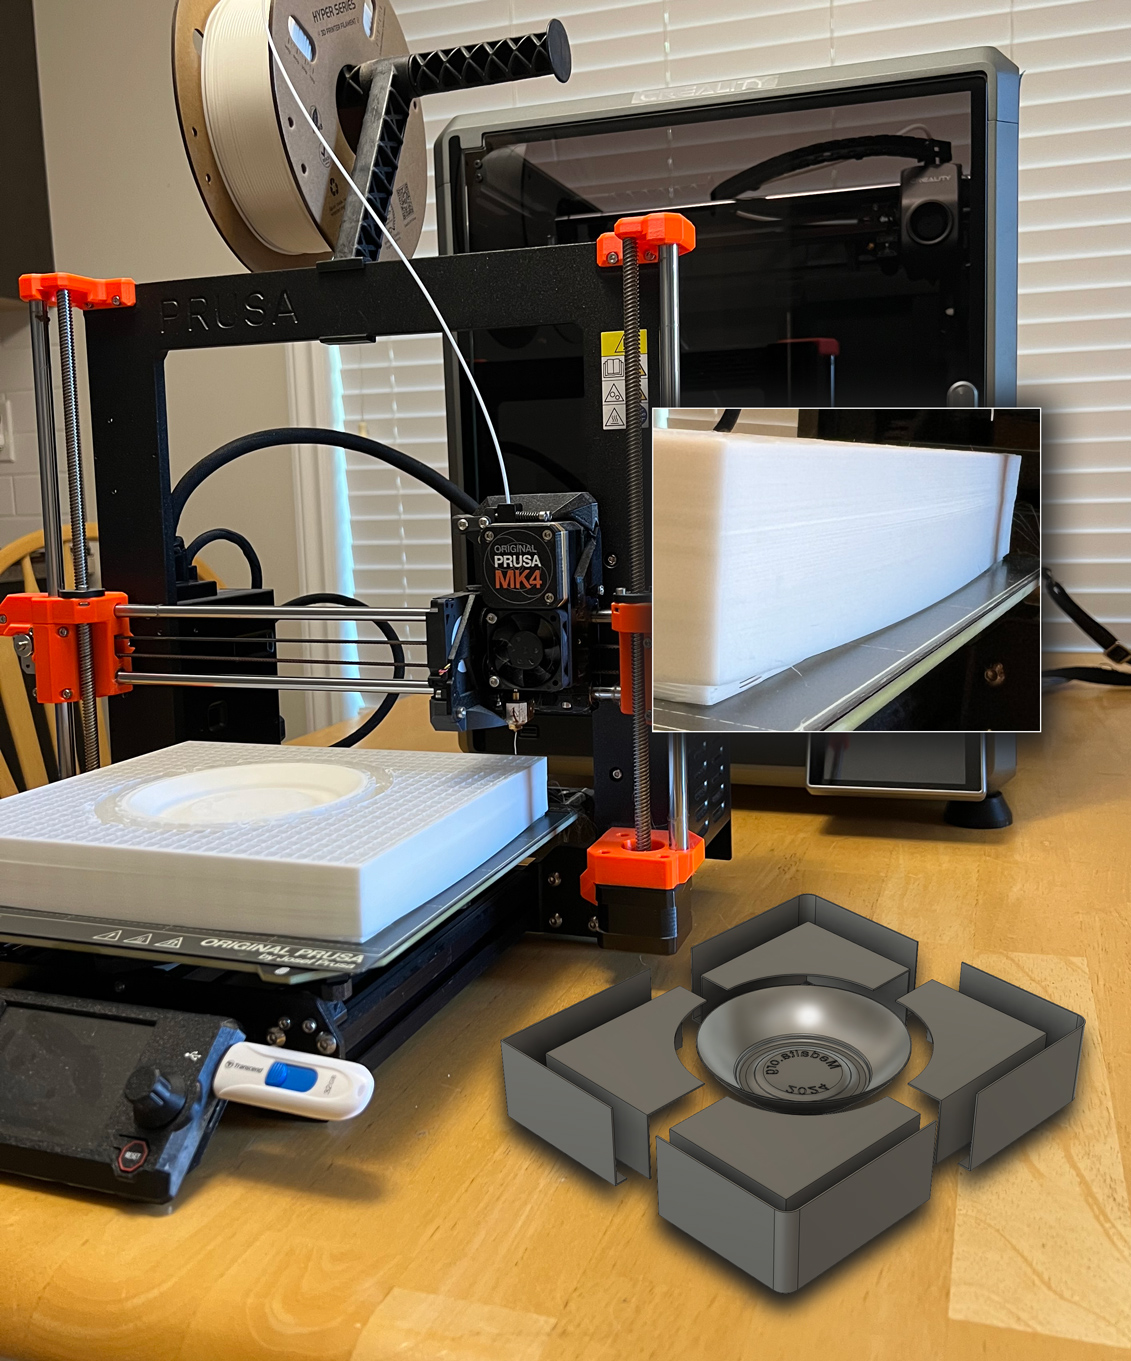
This picture has its own page with more detail, click here to see it.
I am attempting to 3D print a shell for making a rubber block mold (the base of a Medalta ball pitcher). This is almost at the limit of what will fit on the print-bed. It would take 30 hours. But at about 10 hours it did this: All four outer corners warped upwards. I have a larger printer but it will do the same thing! What is the solution? Cut it up into smaller pieces and print each of them at the best orientation (bottom right), this saves significant printing time and achieves better quality. For this piece, the inside surface on the center section is most important, printing it upright with printed support took about 4 hours. All the other pieces print in about 1 hour each. Tape (either masking or MicroPore) can be used effectively to hold everything together for super-gluing or epoxy. Much of the tape can be left in place during the pour. The rubber form has thin 1cm walls, but these are supported by side-rails when plaster is poured.
Infill and support issues with 3D PLA prints

This picture has its own page with more detail, click here to see it.
Top: The left one has a rectilinear fill, the right a square grid fill. Notice the fill on the left has buckled part way up - this piece is too tall for that type. While the grid fill on the right is far more stable, it is not as easily removed (although it can stay in place here).
Middle: The piece on the right printed in half the time because the only fill needed is at the bottom. The fill is rectilinear and easily removed - it affects the smoothness of the surfaces but they are not a finished ones so it does not matter. However that method is risky, notice the failed print on the lower right - upward pull of the flat section pulled it away. This happened twice more so I chalked up the one success to luck.
Bottom: Took about 16 hours. Like others, the grid of printed support out past the edge - that part has to be cut away with a sharp blade knife to enable mating with the other pieces.
Assorted problems with 3D printing PLA molds

This picture has its own page with more detail, click here to see it.
I am 3D printing a block mold - rubber will be poured into it to make a case mold for beer.bottles. It is an amazing process but there are still issues to deal with:
-Stringing (top left). This usually happens when the nozzle is running too hot. This new batch of filament needs a slightly lower temperature, so I adjusted from 215 to 207.
-Size constraints: This is too big to print as one mold so it has to be done in multiple sections (two mains, two end-caps). Pieces fit precisely and can be glued or taped.
-Experience shows where glue, tape or special brackets (e.g. corners lower left) are needed.
-Special tools must be made (lower left is a clip-insertion tool).
-Corner lifting: Happens mid-print (the large thin pads on the lower right are to prevent that).
-Pressure bowing: The stabilizer bars spanning the two mid-pieces (lower left) and the triangular lip (upper right) keep that edge straight despite pressure from the liquid rubber inside.
Warping of PLA under heat of plaster set

This picture has its own page with more detail, click here to see it.
When cutting a larger object into multiple pieces it is important to have an assembly plan.
In this case I have glued at the pieces together (and filled and sanded the joins) and plan to fill the two on the left with plaster to make them rigid.
I should have 3D printed inserts to cap these ends instead. The printer can produce a very precise fit and they can be super-glued in.
Glue-sticking the 3D printer bed for better adhesion

This picture has its own page with more detail, click here to see it.
Many objects are unprintable due to plate adhesion issues. Some objects print successfully when done alone, but doing many of simultaneously can fail when one releases mid-print. In these cases, objects can be guaranteed to stick using a hot bed PVP glue stick like this one from Amazon (even a paper glue stick can be used, it sticks pieces even better but does not apply as evenly).
-When applied to a heated bed using long strokes it goes on evenly and dries hard.
-It can be washed off and replaced after several prints.
-The glued surface sticks pieces very well, this enables reducing the area of contact and lightening objects (giving success even when the slicer issues a "low bed adhesion" print stability warning. For example, these spacers and clips would normally release from an unglued plate.
-Objects having a large contact surface may not be removable without damaging them or the plate. Or, pliers may be needed to pull objects off (flat-bottomed pieces giving the most difficulty).
-The ten clips (right) are quite delicate, having 0.8mm walls and 0.4mm thickness base flanges. When adhesion is too great these can be damaged when removed with pliers, when not enough they release during printing. We adjust for this by increasing flange diameter when adhesion is too low and reducing it when it is too high.
3D-printing artifacts on a slip cast M370C bottle. A problem?

This picture has its own page with more detail, click here to see it.
Here is why the stair-casing artifacts in 3D printed items are not the problem many people think. These are stonewares fired at cone 6 oxidation. The dark one is M370C with 10% added raw umber. The other is M370C. Both are glazed using GA6-B Alberta Slip amber transparent. The wood-grain texture on the right is an artifact of 3D-printing. Strangely, that is the bottle people want! But the production prototype bottle is the one on the left and the stair-casing is barely visible because of the dark fired color of the body. Of course, these are prototypes; block molds could be 3D printed and plaster case molds cast from them - that would provide an opportunity to smooth the surface before casting working molds.
Why 3D design and printing is a better way to make slip casting molds

This picture has its own page with more detail, click here to see it.
I dread the traditional mold making process, the mess, all the supplies and tools involved. I am a potter, I make functional ceramics. I am not a mold-maker, but 3D design and printing have put it within my reach. This way more fun! There is no stopping this, it’s the future.
-I spend most time on design, pouring the plaster or rubber takes minutes.
-Many fewer tools and supplies are needed, the process is less messy, as easy as downloading a file, printing it and pouring in plaster - this is doable in my kitchen! I don't even need mold soap!
-Sanding of flat mating faces is possible (for better seams than I've ever had). This is because natches can be added later (using embeds).
-I can make my own natches and interlock schemes.
-No spare is needed, the 3D-printed pour spouts work better.
-The range of shapes seems limitless. Especially because designs can be split up into pieces, each printed in optimal orientation (and glued together).
-I make molds through multiple design-print iterations. 3D makes do-overs or changes in design as easy as a reprint and plaster-pour. So, I can make a mold just to test an idea!
3D Printing Artifacts on a Bowl Model.
When are these a problem? When are they not?

This picture has its own page with more detail, click here to see it.
3D printing is resetting and revolutionizing all fabrication industries. It brings exciting new capabilities, especially in ceramics. Each disadvantage is being addressed and solved. This stair-casing in the surface, or more correctly termed "printing artifacts", is often cited as a reason for not even considering the process. But here is why that view could rob you of a great opportunity:
- For prototype molds (which are so much easier using 3D techniques), this issue can be completely ignored.
- Even in production, this can be tolerated when opaque glazes hide it and when routine ribbing and sponging reduce it to a non-issue.
- Only certain parts of most pieces exhibit this issue, the more vertical surfaces (and fully flat ones) are smooth. Further, since this is a jigger mold, the inside shape is formed by the rib and is smooth. Likewise with slip casting molds, the inside surfaces are pour-formed, and thus smooth.
- For production molds, 3D printing is just the first step to creating plaster or rubber case molds. During the multistep process, the artifacts can be removed. For example, this is a plaster model of the outside shape of the piece; it is part of a hybrid mold (attaching to a 3D printed clamping baseplate and mating side rails). Thus, this can be tooled completely smooth (before soaping and use in making production molds).
- In some cases, the artifacts actually add to the aesthetics of the final piece and can be amplified with the right glazes.
- We have not noted release issues on molds having artifact surfaces when slip casting clays of sufficient plasticity are employed.
Realistically, the new capabilities of 3D address traditional mold making process weaknesses that we have always just accepted. This new technique brings capabilities into the hands of even a hobby potters that seasoned mold makers only 10 years ago would envy.
3D printer printer poop

This picture has its own page with more detail, click here to see it.
A lot of waste can be generated when objects are printed in multiple colors. Often the color is changed for every layer, or even multiple times per layer, purging the printhead hundreds of times. The wasted amount can far exceed what is used in the object; it is just squirted out the back into a bag. People who run rooms full of dozens of printers churning out action figures to fill orders often don't even see this waste as worth mentioning!
The material shown in this picture is not technically printer poop, it is just failed prints and supports. Much of this is a result of my mistakes and poor planning. But I am getting much better. I make models that print quickly and are as light and reusable as possible, ones that you open in a CAD package and edit yourself, ones with a design history and support pages, projects, videos, etc.
An editorial: 3D Model sites are an obstacle to DIY and environmental responsibility. Their FAQs make no mention of earth impacts of printing plastic. They often ignore the issues of printer poop, model weight, infill and support waste, excessive print times and the likelihood of print failure on many models. They foster the STL file format so that wasteful models are not easily edited.
Links
| Glossary |
3D-Printing
Standard 3D printing technology (not printing with clay itself) is very useful to potters and ceramic industry in making objects that assist and enable production. |
 PayPal | No tracking, No ads, No paywall, No transient content! Just organized, concise information constantly updated and improved. Was this helpful? Consider supporting me. |
Got a Question?
Buy me a coffee and we can talk 

https://digitalfire.com, All Rights Reserved
Privacy Policy