A cereal bowl jigger mold made using 3D printing
Beer Bottle Master Mold via 3D Printing
Better porosity for Brown Sugar Savers
Build a kiln monitoring device
Celebration Project
Coffee Mug Slip Casting Mold via 3D Printing
Comparing the Melt Fluidity of 16 Frits
Evaluating a clay's suitability for use in pottery
Make a mold for 4-gallon stackable calciners
Make Your Own Pyrometric Cones
Make your own sieve shaker to process ceramic slurries
Making a high quality ceramic tile
Making a Plaster Table
Making Bricks
Making our own kiln posts using a hand extruder
Medalta Ball Pitcher Slip Casting Mold via 3D Printing
Medalta Jug Master Mold Development
Mold Natches
Mother Nature's Porcelain - Plainsman 3B
Mug Handle Casting
Nursery plant pot mold via 3D printing
Pie-Crust Mug-Making Method
Plainsman 3D, Mother Nature's Porcelain/Stoneware
Project to Document a Shimpo Jiggering Attachment
Roll, Cut, Pull, Attach Handle-making Method
Slurry Mixing and Dewatering Your Own Clay Body
Testing a New Load of EP Kaolin
Using milk as a glaze
Yixing Teapots
Cookie Cutting clay with 3D printed cutters
Making cookie cutters is one of the easiest ways to get into 3D printing. Drawing them in a CAD program consists of creating a sketch of the profile on the X-Y plane, offsetting it outward by 0.8mm (assuming you have a 3D printer that does a 0.4mm wide line), offsetting it outward again by about 5mm, then extruding the 0.8mm face upward as the cutter (usually about 1.5-2cm) and join-extruding the 5mm face upward 2-3 mm (to give cutter strength and rigidity). Then just print it with the heavy side down.
Related Information
Making complex ceramic tile shapes by 3D printing your own cookie cutters

This picture has its own page with more detail, click here to see it.
This was done on an affordable RepRap printer. The red plastic templates were drawn in Fusion 360 and sliced and printed using Simplify3D. A wooden block was used to press these cookie cutters into the clay. The plastic wrap made sticking a non-issue (and rounded the corners nicely). Commercial bottled glazes were applied to this low fire talc body by brushing (in three coats) after bisque - the rounded corners make brushing easier. The tiles were fired at cone 03. This is an old classic design that I discovered when researching Damascus tile. The toughest obstacle was learning how to use Fusion 360. It turns out that cookie cutters are a starter project for many 3D software packages, there are lots of videos on making them.
A 3D-printed stamp cut and embossed this clay in one step

This picture has its own page with more detail, click here to see it.
This is about 4 inches in diameter and 5/8 inch thick. By laying plastic wrap over the clay and then pressing the cookie cutter down onto that the nice rounded contours were created.
Large cookie-cutter 3D-printed in four pieces

This picture has its own page with more detail, click here to see it.
These four sections were glued together to make a larger one. The plastic wrap (top left) rounds the corners. This method makes it possible to quickly precision-cut the shape for making many pie-crust mugs at a time. Later, I reprinted these templates on a better 3D printer so the vertex holes (top right) cut larger and are better formed (these holes are important, they enable the folds to overlap naturally at the corners). For thin-walled pieces like this, it is necessary to use a highly plastic clay so that when the board is flipped, the four sides fall downward against the mold without ripping (I have a tissue under each to assure that none will stick to the board during flipping). The overlaps are simply glued with slip (no scoring is needed). As soon as possible, each piece is turned over to ensure even drying. These almost never crack no matter how fast they are dried. Incredibly thin-walled pieces can be made.
A giant cookie-cutter for slab built mugs
View and print it now using the Downloads page link
Available on the Downloads page
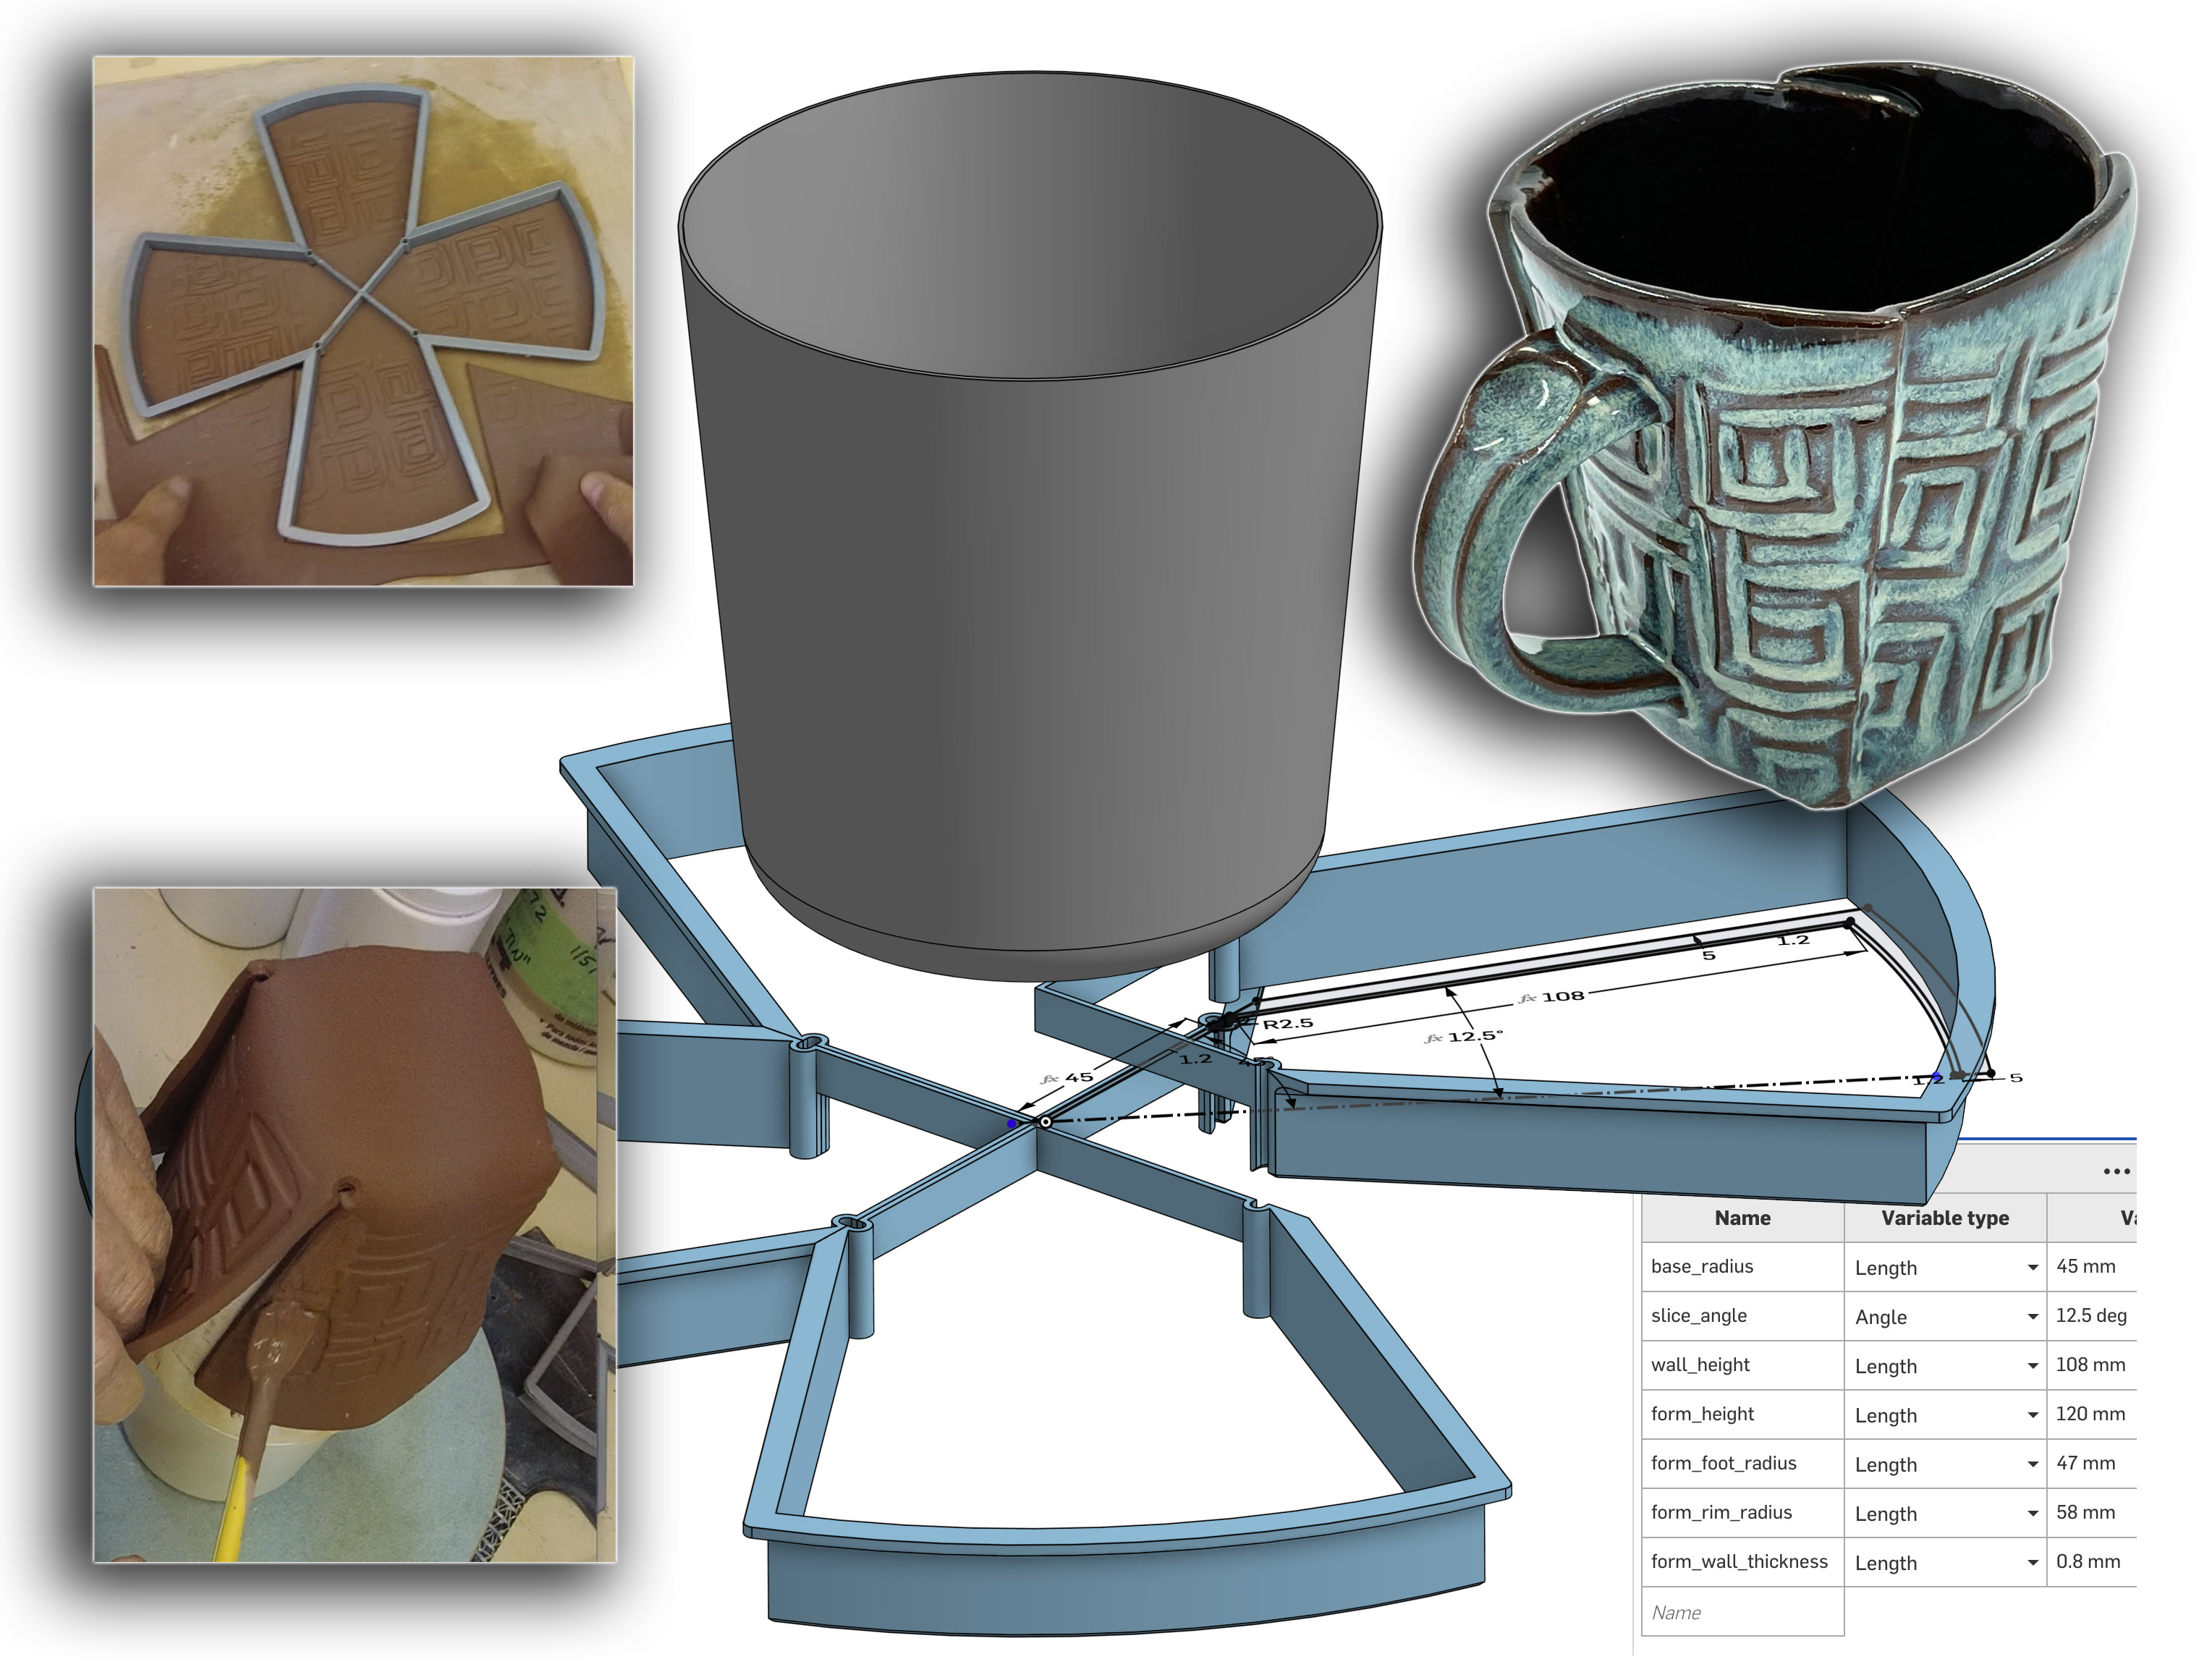
This picture has its own page with more detail, click here to see it.
3D print four of these and glue them together to make a large cookie cutter for producing slab-built mugs. 3D print the cup, fill it with plaster and remove the PLA using a heat gun. Roll out a thin slab of clay, press the cutter into it using a round wooden batt, make sure it is not sticking to the board and flip it over onto the plaster form. Handles can even be attached while it is on the form. If clay is plastic it can be used quite stiff. Experiment, adjust sizing and dimensions and reprint to fine-tune.
This has been drawn "parametrically" with OnShape. I only had to draw half of one of the quarters (I mirrored that, extruded and then did a circular pattern of 4). The downloads page (link above) has a free link to view this drawing at OnShape.com. To 3D print, right-click the part (from the list on the lower left, "Quarter 1" and "Cup"). Choose the Export option and select 3MF as the file type (it should go to your downloads folder). Open it with your slicer and print (turn the quarter over and make four). You can even export in formats that other CAD software can open. Better yet, import it into your OnShape account to see the design history and change multiple aspects of the geometry in the variables panel (the drawing will adjust automatically). Other dimensions (e.g. cut depth) can be edited manually. Parametric design is revolutionary and it is now accessible even to hobbyists; it fits my try-it, adjust-it and try-it-again way of working.
Making my own sandstone to match Karnak, Egypt

This picture has its own page with more detail, click here to see it.
The tiles are made from 45F, an iron-stained feldspathic sand layer in a nearby quarry (it also contains kaolinite). I add 4% Veegum to give it enough plasticity for rolling, stamping and cookie cutting. This material has already experienced the weathering and transport process that our sand-making planet knows how to do. The next step is millions of years of being buried deep enough to get compaction and some heat, then enough dissolution to form precipitates capable of cementing the quartz grains together. I am cheating by using more heat, enough to soften the feldspar to enable it to bond the quartz grain contact-points and fill the pore space between them. The trick is to fire low enough that it does not become a metamorphic but high enough for good bonding. 2000F is doing that, giving this tan color and sandstone surface. Almost 4% shrinkage is also occurring during the firing, synthesizing the compaction process of the natural material.
Make multiple cookie cutters for the best result

This picture has its own page with more detail, click here to see it.
Using the "create pattern" function of my CAD software, Fusion 360, I created a grid of duplicate cookie cutters. That enables 3D-printing up to 25 at a time. While it is impossible to remove them while the clay is soft I can leave them in the cutters overnight, the next day they just drop out. Creating the rounded top edges is easily done first using a little stretch wrap as shown, then it is just a matter of pushing the cutter the rest of the way through and setting them aside to dry. This method creates a high-quality edge finish. Of course, the embossed design was first stamped into these Polar Ice porcelain tiles using a letterpress plate.
Video: Create a cookie cutter/stamper in 3D software, print it and use it

This picture has its own page with more detail, click here to see it.
This cookie cutter can both cut and stamp the piece (notice the 3D render in the centre, the logo is 2mm lower than the cutter around the outside). We make them by rolling a slab to 3.2mm (1/8in) thick, applying stretch wrap over it and then pressing the cutter/stamper into it (using a wood block). Then just peel away the plastic and the outer waste clay and a perfect crest is left. This method enables using clay of almost any stiffness. We find that softer clay works best, just peel it up from the board, apply slip to the back, position it on the side of the leather hard ware and press it down (from the centre outwards). On the lower right is a crested mug that has just been glazed. Upper right is a crest that has been glazed and fired. About the cookie cutter: We create them with 0.8mm wall thickness (twice the width of the 0.4mm extruder on the 3D printer). We export the vector image (made in Illustrator) into Fusion 360 and then add elements to stabilize and hold the profile in place. This cutter is 8mm tall, and the stamp lines are 5mm tall. The crest is 52mm (2 in) wide. This whole process may sound a little intimidating to you - but we are working on a step-by-step video.
3D-printed cookie cutters used to make this tile design

This picture has its own page with more detail, click here to see it.
Only three tile shapes were needed. The fish cutters were 3D printed to both cut and stamp at the same time. Multiple slightly different sizes of the triangle and trapezoid were made to accommodate irregularities and keep joints tighter. The clay is M340 and the glazes are Amaco Celadons and Potter's Choice (for brushing). These are small and we found that a good way to paint them was to glue them down to a plaster slab with a few drops of glaze (it was easy to scrape off when the three coats had dried).
Magic tile assembles organically, never creating a pattern
Available on the Downloads page

This picture has its own page with more detail, click here to see it.
This is the most complex shape known that can fit together organically, without a pattern (dubbed the Einstein tile, it was discovered by mathematicians in 2023). It has six sides of 1 unit length, six of 1÷1.73205080757 and one side measuring twice the latter. Placing the tiles is tricky because it is only logical to seek a pattern, but there is none. One method is to start with a center tile and move outward in a spiral, being ready to backtrack and place them upside down when a piece cannot be fit. The tile shape is a product of connecting four identical irregular pentagons - each made by cutting a regular hexagon into three pieces. To achieve the maximum precision, 3D print multiple cookie cutters and let them stiffen and shrink in the cutters. To round the upper corners use stretch wrap) when stamping (print cutters in both orientations if doing this). Tiling a floor or wall will present issues with the number of edge tiles that need to be cut. However, cutting at least some custom edge shapes is practical because only 90 and 120 degree angles are needed.
Making ceramic "stones that cry out"

This picture has its own page with more detail, click here to see it.
Jesus said: “I tell you, if these remained silent, the stones would cry out.” That was my que to make these clay stones - after all, fired clay is technically a man-made metamorphic rock. I make these by the hundreds on about 20 spiritual topics and give them to people I travel with on the bus to work (my idea of “spiritual” is the seeking of credible answers to life’s ultimate questions). First, I choose a clay (my favourites are MNP or MNS, usually with stains added). Next I make the design - this can be as simple as stamping it into a piece of soft clay using a custom letter press plate. Or, rolling a slab and cutting and stamping rocks using 3D-printed cookie cutter stamp combination. Or, I form the rock using a black-stained porcelain, apply a white engobe at leather hard and when that firms up I decorate using a colored underglaze. When that firms up I finish the design by carving lines through to the black using a sgraffito tool. Next, I fire them to stoneware temperatures, 1200-1300C, and then apply a white low temperature glaze to the back and fire that to 1000C. Finally I apply a custom on-glaze ceramic decal of a QRCode and fire a third time to 800C (the code goes to a web page I make). The result is an almost indestructible rock that will cry out for a thousand years.
Links
| Media |
3D Printing a Clay Cookie Cutter-Stamper
Create a clay cookie cutter by exporting a vector image from Illustrator into Fusion 360, adding width to lines and extruding them to form the cutter, stamp and base |
| Media |
Design a Triangular Pottery Plate Block Mold in Fusion 360
Lilly will take you step-by-step through the process of parametrically drawing a triangular plate with curved sides and rounded corners, for 3D printing to pour a plaster working mold. |
| Articles |
Hire Us for a 3D Printing Project
There are lots of resources here to help yourself, but if necessary we can help you individually. |
| Glossary |
3D Design
3D Design software is used to create dimensionally accurate objects by sketching 2D geometry and transforming it using tools to rotate, extrude, sweep, etc. The software generates the polygon surface. |
| Typecodes |
Mold making using 3D printing
An ordinary consumer 3D printer has many exciting possibilities for making many types of molds, it is a place where people having both artistic and mechanical abilities can get a double the dopamine! |
 PayPal | No tracking, No ads, No paywall, No transient content! Just organized, concise information constantly updated and improved. Was this helpful? Consider supporting me. |
| By Tony Hansen Follow me on        |  |
Got a Question?
Buy me a coffee and we can talk 

https://digitalfire.com, All Rights Reserved
Privacy Policy