Wedging
The process of mixing a plastic clay by hand before forming it. Similar to kneading of bread dough, it is considered an essential step by most potters.
Key phrases linking here: wedging in, wedged in, wedge in, wedging - Learn more
Details
Wedging soft, plastic clay is similar to kneading bread dough. Clay tends to set up over time. And the growth of mold can discolor the surface and cross-section and create non-homogeneous stiffness across the matrix. The process of wedging loosens it (if it has stiffened) and evens it out. It is not uncommon for a clay to soften quite dramatically on wedging, this is thought to occur because of the mobilization of water between the flat particles of clay and the disruption of stable electrical charge patterns between water and clay that develop over time. Wedging tends to line up the flat clay particles concentric to the center of the mass allowing them to slip over each other more easily in that direction. When clay is wedged well before throwing, it is much easier to center it (avoiding a wobbly piece during throwing). Likewise, hand-built pieces will warp less and dry more evenly when the clay is thoroughly kneaded before use.
Wedging is also important before using soft extruded clay, both immediately out of the pugmill or after aging. In addition to the above-mentioned factors, pugmills produce particle patterns that create "laminations" concentric to the center, these leave stresses within seeking relief (that later can produce drying and firing cracks). The wedging process effectively removes these laminations. Of course, if clay is stiff (e.g. for sculpture or architectural pieces), it will not be possible to wedge.
Wedging is remarkably efficient at mixing clays (of color, texture, stiffness). This is especially so if the mass is halved and layered first. Each cut doubles the layers. Thus 8 cycles produces 256 layers. 20 cycles will produce 1,000,000 layers! Clays of completely different colors, even black and white, can be mixed so effectively that no visible remnant of either remains. Likewise, plastic clays of very different stiffnesses can be quickly and completely blended to an intermediate.
The term "wedging in" normally refers to mixing an aggregate such as sand or grog into a plastic clay body. This can also be done using a layering technique. Cut the plastic clay lump into slices and stack them, sprinkling some of the particulates at each layer. Then flatten the mass, cut it vertically in two and stack the halves (to create four layers). Continue the vertical cut and double-layering a dozen times. If more grog remains to be added repeat the process. When it is all mixed in finish by wedging to a homogeneous mass. Manganese granular is commonly added to clays for fired speckle, typically at about 0.2% of the dry weight. Since plastic clay is always around 20% water it is easy to calculate the amount needed.
Related Information
16,000 layers yet still not mixed! What now?

This picture has its own page with more detail, click here to see it.
First I interlayered soft and stiff clay slabs (giving eight layers total). Then I repeatedly sliced it vertically, flattening the two pieces and layered them, each time doubling the number of layers. After eleven times it has 16,536 layers. Yet it is still not mixed! 30 seconds of wedging is all it takes to finish the job. Wedging is a very effective mixing technique.
Laminations in unwedged clay
This picture has its own page with more detail, click here to see it.
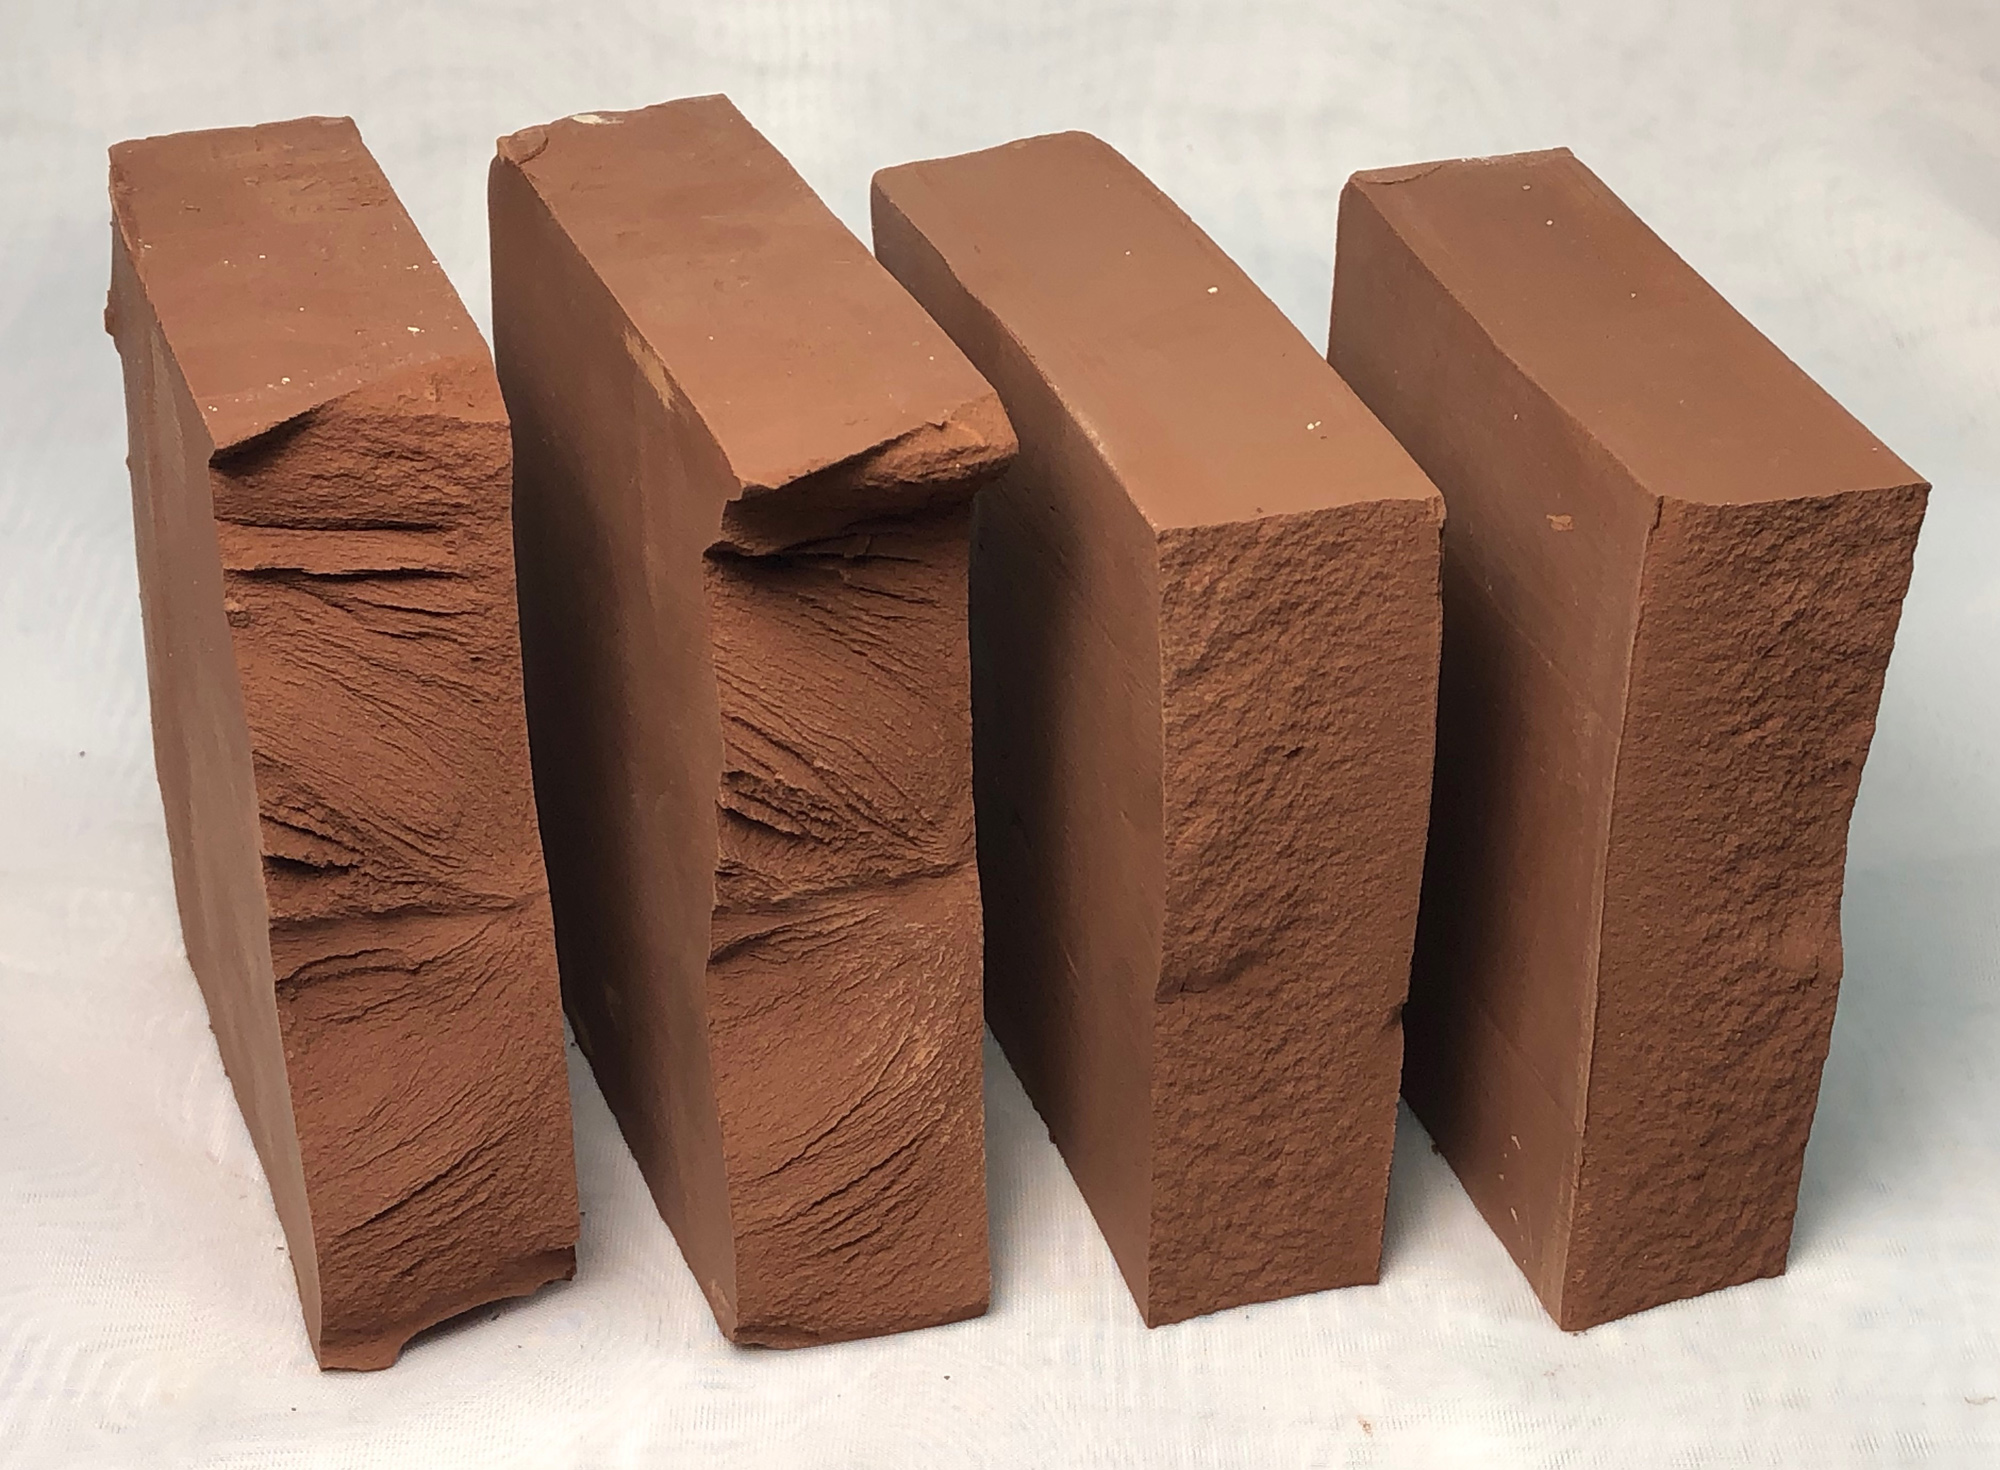
The brick-halves on the left cracked in two during drying, the crack opened at the center. I dried six of them and all cracked in the same way. The one-inch-slices were cut laterally from an extruded slug of clay and sun-dried. The radial pattern of the laminations are clearly visible on the break. These laminations are "a weakness" formed-into this extruded and unwedged clay, they would, of course, extend to fired integrity, weakening the piece. The halves on the right are from a brick that I made by first wedging (kneading) the clay, then forming and cutting it to size. It was likewise sun-dried. But did not crack. I broke it (with difficulty), notice the break followed the stresses of the breaking process, not internal lines of weakness.
Laminations in pugged clay: Wedge it or lose the ware

This picture has its own page with more detail, click here to see it.
These are cross-cuts from slugs of a production run of clay that was improperly pugged (inadequate vacuum). The problem becomes evident weeks or months after pugging. In this case the clay body contained 2% talc, our production must make doubly sure to monitor vacuum pressure at all times (or laminations will result). These are not a problem if clay is wedged well before use. If not the laminations "build in" failure points that initiate drying and firing cracks later. Even if pieces survive the drying and firing processes, weaknesses can persist making them more prone to failure-on-impact or stress. This being said, does that mean you do not need to wedge plastic clay bodies if they are not laminated? No. All clays laminate to some extent when pugged.
Another reason why clay should be wedged or kneaded

This picture has its own page with more detail, click here to see it.
Left: A high-contrast photo of a cut across the cross section of an eight-month-old slug of Plainsman M370 pugged clay. Right: A cut of a just-produced material (which will exhibit the same pattern in eight more months). You can feel different stiffnesses as you drag your finger across this clay, these are a product of the aging process combined with the natural lamination that a pugmill produces. Clearly, the older material needs to be wedged before use in hand building or on the wheel.
Is the clay too stiff to use? Maybe not.

This picture has its own page with more detail, click here to see it.
Clays of very high plasticity often stiffen during storage in the bag. This is Plainsman Polar Ice, it contains 4% VeeGum. This slug is like a brick, yet it will loosen up completely. But it is far too stiff to attempt wedging. However, simply throwing it on the floor a few times (turning it each time) will pre-soften it enough to be able to wedge. Then, before you know it, it is too soft and needs to be put on a plaster table to stiffen it before throwing.
Aged commercial clay really needs to be wedged before use

This picture has its own page with more detail, click here to see it.
This is a cut through an eight-month-old slug of pugged clay. The cut was done near the surface. The patchy coloration is a by-product of the aging process. If a slice of this was fired in a kiln, an even and homogeneous white surface would emerge, with no hint of what you see here. A few moments of wedging will mix the matrix and ready it for wheel throwing or hand forming.
Mold has appeared on the surface of an eight-month-old slug of potters clay

This picture has its own page with more detail, click here to see it.
Clay is Plainsman M370. This is part of the aging process and can appear on any clay, depending on the conditions of storage (especially if stored in a very warm place or one exposed to sunlight). On the right this material has been fired to cone 6. The spots, although dark in the wet state, are burned away during firing. Mixing these specks back into the interior of the slug can be done quickly by wedging (diminishing worries about any allergy issues).
Make your own molochite porcelain body

This picture has its own page with more detail, click here to see it.
The grogs shown here are Molochite 16/30, Christie Minerals STKO 22S and F65 Silica Sand. I wedged 150g of the molochite into 2300g of pugged porcelain (Plainsman M370). This calculates to 7.5% grog (based on 22% water content of the pugged clay). This produced the texture shown. Wedging a grog (or silica sand) into a soft clay body is easy, just sprinkle it on the table and wedge the clay over it. With each push it picks up more, the process is amazingly effective at quickly producing a homogenous material. If the clay is stiff, just moisten the aggregate. Knowing that pugged clays have about 20% water it is easy to calculate a grog addition: A 5 kg slug of clay thus contains 4 kg of powder. To add 10% grog you would add 400g. To add 10% of the total it would be 4000*10/90=444g. How much did this 7.5% grog reduce the drying shrinkage of this body? About 0.5%.
Wedge kyanite in M390 for better drying, firing

This picture has its own page with more detail, click here to see it.
Plainsman M390 with 12.5% 48 mesh kyanite wedged in. This was added to improve the drying properties while maintaining the plasticity. However, the throwing also improved! It was easier to pull up into a tall cylinder. The surface texture is only moderately disrupted by a slight graininess.
Wedging manganese speckle into a cone 6 buff stoneware

This picture has its own page with more detail, click here to see it.
Just need to make a few pieces? This is actually quite easy to do: Just wedge the clay over the granular manganese spread out on the board, when the board is clean turn the slug sideways and cut and layer about 20 times (to get 1 million layers). Then wedge normally. Only 0.2% manganese is needed (as a percentage of the dry clay). Since pugged clay contains 20% water it is easy to calculate the dry weight of this piece. For example, suppose this weighs 2 kg: 80% of that is 1.6 kg or 1600g. 0.2% of 1600 is 3.2 grams. Shown is the kind of mug I get. The outside glaze is G2934Y silky matte (opacified with tin and Zircopax) and the inside glaze is G2926BW glossy white. It was fired at cone 6 using the PLC6DS schedule.
Inbound Photo Links
 Frozen clay suffers laminations. Does that really harm it? |
 PayPal | No tracking, No ads, No paywall, No transient content! Just organized, concise information constantly updated and improved. Was this helpful? Consider supporting me. |
| By Tony Hansen Follow me on        |  |
Got a Question?
Buy me a coffee and we can talk 

https://digitalfire.com, All Rights Reserved
Privacy Policy