Side Rails
Side rails are the containment used when pouring plaster molds. We 3D-print these to custom fit each mold.
Key phrases linking here: side rails, railing, cottle - Learn more
Details
Precise railing is a key to success in mold-making for ceramics. Polycoated cottle boards are traditional for this and sold online in many places. Silcone mold housings of all types are sold on Etsy.com. This page, however, provides various examples of how we 3D-print these instead. These rails, when properly made, impose perpendicularity, precise cornering or rounding and accurate dimensions. They are the exact size needed. And the 3D-printed surface naturally releases from rubber compounds and plaster without the need for a parting agent.
Advantages we have observed:
-The potential precision enables notch-free molds.
-The ease of making them enables rails that are custom-fit to each mold being made.
-No tools or large clamps or trips to a hardware store are needed. Rails can be stored with matching mold, enabling quick assembly and casting.
-Rigid rails enable printing lighter-duty block molds (because the rails impose perfect corners and perpendicularity).
-Rails can act both to contain plaster and to create a shape that needs to fit into a cup head.
-PLA print filament produces a surface that plaster releases from so no parting agent is needed.
-3D-printed rails can wrap under a mold, keeping them securely in place during pouring.
These are best printed at the same time as the mold. It is easy to make the mistake of not printing them tall enough, to avoid this consider that they are generally used to print the case mold - and then working molds from the case mold. For best fit, print a pair and try them along both the width and length (to do that it will be necessary to turn one upside down), based on that adjust the dimensions of the other pair and print them. Better yet, if the mold is square then the rails can all be the same length and width.
Warping during printing can be an issue when printing long rails, it might be necessary to integrate pads at the ends to hold them onto the bed (and cut them off after printing).
Related Information
3D drawing of a side rail for plaster containment

This picture has its own page with more detail, click here to see it.
The parameters define dimensions of the rails. I make them as a pair like this, on is drawn and the other is reflected across the yellow construction plane. Most commonly I set the height, width and length. I send them to the slicer individually and then duplicate each to print all four. I printed these at a thickness of 1.2mm (three times the 0.4mm width of the nozzle), this produces a rigid rail that prints quickly. The vertical flange only needs to extend enough so clamps fit securely. The width of the bottom flange determines the rigidity of the corner and sides (a wider bottom flange also helps assure the rail will stick better to the heated bed of the printer).
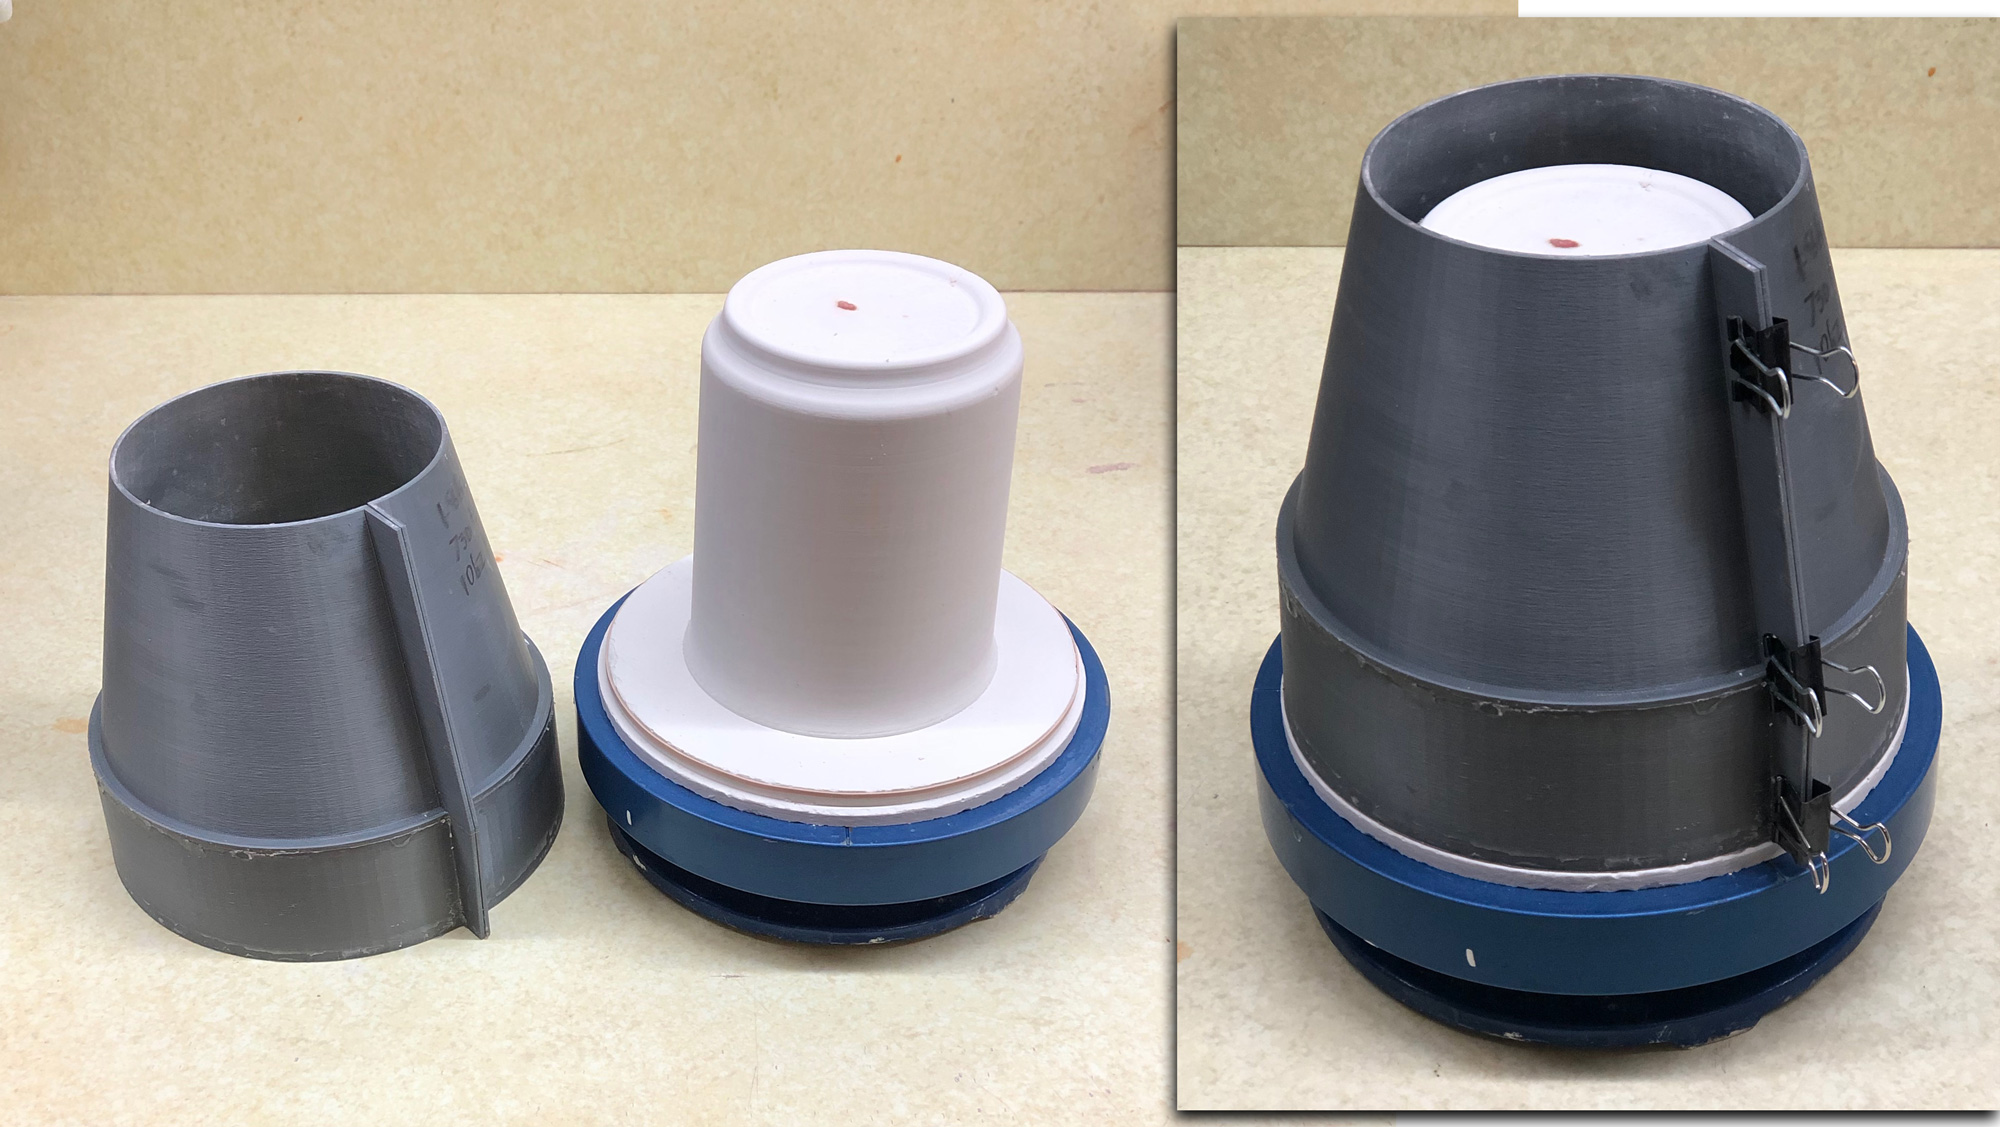
v1.0 3D-printed flanged rail to cast working plaster jigger molds
This picture has its own page with more detail, click here to see it.
The multi-use grey outer rail on the left was printed in two parts and glued together at the shoulder (to avoid the printing of support). The wall thickness is 1.6mm, actually too thick for fast printing. For v2.0 we went to 1.2mm and printed it upside down, in one piece, on a flange (this generated support but new printers to that so well that the step disconnects well and is not rough). The vertical split enables opening the shell a little after the plaster has set, quickly releasing it. The center model, of the inside contour of the mug, is integrated into a two-step base, it was made by casting the plaster inside another two-piece 3D-printed form. After removing that using a heat gun, I smoothed the plaster surface using a metal rib and trimming tool and then soaped it to ready for a pour. The mold shell is held securely in place by stretching a wide rubber band around the first step and clamping the shell into place around it. The assembly is then ready to be filled with plaster to make a jigger mold. Doing this on a turntable is also a good idea - it enables rotating it while filling and agitating after full to dislodge any air bubbles.
Vertically printed 3D side rails

This picture has its own page with more detail, click here to see it.
I made these specifically to fit this case mold. To be more rigid I printed a wall thickness of 1.2mm. The flange at the bottom fits under the mold and assures that no plaster will leak under and displace it upward (provided of course that the vertical flanges clamp together with a tight fit).
Version 2 Ceramic Beer Bottle Mold
Making a rubber case master mold

This picture has its own page with more detail, click here to see it.
This time I printed the block mold, rather than the case mold, in six pieces on my consumer 3D printer.
Top: I printed the two halves upright (creating them in the slicer rather than Fusion 360). Because the print lines run concentric the quality is so much better than the previous version printed flat. The ribbing inside made the halves strong so they did not go out of shape when filled with plaster (to give them weight).
Second: The mold halves were simply laid against each other - they mated perfectly (and stayed in place because they are full of plaster). The four rails were then clamped in place.
Third: The PLA was soaped (using Murphy's Oil Soap) and rubber poured in (Smooth-On PMC-746). The next day it easily pulled out.
Fourth: The finished rubber case mold. The sides are pretty flabby so I make them rigid using the four rails (placed upside down).
Right: Using a plaster mold created from this rubber case mold I slip-casted a bottle using my L4768D recipe, glazed it with GA6-B and fired it at cone 6.
3D design, printing and use of a casting slip test bar mold
Available on the Downloads page

This picture has its own page with more detail, click here to see it.
This is for making test bars of slip casting clays bodies for use in the SHAB test (to measure drying shrinkage, firing shrinkage and fired porosity). I designed it in Fusion 360 and 3D printed the light-duty rails and case mold. I poured plaster into that to make the two plaster working mold halves (top right). The funnels provide a reservoir so the bars be cast solid. This mold can produce a set of three bars in less than an hour.
3D-printing basic rails suitable for some pours

This picture has its own page with more detail, click here to see it.
This type of rail eliminates issues with lifting from the bed when trying to 3D-print them upright. These can be cut to length with scissors at pouring time and clamped on the flange. This type of rail is only sturdy enough for shallow pours. And when a little movement during casting can be tolerated.
Printing my own version 1 block mold in two pieces

This picture has its own page with more detail, click here to see it.
Of course, this is far too large to print in one piece on my Prusa MK4 printer so I sliced it in two and added flanges to clamp the halves together. There is quite a bit of stair-stepping artifacts on the 3D printed surface, I did not worry about smoothing it and it did not prevent casting two plaster molds. No mold soap was even needed, the plaster molds came out using compressed air. The long side rails did require some stabilization (they were flexing with the weight of the plaster).
Again, this method was only needed because I did not have a printer big enough to print the mold in one piece. Later, I did get one.
Slotted side rails enable better mold making

This picture has its own page with more detail, click here to see it.
In 3D printing of PLA molds for slip casting (especially case molds from which working molds are directly made), warping of the print is a constant problem. During printing, corners can pull up and away from the print bed (often after hours of printing). This drawing shows how slotted side rails enable sliding the mold in (this is the base of a bottle shape). The slots hold it straight. These slots also prevent the plaster from migrating around the edge and getting underneath. And they lift the print off the table enough to permit clip inserts in the holes (they hold embeds for natches in place). Notice that I have made a 1.6mm slot for a 1.2 mm mold - this was needed because the slicer has to insert printed support in the slot, this creates imprecise geometry and issues with assembly. The extra allowance assures trouble-free use (you may find it necessary to adjust this a little.
3D printing rails enables large thin-walled rubber molds

This picture has its own page with more detail, click here to see it.
We pour mold walls 10mm thick (because molding rubber, like PMC-746, is expensive and heavy). Normally a large mold like this would stretch completely out of shape when plaster is poured. But with these 3D printed rails there is no problem. This mold needs two of them. On the smaller 3D printer (top left) they need to be done in four pieces and glued together (lower left). But on the larger 3D printer they can be done in one piece (upper right). While many 3D printing tasks are better done by chopping objects up into smaller pieces and gluing them, this type of thing is an exception.
Why 3D design and printing is a better way to make slip casting molds

This picture has its own page with more detail, click here to see it.
I dread the traditional mold making process, the mess, all the supplies and tools involved. I am a potter, I make functional ceramics. I am not a mold-maker, but 3D design and printing have put it within my reach. This way more fun! There is no stopping this, it’s the future.
-I spend most time on design, pouring the plaster or rubber takes minutes.
-Many fewer tools and supplies are needed, the process is less messy, as easy as downloading a file, printing it and pouring in plaster - this is doable in my kitchen! I don't even need mold soap!
-Sanding of flat mating faces is possible (for better seams than I've ever had). This is because natches can be added later (using embeds).
-I can make my own natches and interlock schemes.
-No spare is needed, the 3D-printed pour spouts work better.
-The range of shapes seems limitless. Especially because designs can be split up into pieces, each printed in optimal orientation (and glued together).
-I make molds through multiple design-print iterations. 3D makes do-overs or changes in design as easy as a reprint and plaster-pour. So, I can make a mold just to test an idea!
Side Rails For v1 Working Mug Mold
This picture has its own page with more detail, click here to see it.
In this approach to making a prototype mold I have poured plaster into a 3D printed block mold (and done minimal surface treatment to smoothen it). This produced the plaster case case mold shown here. These side rails were made specifically to fit it. For rigidity I printed their wall thickness at 1.2mm. The flange at the bottom fits under the mold and helps assure that no plaster will leak under and displace it upward (provided, of course, that the plaster form is held tightly in place within the rails).
 PayPal | No tracking, No ads, No paywall, No transient content! Just organized, concise information constantly updated and improved. Was this helpful? Consider supporting me. |
| By Tony Hansen Follow me on        |  |
Got a Question?
Buy me a coffee and we can talk 

https://digitalfire.com, All Rights Reserved
Privacy Policy