Casting-Jiggering
A process in ceramic production where items are slip-cast first and then finished using a jigger wheel.
Key phrases linking here: casting-jiggering - Learn more
Details
The slip-casting process is well adapted for producing non-functional ware, especially having thinner walls. However it does not do well for functional pieces that require thicker walls and contoured lips (heavier cast walls have less regular wall thickness). However these issues can be dealt with by adding a jiggering step to even out the wall and round and contour the lip.
For the jiggering step to work a casting slip of adequate plasticity is needed so that clay does not tear when subjected to pressure from the template (more plastic slips need more ball clay and less kaolin, this can mean that longer casting times must be tolerated).
To jigger the lip of a piece it has to be cast in such a way that the clay extends upward from the top of the mold. The key to achieving this is 3D-printing a pour spout that and carefully placing and gluing it to the top of the mold (using slip). After draining the molds, the spout can be removed and the jiggering process done.
There are a number of complications to effectively creating this process in a studio, but with the advent of 3D printing many of these have been removed.
An interesting aspect of this process is that "weekend warrior" potters can employ it to produce ware. Within a two or three hour time window molds can be filled, poured, jiggered and pieces extracted ready for handle attachment and drying. Since these bodies normal shrink very little, drying can be done without any need for covering ware.
Related Information
Hand-tooling a mug model vs. 3D-printing a mold to cast it

This picture has its own page with more detail, click here to see it.
I am creating molds for a 2019 casting-jiggering project to reproduce heavy stoneware mugs manufactured here 50 years ago (I am not a mold maker, just a potter). I have a profile drawing I want to match (upper left). The solid plaster model on the left was my first attempt at manual tooling. The metal template was time-consuming to hand-make, its contour was difficult to match to the drawing and the plaster surface turned out rough and difficult-to-smooth. To make the plaster model on the right I 3D printed a shell, poured the plaster in, extracted it after set and then smoothed it on the wheel using a metal rib and trimming tool. It matches the drawing perfectly and the round is very true. 3D-printing is revolutionary for this type of thing! The drawings: I hired someone on Upwork.com to make them for me (using Fusion 360). The shell-mold (to cast the model) on the upper right: I printed that too, in two pieces.
My potter's wheel with aluminum cup-head and jigger mold inserted

This picture has its own page with more detail, click here to see it.
The cup-head was lathed from a block of aluminum and it attaches to the shaft the same as a regular wheel-head. Plaster molds simply drop in and sit on their shoulder. The shoulder is the only point-of-contact, this prevents chattering while the mold spins when under pressure. I am using these molds for a casting-jiggering process (or just casting). For example, I can cast a mug in the mold, then pour out the slip, wait a few minutes and then, as the wheel spins, finish the rim and inside sure using a 3D-printed template/rib. I do not actually use the jigger arm, it is easier just to hold the template in hand. I can finish the rims on any round pieces made in these molds.
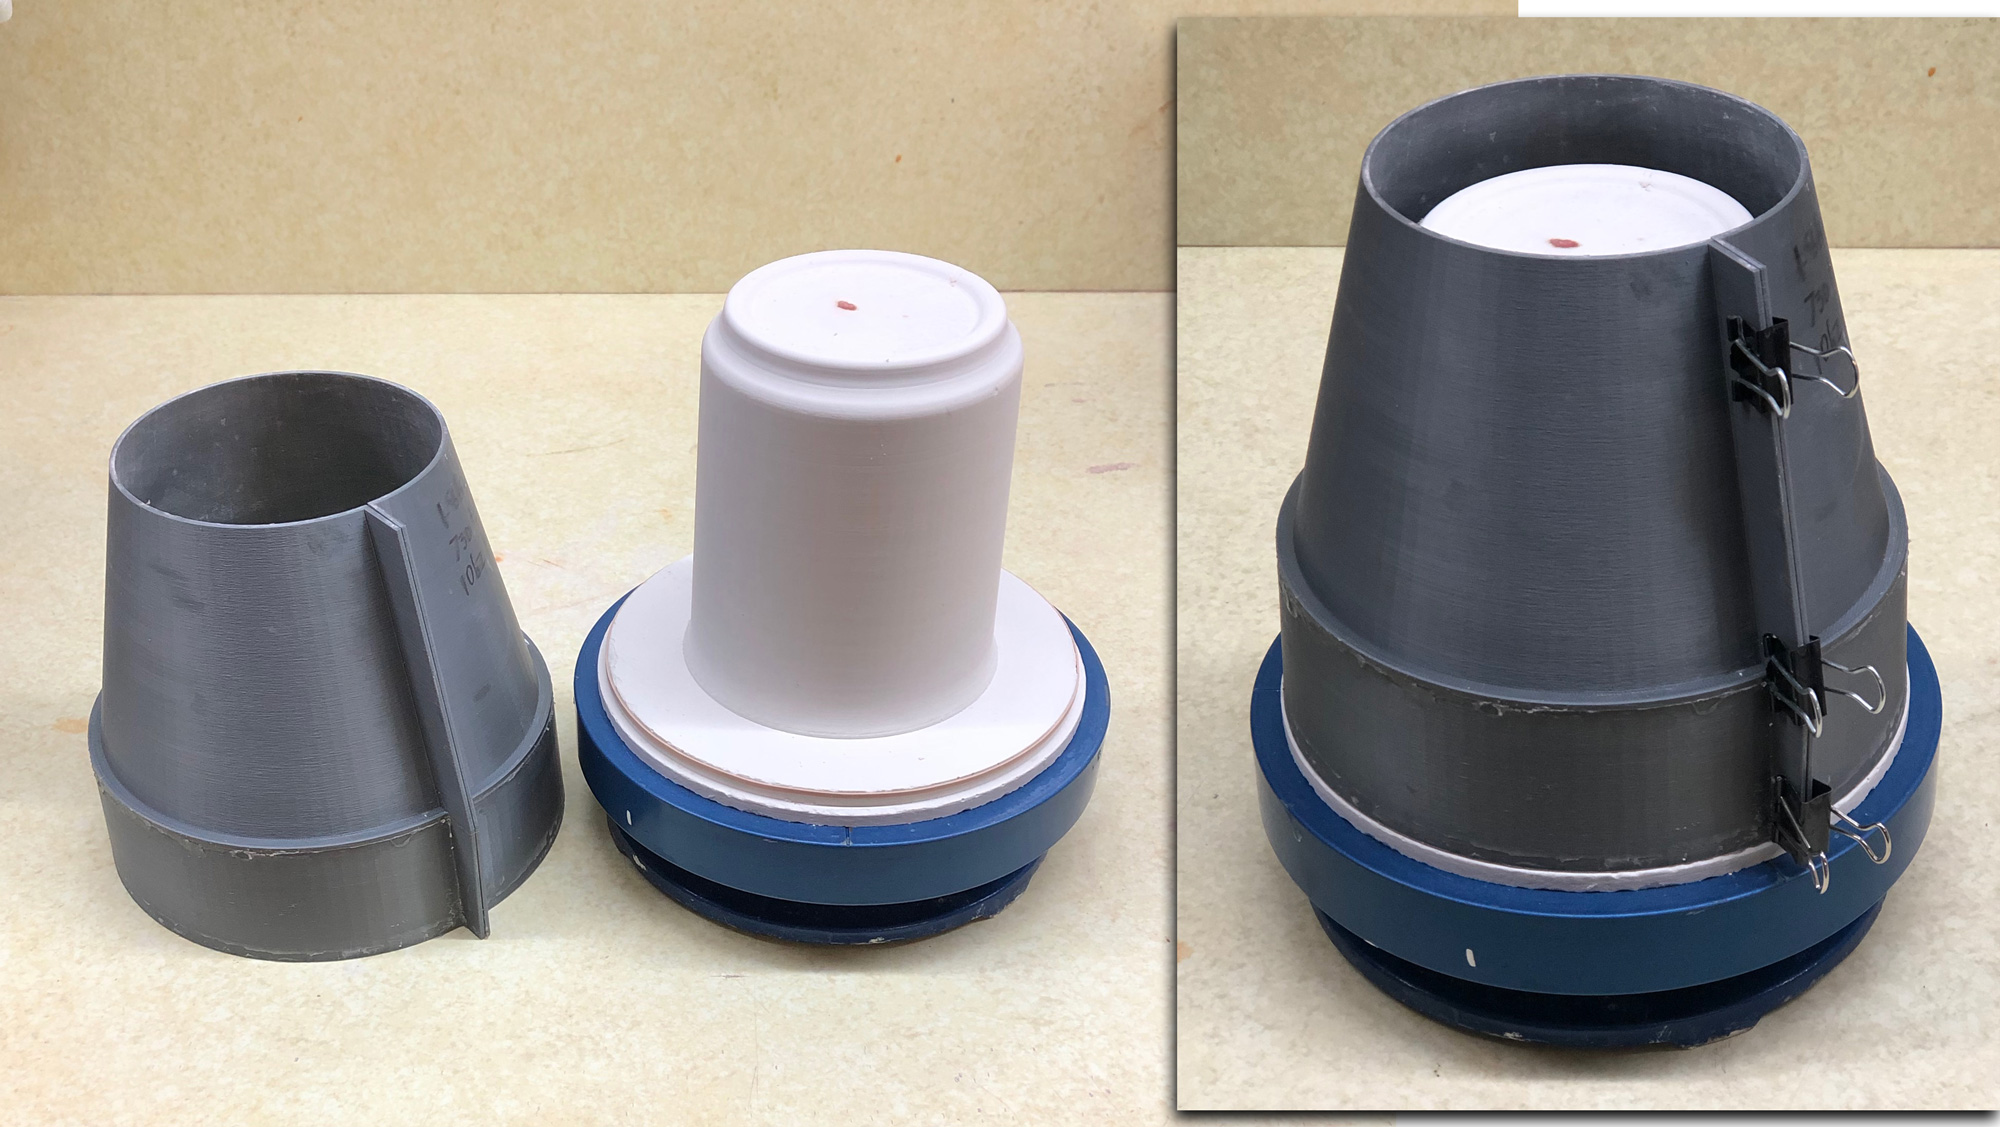
A 3D-printed pour spout on a mug jigger-casting mold

This picture has its own page with more detail, click here to see it.
I prepare to attach these by simply touching them to the top of the slip (it is sticky and coats the underside evenly). Then it is just a matter of setting it in place and and it glues down in seconds. I make these a little larger diameter than the top of the opening in the plaster mold (e.g. 2mm), producing a small overhang on the cast piece (this one has 0.8mm thick walls and prints quickly). During the time in the mold, the clay slurry creates a thickness against the plaster walls that also extends upward above the top (inside the spout). Shortly after pour-out I put these into the cuphead on the jigger wheel and make a cut and lift the spout away. This leaves an over-hang and over-height that enable finishing the rim using the jigger template.
v1.0 3D-printed flanged rail to cast working plaster jigger molds
This picture has its own page with more detail, click here to see it.
The multi-use grey outer rail on the left was printed in two parts and glued together at the shoulder (to avoid the printing of support). The wall thickness is 1.6mm, actually too thick for fast printing. For v2.0 we went to 1.2mm and printed it upside down, in one piece, on a flange (this generated support but new printers to that so well that the step disconnects well and is not rough). The vertical split enables opening the shell a little after the plaster has set, quickly releasing it. The center model, of the inside contour of the mug, is integrated into a two-step base, it was made by casting the plaster inside another two-piece 3D-printed form. After removing that using a heat gun, I smoothed the plaster surface using a metal rib and trimming tool and then soaped it to ready for a pour. The mold shell is held securely in place by stretching a wide rubber band around the first step and clamping the shell into place around it. The assembly is then ready to be filled with plaster to make a jigger mold. Doing this on a turntable is also a good idea - it enables rotating it while filling and agitating after full to dislodge any air bubbles.
Inbound Photo Links
 Casting plates, is it practical? |
Links
| Glossary |
Jiggering
Jiggering is a process of forming pottery that employs a spinning plaster mold and a tapered template to press soft clay or porcelain against it. |
| Glossary |
Throwing
The process of forming soft clay on a potter's wheel. |
| Glossary |
Casting Slip
Casting slips are among the easiest clay bodies to make yourself. The ability to make and tune your own will open many doors in your production process. |
| Projects |
2019 Jiggering-Casting Project of Medalta 66 Mug
My project to reproduce a mug made by Medalta Potteries more than 50 years ago. I cast the body and handle, jigger the rim and then attach the handle. 3D printing made this all possible. |
 PayPal | No tracking, No ads, No paywall, No transient content! Just organized, concise information constantly updated and improved. Was this helpful? Consider supporting me. |
| By Tony Hansen Follow me on        |  |
Got a Question?
Buy me a coffee and we can talk 

https://digitalfire.com, All Rights Reserved
Privacy Policy