Drying Crack
During drying clays and porcelains shrink as they become rigid. When this occurs unevenly, cracks are the result.
Key phrases linking here: drying cracks, drying crack - Learn more
Details
Cracks form to relieve stresses. Plenty of stresses occur while ceramic clays dry. This is because they shrink as they transform from soft-plastic to dry-hard, we call this drying shrinkage. 6-7% is common for plastic throwing bodies. Casting bodies, by contrast, can shrink less than 2%. In the vast majority of cases, drying performance can be improved by understanding simple concepts and making improvements in the drying process. Admittedly, it is often practical to make improvements to the clay body also (although such improvements can affect other things). Conceptually, any shape, made out of any clay, of any size, can be dried successfully if done so even enough and slow enough ("slow enough" can mean weeks or even months in some circumstances!). That being said, evenness is more important than drying speed, in fact, fast-yet-even drying results in fewer cracks than slow-but-uneven drying.
When ceramic dries it shrinks. The majority of shrinkage occurs as the first water is released. Unfortunately, that phase is also where gradients within ware can be introduced. A 'gradient' is where one part of an item (e.g. the lip of a vessel) is further along in drying than another part (e.g. the base). That means it is stiffer, possibly having shrunk the full amount to rigidity. If an adjacent section is still soft, it needs to shrink, the only way for the stresses between the two sections to be released is by the formation of cracks.
Since plastic bodies shrink more, it follows they crack more. Plastic clays have many more fine particles, these provide much more surface area between which to trap water. That means better dry strength but more shrinkage. Plastic bodies can have triple the shrinkage of casting bodies, even though the later are formed at a higher water content. The extra dry strength can, on one hand, help prevent cracks from starting. But, on the other, it can create more spectacular ones if they do start! Plastic bodies also dry slower. That enables more time for the stage of drying to differ across a piece.
Different types of clays (e.g. kaolin, ball clay, bentonite, smectite) have different characteristics (e.g. shrinkage rates, shrinkage curves, drying speed, dry strength and ability to withstand the stress, ability to terminate micro-cracks at pores and particles, etc). The most common of drying cracks is called the 'S-crack', it is a classic signal that ware is being dried unevenly. Almost always this is because the rim of the piece was allowed to get ahead of the base.
Drying cracks can also occur in grogged bodies. Grog is added to reduce body shrinkage, provide more channels for water to escape and provide points-of-termination for beginning micro-cracks. That being said, the grog can also provide points-of-weakness, especially when ware features abrupt contours, big differences in wall thickness, sharp unfinished corners or rims, rolled edges with splits, etc. Cracks in such clay can start and zig-zag their way in.
Related Information
Why do cracks across the base of ware form an S shape?

This picture has its own page with more detail, click here to see it.
This cup is being force dried with a heat gun. The speed of the drying is not the problem. I can dry this mug in minutes as long as I apply the heat evenly to all surfaces. But in this case I have dried the side walls first and the base is far behind. The first surprise is where the crack starts: It is actually the meeting of two, they each start at the outside edge (that is where the stress encounters clay stiff enough to crack). Another surprise is when: Near the end of the process the cracks suddenly grow (these photos span only about a minute). The way it which the two cracks find each other at the center produces the characteristic S-crack.
It is not the speed of drying, but how even it is
This picture has its own page with more detail, click here to see it.
Half of these Plainsman Polar Ice mugs cracked. But I know exactly why it happened! After throwing them I put them on a slowly rotating wheelhead in front of a fan to stiffen them enough so I could attach the handles quickly. Of course, I forgot them and they got quite stiff on the lip (while the bottom was still wet). I quickly attached the handles and then covered them with cloth and plastic and let them sit for two days to let them even out. Notwithstanding that, that early gradient sealed their destiny. The lesson: At no time in the drying process should any part of a piece be significantly ahead of another part.
Heavy and thick plates cracking? What to do?

This picture has its own page with more detail, click here to see it.
The difficulty of crying large plates increases dramatically by size and thickness. The better the mixing and wedging, the smaller the piece, the thinner the walls, the more even the wall thickness, the less porcelaneous the clay, the lower the drying shrinkage, the higher the dry strength and the more even the drying the fewer cracks there will be. The poorer the mixing and wedging, the larger the piece, the thicker the walls, the more uneven the cross-section, the more porcelaneous and smooth the clay, the higher its drying shrinkage, the lower its dry strength and the more uneven the drying the more cracks there will be. Do not dismiss the possibility that it could take a month or more to dry this type of piece.
Successfully guiding large bowls through drying and firing is not easy

This picture has its own page with more detail, click here to see it.
Failure is often not something specific. The greater the wall thickness variation the more difficult it is to dry and fire it evenly. The stronger the rim the better it will withstand stresses. The finer particled and more porcelaneous the body the more difficult drying and firing will be. After throwing, the longer a piece is left rim up in air the greater the moisture content difference will be between it and the base. The earlier a bowl can be trimmed the better the success. The less a soft or leather hard bowl is handled such that it goes out-of-shape, the better. The slower and more even the drying the better the success. The better the air flow and slower the heat-up through water-smoking in the kiln, the better. The more that heat can reach all sides of the piece the more evenly it will heat up during firing. The less the point of contact between the base of the bowl and the kiln shelf, the less the shelf will heat-sink it and increase temperature gradients within it.
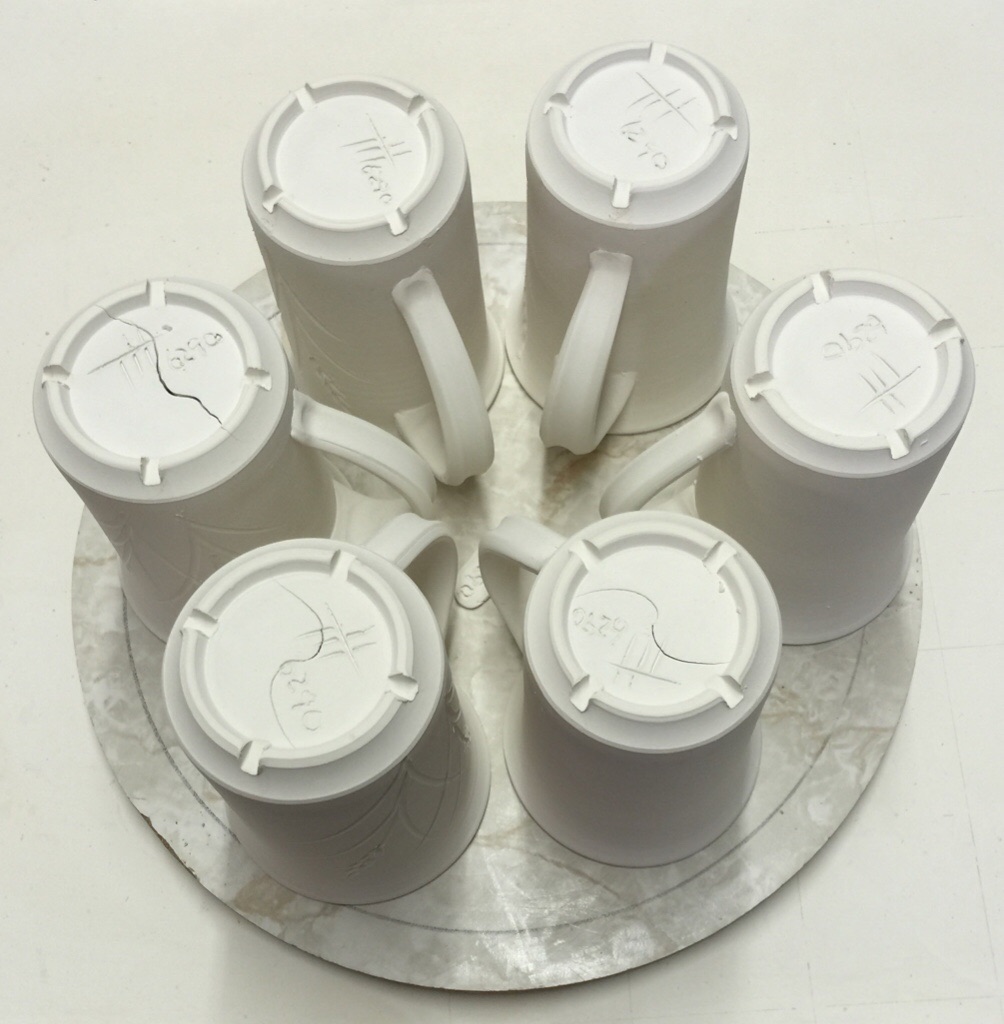
Place mugs with handles at the center and cover for drying

This picture has its own page with more detail, click here to see it.
Handles expose all sides to the air and dry (and therefore shrink) much more quickly than the walls of the mugs (especially in our dry climate). To achieve more even drying we put the handles on as soon as possible and place them like this. We also cover them by wrapping a heavy cloth over and tucking it in all around.
A typical DFAC drying disk of an iron stoneware clay

This picture has its own page with more detail, click here to see it.
The center portion was of this DFAC test disk was covered and so it lagged behind during drying, setting up stresses that caused the disk to crack. This test is such that most pottery clays will exhibit a crack. The severity of the crack becomes a way to compare drying performances. Notice the test also shows soluble salts concentrating around the outer perimeter, they migrated there from the center section because it was not exposed to the air.
How to dry these mugs evenly to avoid cracks

This picture has its own page with more detail, click here to see it.
It is important that during all stages of drying gradients (sections of different stiffnesses) do not develop in pieces. Thus I like to attach handles as soon after throwing as possible. An unavoidable gradient develops anyway because the rims need to be stiff enough to attach the handles without going out of shape too much. Now how can I stiffen these mugs for trimming and even them out at the same time? The first key is to put them on a plaster bat (as I have done here). Then I cover them with a fabric (arnel fabric works well because it flows). Then I put the whole thing into a large garbage plastic bag folded underneath to seal it. The plaster stiffens the bases and absorbs moisture in the air to stiffen the walls also. The next day every part of the piece is an even leather hard.
Why were these handles pulled an hour after the mugs were thrown?

This picture has its own page with more detail, click here to see it.
Because they dry and stiffen much faster. When the handles are glued on with slip about an hour later they are about the same stiffness as the mugs. The handled mugs, which are sitting on plaster batts, will then be covered with cloth and plastic over night. The next morning, the bases will have stiffened and all sections of the mugs will be about the same stiffness, ready for trimming. After that they will be decorated, then placed on smooth wooden batts and wrapped with a cloth for drying.
Sixteen kinds of clay. No mugs have cracked in drying. Why?

This picture has its own page with more detail, click here to see it.
The key is avoidance of methods that result in one part of the piece being stiffer at any stage of drying (not vinegar in the water, compressing the bottoms, etc.). Throw mugs with walls of even thickness. Put them on a plaster bat (it dewaters the base). Make the handles a while after you have made the mugs (they stiffen quicker). Apply them as soon as the rims are stiff enough to maintain shape (in my climate, two hours). Use a join method that enables application of lots of pressure (better than scoring). Use only enough slip (of thick cream consistency) to make the join (no excessive squirting out at the perimeter). Pack all the mugs closely on bats, rims up, cover with flowing cloth (e.g. arnel). Put them inside big bags or wrap plastic around and tuck it under. Trim the bases the next day (to the same thickness as the walls). Place rims down (with handles at the center) on smooth batts (not plaster) and cover them with large fabrics that can wrap under leaving no holes exposed to the outside air (in our dry climate two days dries them).
Stonewares dry better than porcelains

This picture has its own page with more detail, click here to see it.
The plastic porcelain has 6% drying shrinkage, the coarse stoneware has 7%. They dried side-by-side. The latter has no cracking, the former has some cracking on all handles or bases (the lower handle is completely separated from the base on this one). Why: The range of particle sizes in the stoneware impart green strength. The particles and pores also terminate micro-cracks.
Same clay disk dried fast (heat gun) and slower (fan) for the DFAC test

This picture has its own page with more detail, click here to see it.
The center portion was protected while the perimeter dried and shrank first (reshaping the central section). No cracks. But as the central area hardened it reached a point where it was stiff enough to impose forces that forced two cracks to start from the outer edge (opposite each other), these grew inward and found each other. Then the gap widened to dissipate more of the stresses (the width of this gap relates to the drying shrinkage of the clay). But the accelerated pace in the top disk left more stresses, they were relieved by the other hairline cracks from the outer edge, these happened at the very end.The lesson: The stage was set for cracking on both samples very early in the drying process. But the actual cracks occurred very late. Accelerating the process only created small extra edge cracks (on top disk).
A step to prevent cracking at handle-joins on thrown mugs

This picture has its own page with more detail, click here to see it.
Drying cracks are opportunistic, especially in highly plastic or fine-particled clays. They like to initiate inside sharp acute angles. The sharper the angle the greater the chance of crack. By doing this procedure before the clay gets too stiff (in the leather-hard stage) you will deny a crack a place to start. Of course, even drying is still important, the water content of a handle should now be allowed to get too far ahead of that of the main body of the mug at any time. In the pictures on the right, two tools are being used to compress and round the angle at which the handle meets the wall of the mug.
Worst case scenario for handle joins and successful drying

This picture has its own page with more detail, click here to see it.
These M390 mugs had progressed to stiff leather hard (after handles were applied, using just slip, and bases trimmed). A white engobe was then applied to the inside. It significantly softened the bodies of the mugs (to re-dry them to the point of being able to turn them over takes 4-6 more hours). This process sets up a big moisture differential between the mug and handle. "Even drying" is the key to success, so slowing down the handles is obviously needed. How? I apply wax emulsion (actually, I like Reed Wax), leaving just the inside handle-curves bare. That slows down drying enough to keep them even with the body of the mug. This method works so well that these do not even need covering during drying (even in our desert climate). Even drying is the goal - fast and even drying is much better than slow and uneven.
This appears to be a drying crack, but it is not

This picture has its own page with more detail, click here to see it.
This clay normally dries well, but not this time. Strangely, this crack is not at the handle join, it is penetrating into the mug wall. Actually, this is not a crack, it is a split. Excessive slip around the join was not removed, that is bad when a body has larger particles, they permit water left on the surface to penetrate inward and begin a split. An aggravating factor was that the handle was allowed to dry faster than the mug itself, pulling at this join and opening the split even more.
Strange drying crack on a porcelain mug

This picture has its own page with more detail, click here to see it.
Drying crack on the inside of a mug at the handle join. Why?
Compression of the base is the key to avoiding S-cracks? Wrong.

This picture has its own page with more detail, click here to see it.
This is an exchange I had on Facebook on this topic. Many people believe cracks are caused by high water content, high shrinkage clay, not compressing the base when throwing, throwing off the hump or stretching the clay excessively when throwing. But I break some or all of these rules every time I make mugs and have almost no cracks. Why? Because the reason pieces crack is unevenness in wall thickness and drying. And I make sure both are even.
An example of an S-crack in the bottom of a fired porcelain mug

This picture has its own page with more detail, click here to see it.
Its shape, growth during the firing and penetration of glaze down into the crack demonstrates it preexisted firing (happened during the drying).
Drying mugs in front of a fan in 2 hours. No Cracks.
These are Plainsman Coffee clay. They, and the handles, were made on the wheel about half an hour ago, then stiffened enough in front of the fan to enable handle attachment. Coffee clay is plastic and will crack if pieces are not dried evenly. But if they are dried evenly, there is no problem. The handles were waxed after they were attached (leaving only a thin section on the inside where some water could escape). This slowed them down, otherwise they would have dried far ahead of the body. They went in the kiln and were ready for glazing the next morning.
Inbound Photo Links
 Various grogs available in North America |
 It dry shrinks much more yet cracks less. How is that possible? |
 One reason why stoneware clays are more convenient |
Links
| Articles |
Drying Ceramics Without Cracks
Anything ceramic ware can be dried if it is done slowly and evenly enough. To dry faster optimize the body recipe, ware cross section, drying process and develop a good test to rate drying performance. |
| Tests |
Drying Factor
The DFAC Drying Factor test visually displays a plastic clay's response to very uneven drying. It is beneficial to show the relative drying performance of different clays. |
 PayPal | No tracking, No ads, No paywall, No transient content! Just organized, concise information constantly updated and improved. Was this helpful? Consider supporting me. |
| By Tony Hansen Follow me on        |  |
Got a Question?
Buy me a coffee and we can talk 

https://digitalfire.com, All Rights Reserved
Privacy Policy