Jiggering
Jiggering is a process of forming pottery that employs a spinning plaster mold and a tapered template to press soft clay or porcelain against it.
Key phrases linking here: jiggering, jiggered, jigger - Learn more
Details

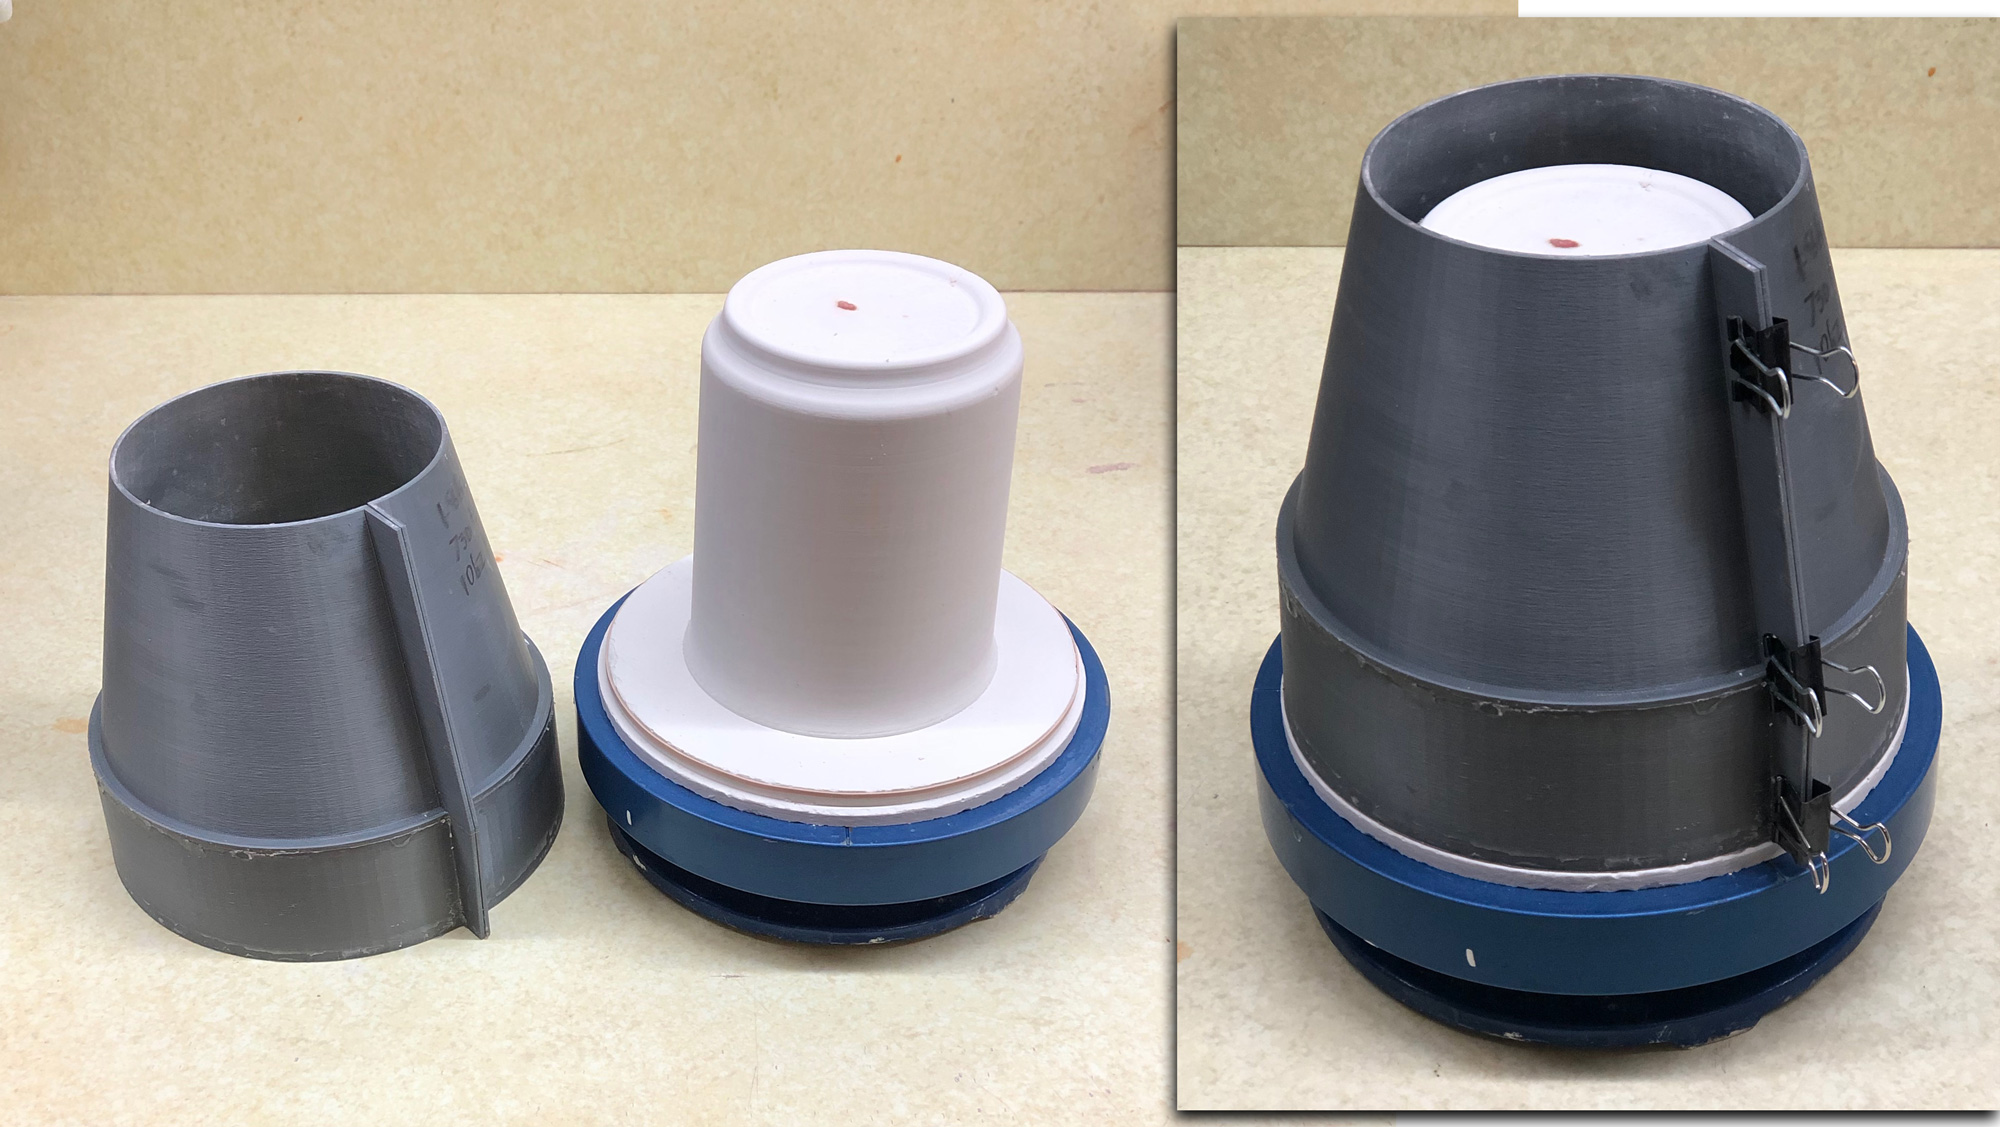
Finished bowl jigger mold encased in a PLA 3D print
This is much more durable than a standard plaster jigger mold. And much nicer to handle. And it drops very precisely into the cup head, a perfect fit. This was the unexpected culmination of a project to simply use 3D methods to create a traditional all-plaster mold. But it became evident it was better to leave the PLA shell in place.
A process for mass-producing simple shapes on a mechanized pottery wheel. Traditionally, these had a solid swing-arm with a fixed template. However in industry today, machines employ rotating templates (e.g. of stainless steel or nylon). These can be brought into position along a complex path to enable making shapes otherwise impossible (e.g. vertical and then lateral position using linear bearings). The basic process is flexible in that it can be automated for high production in industry yet is also very accessible to potters.
For plates, a profile describing the outside shape of the piece is typical, to force the soft clay against a rotating plaster mold describing the inside contour (although it is also be done to oppositive way for deeper shapes). For vessel forms, the profile forms the inside shape and the mold the outside. After drying against the plaster, the piece shrinks and releases from the mold and can be removed. After removal, fix-up generally needs to be done to smooth any irregularities on the surface that was against the mold and finish the edges and lips of pieces. Industrial jiggering machines use a rotating mechanism and can press the clay against the form with much greater force, this enables the use of stiffer material and produces a smoother surface that does not need fix-up.
Clays used for traditional jiggering with a fixed template are much softer than that used for throwing on the potter's wheel. The work required to set up a jiggering process is significant and a number of mechanical and mold-making skills are needed. Small scale jiggering is most practical for plates and bowls. Upright shapes, like mugs, present many more challenges, both mechanical and material, it can actually be faster to throw these on the wheel than jigger them.
3D printing is becoming invaluable in the development and/or production of molds for jiggering.
RAM pressing is a better alternative for many flatter shapes (but is much more expensive).
Industrial machines are heavy, even a small model can weigh 300+ kg. Their specs quote a maximum shaping diameter and depth and RPM. They can be manual, semi-automatic or automatic.
Related Information
An industrial cup shaping jigger machine

This picture has its own page with more detail, click here to see it.
An industrial plate shaping jiggering machine

This picture has its own page with more detail, click here to see it.
Jim Etzkorn jiggering a crock in 2013 at the historic Medalta Potteries

This picture has its own page with more detail, click here to see it.
Medalta still manufactures ware, albeit on a much smaller scale, in a dedicated facility. Visitors to the exhibits see this operation when they do the standard tour. Most ware is transparent glazed and fired at cone 6 oxidation in electric kilns.
v1.0 3D-printed flanged rail to cast working plaster jigger molds
This picture has its own page with more detail, click here to see it.
The multi-use grey outer rail on the left was printed in two parts and glued together at the shoulder (to avoid the printing of support). The wall thickness is 1.6mm, actually too thick for fast printing. For v2.0 we went to 1.2mm and printed it upside down, in one piece, on a flange (this generated support but new printers to that so well that the step disconnects well and is not rough). The vertical split enables opening the shell a little after the plaster has set, quickly releasing it. The center model, of the inside contour of the mug, is integrated into a two-step base, it was made by casting the plaster inside another two-piece 3D-printed form. After removing that using a heat gun, I smoothed the plaster surface using a metal rib and trimming tool and then soaped it to ready for a pour. The mold shell is held securely in place by stretching a wide rubber band around the first step and clamping the shell into place around it. The assembly is then ready to be filled with plaster to make a jigger mold. Doing this on a turntable is also a good idea - it enables rotating it while filling and agitating after full to dislodge any air bubbles.
3D render of a jiggering template

This picture has its own page with more detail, click here to see it.
I print these using PLA filament, they are strong enough for hobby or studio use (even if not printed solid). The knife-edge prints precise and smooth, there is no need for sanding. Notice that the drawing (far left) includes the contours of the inside and outside of the mug. Making the jigger template/knife only requires adding three straight lines. Then I extrude it forward 1cm and add a 30-degree draft. The top edge can, of course, be extended upward to mount on the jigger arm. The working template has to be narrower than this at the bottom to clear the edge when the jigger arm is lowered. I have also used this to hand-finish the slip-cast mugs (just by holding it, without a jigger arm).
Jigger wheel auminum cuphead (for cups)

This picture has its own page with more detail, click here to see it.
Showing dimensions to fit a Shimpo RK2 wheel, its shaft is 0.983 in diameter. The molds fit down inside as shown, only contacting the cuphead at the shoulder. This is machined from aluminum. We do not sell this of course, but you could take this drawing to a machine shop and have them make you one (the numbers are readable when this is zoomed to full size).
Jigger wheel aluminum cuphead (for plates)

This picture has its own page with more detail, click here to see it.
The head is lathed from aluminum. It fits on a potter's wheel (adjust the inside diameter to fit the shaft). The plaster mold drops into it this cuphead and stays in place by friction. The only point of contact between the mold and aluminum should be at the top inside corner of the cuphead.
My potter's wheel with aluminum cup-head and jigger mold inserted

This picture has its own page with more detail, click here to see it.
The cup-head was lathed from a block of aluminum and it attaches to the shaft the same as a regular wheel-head. Plaster molds simply drop in and sit on their shoulder. The shoulder is the only point-of-contact, this prevents chattering while the mold spins when under pressure. I am using these molds for a casting-jiggering process (or just casting). For example, I can cast a mug in the mold, then pour out the slip, wait a few minutes and then, as the wheel spins, finish the rim and inside sure using a 3D-printed template/rib. I do not actually use the jigger arm, it is easier just to hold the template in hand. I can finish the rims on any round pieces made in these molds.
Cuphead for Shimpo jigger wheel

This picture has its own page with more detail, click here to see it.
This is machined out of aluminum. We also have drawings of a 3D-printable shell-mold for making molds that drop into this. And methodology for printing the outside contour of pieces to be jiggered.
Jigger arm from both sides

This picture has its own page with more detail, click here to see it.
The arm is heavy, made from 1/2 inch plate steel. The counterweight at the end have 1 in plate weights. The swivel mounts are machined to fit the custom cone-ended bolts.
Jigger arm assembly for a Shimpo RK2 pottery wheel

This picture has its own page with more detail, click here to see it.
We have mechanical drawings for this (and the cup heads). This is very sturdy and useful. The arm is relatively short compared to industrial jigger wheels and is thus useful for only small shapes. There is an advantage: The template contacts vertical walls at a more perpendicular angle. But the disadvantage is that the trailing edge of the template hits the outside edge of the lip on taller shapes. The pointed bolts hold the arm securely and their tightness enables varying the friction of movement. They have enough length to also position the arm horizontally. We 3D print templates and block masters for making working molds that drop into the cuphead.
Using a Giffin Grip for jiggering

This picture has its own page with more detail, click here to see it.
Techniques like this may not be as good as using a cup-head, but it may be more practical for potters and hobbyists who also use their potters wheel for throwing (because changing wheelheads can be a big hassle). Mols could also be secured to the standard wheelhead using other techniques (e.g. bat pins or a clamp-on cuphead). This arrangement also enables easier mold-making because the backside is flat. And a wide range of sizes can be accommodated. And, of course, this method is less expensive.
Using clay as a glue to hold a 3D-printed jigger mold in place

This picture has its own page with more detail, click here to see it.
This was part of my nursery plant-pot mold-making project. I held previous shell-molds down with a brick on top. But that was not working well, putting the mold out of shape, making it difficult to pour the slip inside and agitate the mold after pouring to surface the bubbles. I found that the 3D printed mold can be held down by simply using a sticky clay slip (Plainsman Polar Ice)! I printed this one with a flange at the bottom for this purpose. I am pouring the mold on an arborite bat on the wheelhead of a potters wheel. This enables turning the wheel slowly and pouring the plaster into the perimeter slowly through a funnel, that produces a much better surface. If you don't have a super sticky clay you can make one by adding 4% Veegum to a Grolleg porcelain. Actually, Grolleg and New Zealand kaolins are both very sticky, so they could also work.
Surface treatment affects glaze speck development in jiggered stoneware

This picture has its own page with more detail, click here to see it.
Notice the inside of this large transparent glazed cone 6 stoneware bowl. There is a concentration of specks on one part because that area was sponged at the leather hard and dry stages to smooth surface problems that happened during the jiggering process. These specks are normally driven below the surface during forming.
Laminations in a jiggered bowl

This picture has its own page with more detail, click here to see it.
These are not cracks. They do not go through to the inside. During forming the clay was folded over itself rather than compressed against the mold.
Inbound Photo Links
 Casting plates, is it practical? |
 v2.0 DIY Jiggering is Here! |
Links
| Glossary |
Casting-Jiggering
A process in ceramic production where items are slip-cast first and then finished using a jigger wheel. |
| Glossary |
Throwing
The process of forming soft clay on a potter's wheel. |
| Projects |
2019 Jiggering-Casting Project of Medalta 66 Mug
My project to reproduce a mug made by Medalta Potteries more than 50 years ago. I cast the body and handle, jigger the rim and then attach the handle. 3D printing made this all possible. |
| Projects |
Project to Document a Shimpo Jiggering Attachment
Make your own jiggering attachment for your potter's wheel. Here are the plans and lots of help to get you going with molds and techniques. |
| URLs |
https://www.refsan.com.tr/en/sablon-torna-
RefSan automatic jigger and jolly machines |
 PayPal | No tracking, No ads, No paywall, No transient content! Just organized, concise information constantly updated and improved. Was this helpful? Consider supporting me. |
| By Tony Hansen Follow me on        |  |
Got a Question?
Buy me a coffee and we can talk 

https://digitalfire.com, All Rights Reserved
Privacy Policy