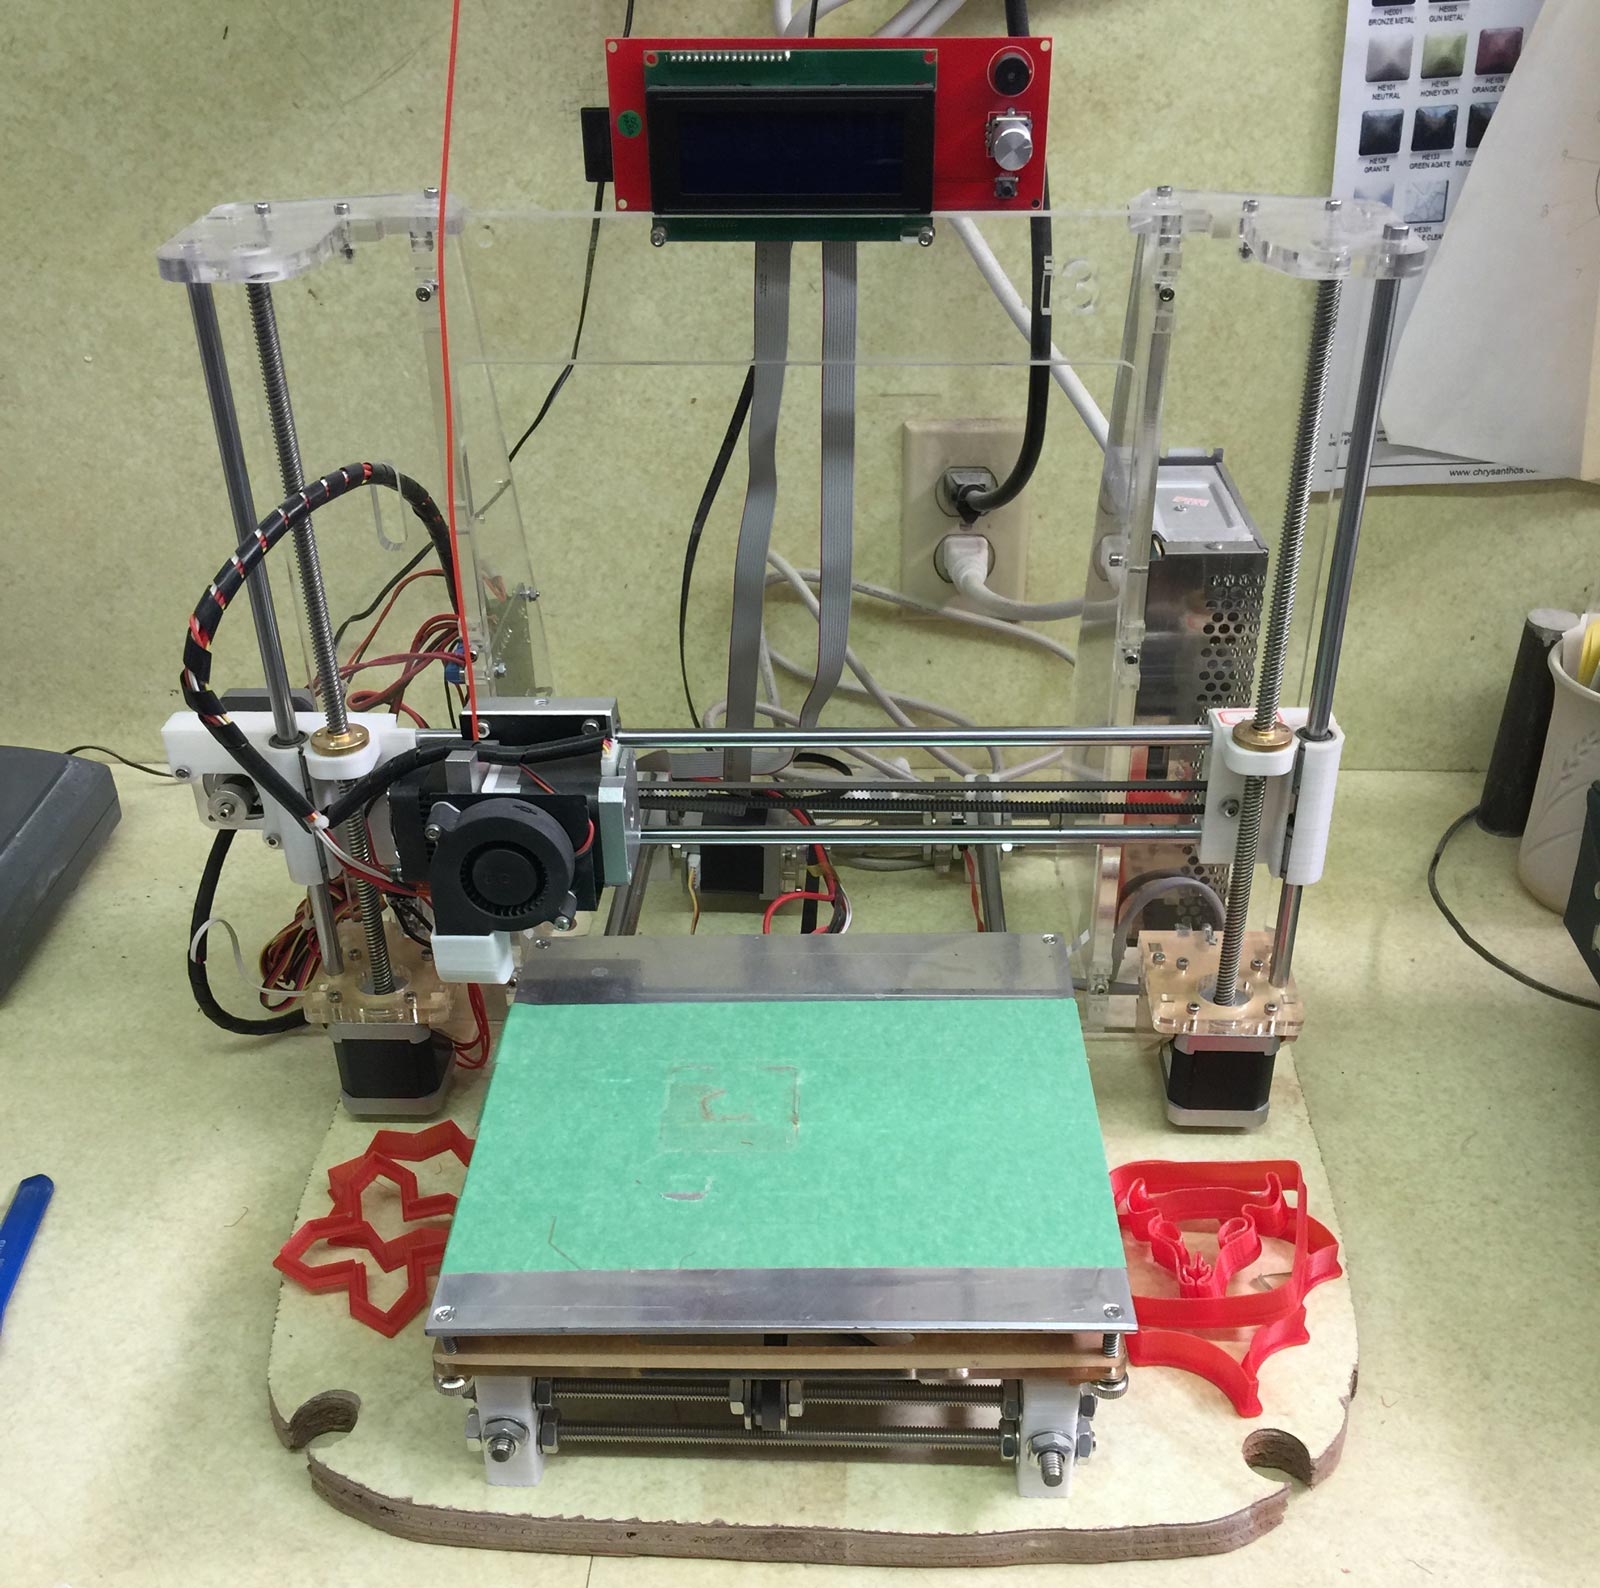
3D Printer
Standard 3D printers (not clay 3D printers) are incredibly useful in ceramic production and design, bringing difficult processes within reach of potters and hobbyists.
Key phrases linking here: 3d printers, 3d printer - Learn more
Details
This page is about using FDM 3D printers and PLA filament in the production of ceramics, adapting a new technology to one of the world's oldest fabrication processes. 3D printing of clay is not covered here at all, read one to see why you might want to reassess your approach to entering this field. A standard 3D printer, that uses PLA filament for example, can be incredibly useful, especially for more craft and production-oriented products. You can design and print mock-ups, molds, mold natches, stencils and stamps and embossers and templates and cutters, tools, forms, mold pour-spouts, supports and holders, rollers and texture makers, and more. Being able to make so many kinds of things opens up ceramic processes that may have been impractical before. Learning how to use a printer like this will transform the way you think in 3D, it will foster better planning and more careful design.
Having the right expectations of these devices and the whole process is important. 3D printers are not normally sold in retail stores because many people lack a good use and have unrealistic expectations of the ease of learning to use them, this is certainly in part because of the hype. And, many that do brag up their usefulness are just downloading STL files and printing them, they don't actually to the 3D design themselves. Entering this field with the necessity of creating something that will help with your ceramic production is a big factor for eventual success - that will be the motivation you need to weather the disappointments and roadblocks encountered. Understand, upfront, that the process is a cycle of creating a design, printing it, determining suitability, changing the design and reprinting. Then a year later, upon realizing a much better way, the cycle starts again. This continuous evolution is an exciting part of 3D printing and design.
I only deal with FFF printers (fused filament fabrication) at this time, devices that print by extruding a tiny stream of melted material through a nozzle, adding layer after layer to produce an object. Vendors love to sing about the host of materials that can be printed but there is need for caution and what is practical. Each material brings baggage (e.g. high temperatures needed to print, issues with warping and adherence to the print bed, fumes created during printing, cost, suitability of your printer that that filament, clogging of the printer nozzle, etc). And vendors want to sell you printers based on other technologies and that cost a lot more, but again, be very wary of the baggage these bring (especially costs and toxicity). A fancy printer will not solve a problem that is rooted in your bad 3D designs. It is best to stick with PLA filament of FFF printing and make it work as long as you can.
The 3D printer is just a step in a rather long process of creating reliable, practical and useful parts. And one of the easier steps. Learning to use 3D design software is much more challenging - so don't buy a printer until you are proficient at using 3D CAD software. Even learning to use the 3D slicer software is as challenging as the actual printing.
3D printers need frequent software updates (at least they should if you bought one from a progressive company). Many are full fledged, internet connected computers that can update on their own. Older ones typically can flash new firmware by simply noticing, at startup, the presence of a file on the SD card or USB thumb drive you are using to submit the GCode files. Or they can be updated using a function in the Slicer software.
As already noted, don't overbuy a printer. Fancy is not needed. Nor is large. Good designs that print well on the printer you have are what is needed. Just get a quality consumer device (e.g. our favourite is the Prusa MK4). It is not realistic to expect success in large prints that take days, problems are common midway through and prints are thus lost. Since printers produce such good dimensional stability it is often better to print objects in multiple pieces and glue them together. This enables saving time because each piece can be positioned optimally to avoid excessive supports. And, "version 1.0" of a print is almost never right, it is just part of the learning on the way to "version 5.0" which might be. Another danger of printing large objects is more insidious: Increasing pressure to leave a printer running while you are not there - the instructions for every device on the market warn about this. But most do it anyway!
FFF devices having a large print bed face real challenges of levelling it. As the bed heats up it warps. Differences of even half a mm lead to headaches with first layer adhesion. You could end up just doing small things on that monster printer!
Related Information
It is 2018. This Prusa MK3 3D printer is worth the extra cost.

This picture has its own page with more detail, click here to see it.
Czech inventor, Josef Prusa, takes great pains to preface the name of each model with the word "Original" (e.g. this is an "Original i3 MK3S"). Dozens of Chinese companies have copied his i3 machines and sell them for 1/3 to 1/2 the price. But buyers often deal with poor or no customer support, disconnects between absurdly poor instruction manuals and parts, poor quality parts, parts that do not fit or work, no wonder that a large percentage are never able to complete the assembly. This printer, by contrast, has a LEGO-quality instruction manual and lots of online support. It also has auto bed levelling (this is a huge factor), much better cable routing, automatic filament insert, removable flexible bed, has its own slicing software, it prints faster, is quieter, does not break down all the time and print quality is much better (note the closeup: less than 1mm thickness, yet highly precise). You can even pull the plug out of the wall during a print and it will continue after reconnect! And its updates its drivers through the slicer software.
The Prusa MK4 3D printer is worth the upgrade from MK3

This picture has its own page with more detail, click here to see it.
It is 2024 and I just got this. This time I paid extra and bought it fully assembled. It arrived in Canada quickly and was packed very well. I have already made hundreds of things on it, it is the reason for current projects (I use this to make molds for ceramics).
This upgrade was really worth it. The biggest benefit of the MK4 is improved bed levelling and prints stick much better. The second biggest benefit is precision. It can print molds too large for the bed in two parts and they mate perfectly. 1/10 mm difference in size is the difference between parts fitting precisely for being too lose or too tight. The MK4 is also capable of printing quite a bit faster. And it has a much better controller board and control panel. Filament loading is easier and the controller is smarter about fault conditions. Like the MK3 this arrived with fantastic documentation, I was up and running in no time.
I don't know how I would live without this amazing machine now! This is an example of a recent print. This was printed in two halves (the top half was done upside down), and they fit together incredibly well. The walls are only 0.8mm thick. Using 3D printed side rails I will be able to fill this with plaster to make a block mold (having embeds into which 3D printed natches will mount).
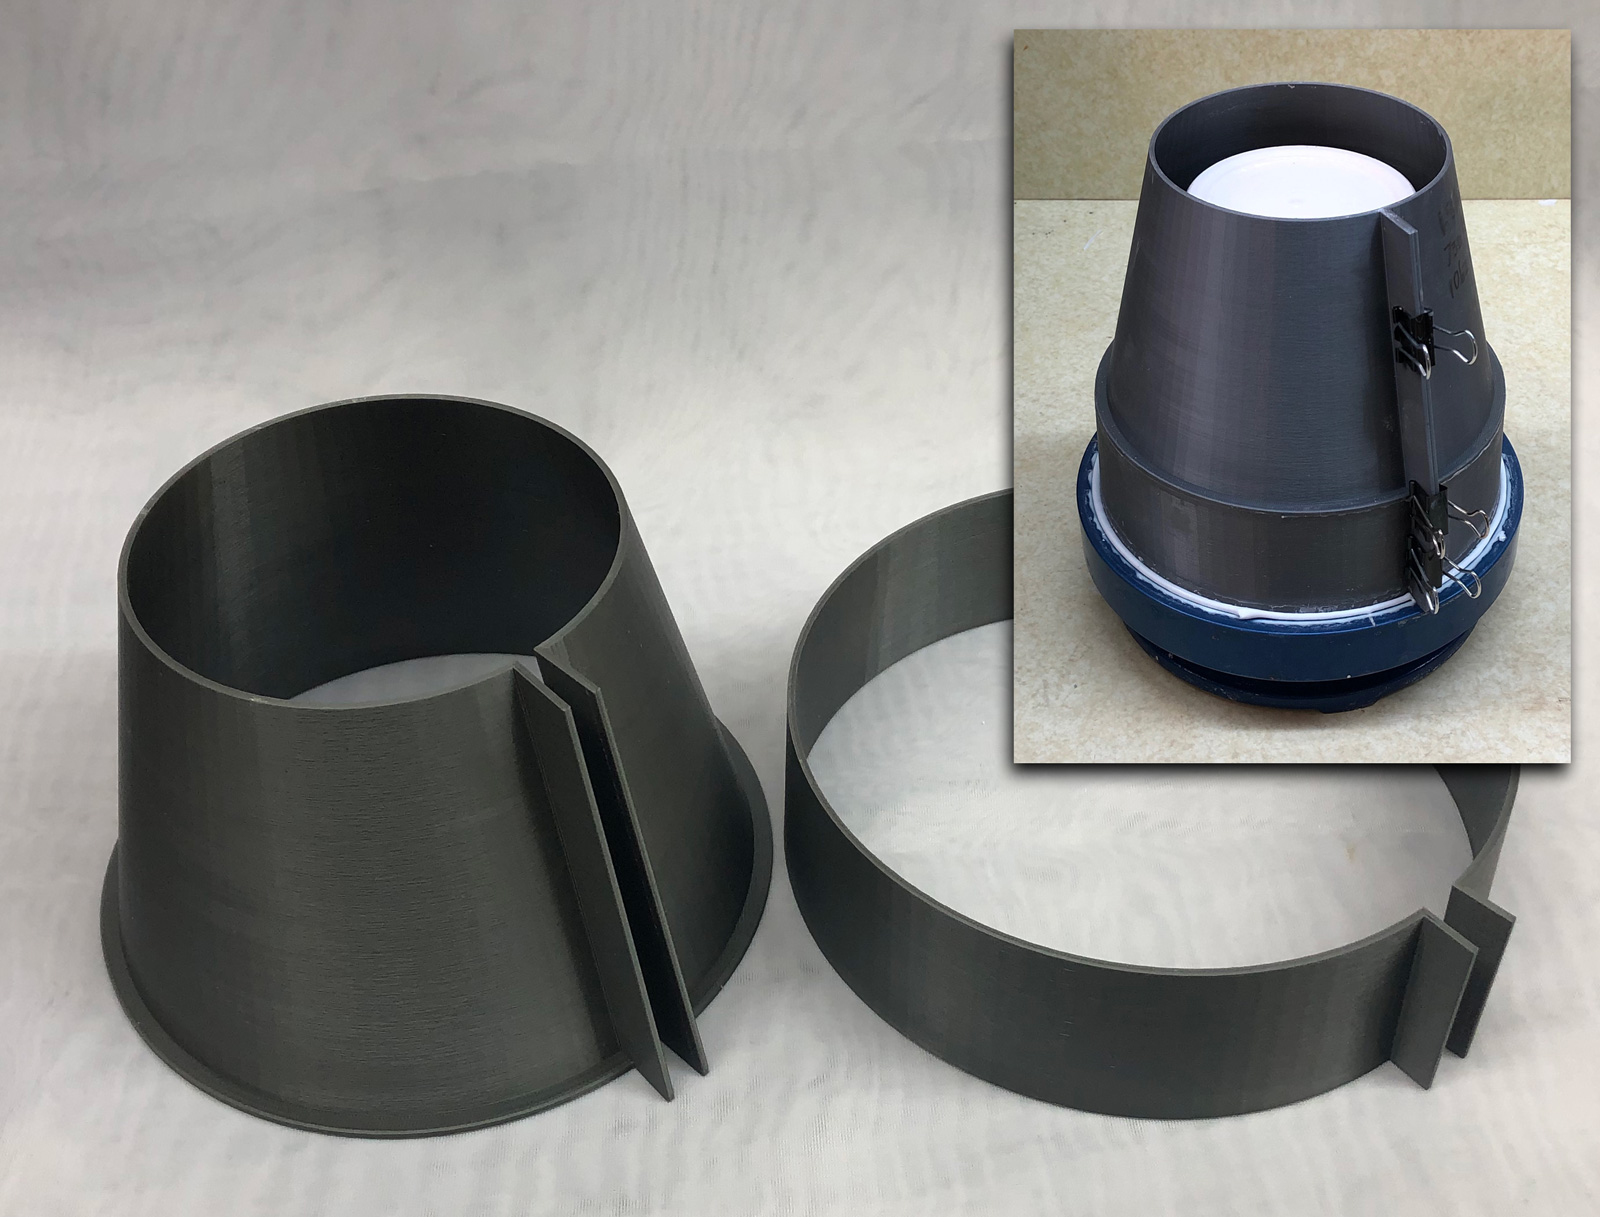
Assorted problems with 3D printing PLA molds

This picture has its own page with more detail, click here to see it.
I am 3D printing a block mold - rubber will be poured into it to make a case mold for beer.bottles. It is an amazing process but there are still issues to deal with:
-Stringing (top left). This usually happens when the nozzle is running too hot. This new batch of filament needs a slightly lower temperature, so I adjusted from 215 to 207.
-Size constraints: This is too big to print as one mold so it has to be done in multiple sections (two mains, two end-caps). Pieces fit precisely and can be glued or taped.
-Experience shows where glue, tape or special brackets (e.g. corners lower left) are needed.
-Special tools must be made (lower left is a clip-insertion tool).
-Corner lifting: Happens mid-print (the large thin pads on the lower right are to prevent that).
-Pressure bowing: The stabilizer bars spanning the two mid-pieces (lower left) and the triangular lip (upper right) keep that edge straight despite pressure from the liquid rubber inside.
The controller on a common 3D printer

This picture has its own page with more detail, click here to see it.
An SD-Card or USB stick inserts into the side of the front controller and display unit (typically G-Code files produced by the slicer software are copied to the memory stick on a computer).
#2 The main menu displays on startup. Move the selector by turning the dial and select a choice by pressing it again.
#1 When a file is selected for print it is previewed and awaits confirmation. That initiates the head and bed heat-up sequence and a levelling calibration and then printing begins.
#3 An info screen displays during print, showing the temperature of the nozzle and the bed and percentage completion.
#4 Pressing the dial during a print offers some tuning options that can be adjusted while printing (e.g. print speed, nozzle and bed temperature).
The controller board on a common RepRap 3D printer

This picture has its own page with more detail, click here to see it.
This board is an "Arduino computer", a standard device around which a worldwide community of gadget-building enthusiasts has grown. It has also become standard on RepRap printers. This version has many connectors, they connect to stepper-motors (that control the X, Y, Z axis and the feeding of the filament through the printhead), to switches and sensors for the heating element and fans on the printhead and to sensors and switches for the heated bed. This board runs open source software that can read a g-code file (which defines the movements of the print head for each layer). It uses the Z-motor to move up for each new layer, the X and Y motors to control head movement for the layer and the filament-feed motor to control the extrusion.
The movable printing bed on a common 3D RepRap printer
This picture has its own page with more detail, click here to see it.
These build-it-yourself kits are good to learn how the printers work (but don't get one until you have seen the instruction manual). The printhead slides (on bushings) along two horizontal stainless rods - the gear-belt, driven by a stepper motor on the far left, controls its left-right position along the X-Axis. Two motors on the lower left and right turn vertical worm-gears that move the printing mechanism up and down (along the Z-axis). Like the print-head, the printing bed (or platform) is pulled forward and backward by a rubber gear-belt driven by the Y-Axis stepper motor (at the lower back). The bed is heated, maintaining a temperature of about 50C, this keeps the printed piece from warping and loosening during printing. On cheaper printers like this it is common to put masking tape on the bed, pieces stick to it better. Calibrating the height of the bed is tedious on these.
The printhead of a make-it-yourself RepRap 3D printer

This picture has its own page with more detail, click here to see it.
The assembly has a powerful electric stepper-motor with attached to a gear assembly that pulls the filament in through a hole in the top. It forces the filament down through a heated nozzle. PLA is a common filament type, it requires the nozzle be at 215C to extrude well. The brass nozzle puts out a 0.45mm wide extrusion (it is mounted to the bottom of a small aluminum block at the bottom). The nozzle has a heat sensor and its own cooling fan (enabling the controller to precisely maintain nozzle temperature). An additional fan and heatsink (on the left side) keep the motor and filament feed area cool. The entire head assembly is pulled left and right along stainless steel rods by a gear-belt controlled by the X-axis motor. Inserting filament can be tricky in machines like this. The best strategy is pre-heating the nozzle, pressing release level (to enable free filament movement) and then pushing the filament to feed it manually through the nozzle, then pulling it out suddenly. To reload, cut it to a point (using scissors), configure the printer to preheat the nozzle to 215C, then feed it down through until it extrudes.
The rear of a partially assembled RepRap 3D printer

This picture has its own page with more detail, click here to see it.
In this printer (which is being assembled) the printhead moves along two stainless steel rods (for the x-axis). Its position is controlled by the front top stepper motor (which has a gear through which runs a rubber belt attached to the printhead. The two lower stepper motors with worm gears attached to their shafts control the vertical z-axis position of the printhead assembly. Since the computer controls these motors it can move the head to any position on the x or z axis. Vertical z-movement is slower and more precise since it determines the thickness of each slice to be printed.
Things too big to 3D print can be done in pieces
This picture has its own page with more detail, click here to see it.
This jigger case mold has a step that provides the ideal place to split it into two pieces for printing. It is unnecessary to complicate the drawing by doing it in the 3D design app because the 3D slicer software can do it. In Simplify3D I just pushed the object downward on the platform (anything below does not print). Prusa Slicer (and Slic3r) has a cutter tool to split an object in two. Either piece can then be flipped over for faster printing (e.g. less printed support). Had this been printed as one piece support would have been necessary under the step, that would have slowed the process and affected the quality. After printing, I just super-glued the two pieces together.
Precision of a better 3D printer on thin walls

This picture has its own page with more detail, click here to see it.
The grey cutter was done on a better printer (my Prusa i3 MK3), the other on a Chinese machine I got on Ebay. Not only are the edges crisper but the vertical walls are not splitting down the center into two layers. The splitting happens because I use 0.9mm thickness for the walls (the extruder puts down a 0.45mm wide path so I get a quicker two-pass print). I print these same types of pieces on both printers using multiple filaments and the same slicer software. The better printer always produces better results.
Inbound Photo Links
 3D printing a propeller for a lab mixer |
 Draw a triangular plate press mold in Fusion 360 |
Links
| Glossary |
3D Slicer
A slicer is software that can cut a 3MF, OBJ or STL 3D model file into hundreds or even thousands of layers and then control a printer to print them layer-by-layer. |
| Glossary |
3D-Printing
Standard 3D printing technology (not printing with clay itself) is very useful to potters and ceramic industry in making objects that assist and enable production. |
| Glossary |
3D Design
3D Design software is used to create dimensionally accurate objects by sketching 2D geometry and transforming it using tools to rotate, extrude, sweep, etc. The software generates the polygon surface. |
| URLs |
https://en.wikipedia.org/wiki/Polylactic_acid
PLA 3D printer filament information at Wikipedia While derived from renewable resources like corn starch or sugarcane, in a landfill PLA (polylactic acid) filament persists like other plastics. However, it is biodegradable in industrial composting facilities at temperatures ~140°F (60°C) with controlled moisture and microbial activity. PLA is very recyclable, industrial users can turn waste back into filament with inexpensive machines. |
| URLs |
https://reprap.org/wiki/RepRap
RepRap 3D Printer movement page |
| URLs |
https://en.wikipedia.org/wiki/RepRap_project
RepRap project information on Wikipedia |
| URLs |
https://dental.formlabs.com/products/form-4b/
The 4 Formlabs 4B printers for dental They support high precision (e.g. many dental applications). |
| URLs |
https://www.rapidia.com/
Metal paste deposition 3D printers This company knows how to formulate slurries with metal powder and add a variety of thickeners, binders, and dispersants to make the paste stable and printable. They can also do this with clay. |
| URLs |
https://craftcloud3d.com/
Outsource bigger 3D prints. 20 technologies, 35 file formats, choose from 150 service providers. |
| Projects |
2019 Jiggering-Casting Project of Medalta 66 Mug
My project to reproduce a mug made by Medalta Potteries more than 50 years ago. I cast the body and handle, jigger the rim and then attach the handle. 3D printing made this all possible. |
| Typecodes |
Mold making using 3D printing
An ordinary consumer 3D printer has many exciting possibilities for making many types of molds, it is a place where people having both artistic and mechanical abilities can get a double the dopamine! |
 PayPal | No tracking, No ads, No paywall, No transient content! Just organized, concise information constantly updated and improved. Was this helpful? Consider supporting me. |
| By Tony Hansen Follow me on        |  |
Got a Question?
Buy me a coffee and we can talk 

https://digitalfire.com, All Rights Reserved
Privacy Policy