A Low Cost Tester of Glaze Melt Fluidity
A One-speed Lab or Studio Slurry Mixer
A Textbook Cone 6 Matte Glaze With Problems
Adjusting Glaze Expansion by Calculation to Solve Shivering
Alberta Slip, 20 Years of Substitution for Albany Slip
An Overview of Ceramic Stains
Are You in Control of Your Production Process?
Are Your Glazes Food Safe or are They Leachable?
Attack on Glass: Corrosion Attack Mechanisms
Ball Milling Glazes, Bodies, Engobes
Binders for Ceramic Bodies
Bringing Out the Big Guns in Craze Control: MgO (G1215U)
Can We Help You Fix a Specific Problem?
Ceramic Glazes Today
Ceramic Material Nomenclature
Ceramic Tile Clay Body Formulation
Changing Our View of Glazes
Chemistry vs. Matrix Blending to Create Glazes from Native Materials
Concentrate on One Good Glaze
Copper Red Glazes
Crazing and Bacteria: Is There a Hazard?
Crazing in Stoneware Glazes: Treating the Causes, Not the Symptoms
Creating a Non-Glaze Ceramic Slip or Engobe
Creating Your Own Budget Glaze
Crystal Glazes: Understanding the Process and Materials
Deflocculants: A Detailed Overview
Demonstrating Glaze Fit Issues to Students
Diagnosing a Casting Problem at a Sanitaryware Plant
Drying Ceramics Without Cracks
Duplicating Albany Slip
Duplicating AP Green Fireclay
Electric Hobby Kilns: What You Need to Know
Fighting the Glaze Dragon
Firing Clay Test Bars
Firing: What Happens to Ceramic Ware in a Firing Kiln
First You See It Then You Don't: Raku Glaze Stability
Fixing a glaze that does not stay in suspension
Formulating a body using clays native to your area
Formulating a Clear Glaze Compatible with Chrome-Tin Stains
Formulating a Porcelain
Formulating Ash and Native-Material Glazes
G1214M Cone 5-7 20x5 glossy transparent glaze
G1214W Cone 6 transparent glaze
G1214Z Cone 6 matte glaze
G1916M Cone 06-04 transparent glaze
Getting the Glaze Color You Want: Working With Stains
Glaze and Body Pigments and Stains in the Ceramic Tile Industry
Glaze Chemistry Basics - Formula, Analysis, Mole%, Unity
Glaze chemistry using a frit of approximate analysis
Glaze Recipes: Formulate and Make Your Own Instead
Glaze Types, Formulation and Application in the Tile Industry
Having Your Glaze Tested for Toxic Metal Release
High Gloss Glazes
Hire Us for a 3D Printing Project
How a Material Chemical Analysis is Done
How desktop INSIGHT Deals With Unity, LOI and Formula Weight
I have always done it this way!
Inkjet Decoration of Ceramic Tiles
Is Your Fired Ware Safe?
Leaching Cone 6 Glaze Case Study
Limit Formulas and Target Formulas
Low Budget Testing of Ceramic Glazes
Make Your Own Ball Mill Stand
Making Glaze Testing Cones
Monoporosa or Single Fired Wall Tiles
Organic Matter in Clays: Detailed Overview
Outdoor Weather Resistant Ceramics
Painting Glazes Rather Than Dipping or Spraying
Particle Size Distribution of Ceramic Powders
Porcelain Tile, Vitrified Tile
Rationalizing Conflicting Opinions About Plasticity
Ravenscrag Slip is Born
Recylcing Scrap Clay
Reducing the Firing Temperature of a Glaze From Cone 10 to 6
Setting up a Clay Testing Program in Your Company or Studio
Simple Physical Testing of Clays
Single Fire Glazing
Soluble Salts in Minerals: Detailed Overview
Some Keys to Dealing With Firing Cracks
Stoneware Casting Body Recipes
Substituting Cornwall Stone
Super-Refined Terra Sigillata
The Chemistry, Physics and Manufacturing of Glaze Frits
The Effect of Glaze Fit on Fired Ware Strength
The Four Levels on Which to View Ceramic Glazes
The Majolica Earthenware Process
The Potter's Prayer
The Right Chemistry for a Cone 6 Magnesia Matte
The Trials of Being the Only Technical Person in the Club
The Whining Stops Here: A Realistic Look at Clay Bodies
Those Unlabelled Bags and Buckets
Tiles and Mosaics for Potters
Toxicity of Firebricks Used in Ovens
Trafficking in Glaze Recipes
Understanding Ceramic Materials
Understanding Ceramic Oxides
Understanding Glaze Slurry Properties
Understanding the Deflocculation Process in Slip Casting
Understanding the Terra Cotta Slip Casting Recipes In North America
Understanding Thermal Expansion in Ceramic Glazes
Unwanted Crystallization in a Cone 6 Glaze
Using Dextrin, Glycerine and CMC Gum together
Volcanic Ash
What Determines a Glaze's Firing Temperature?
What is a Mole, Checking Out the Mole
What is the Glaze Dragon?
Where do I start in understanding glazes?
Why Textbook Glazes Are So Difficult
Working with children
How to Find and Test Your Own Native Clays
Description
Some of the key tests needed to really understand what a clay is and what it can be used for can be done with inexpensive equipment and simple procedures. These practical tests can give you a better picture than a data sheet full of numbers.
Article
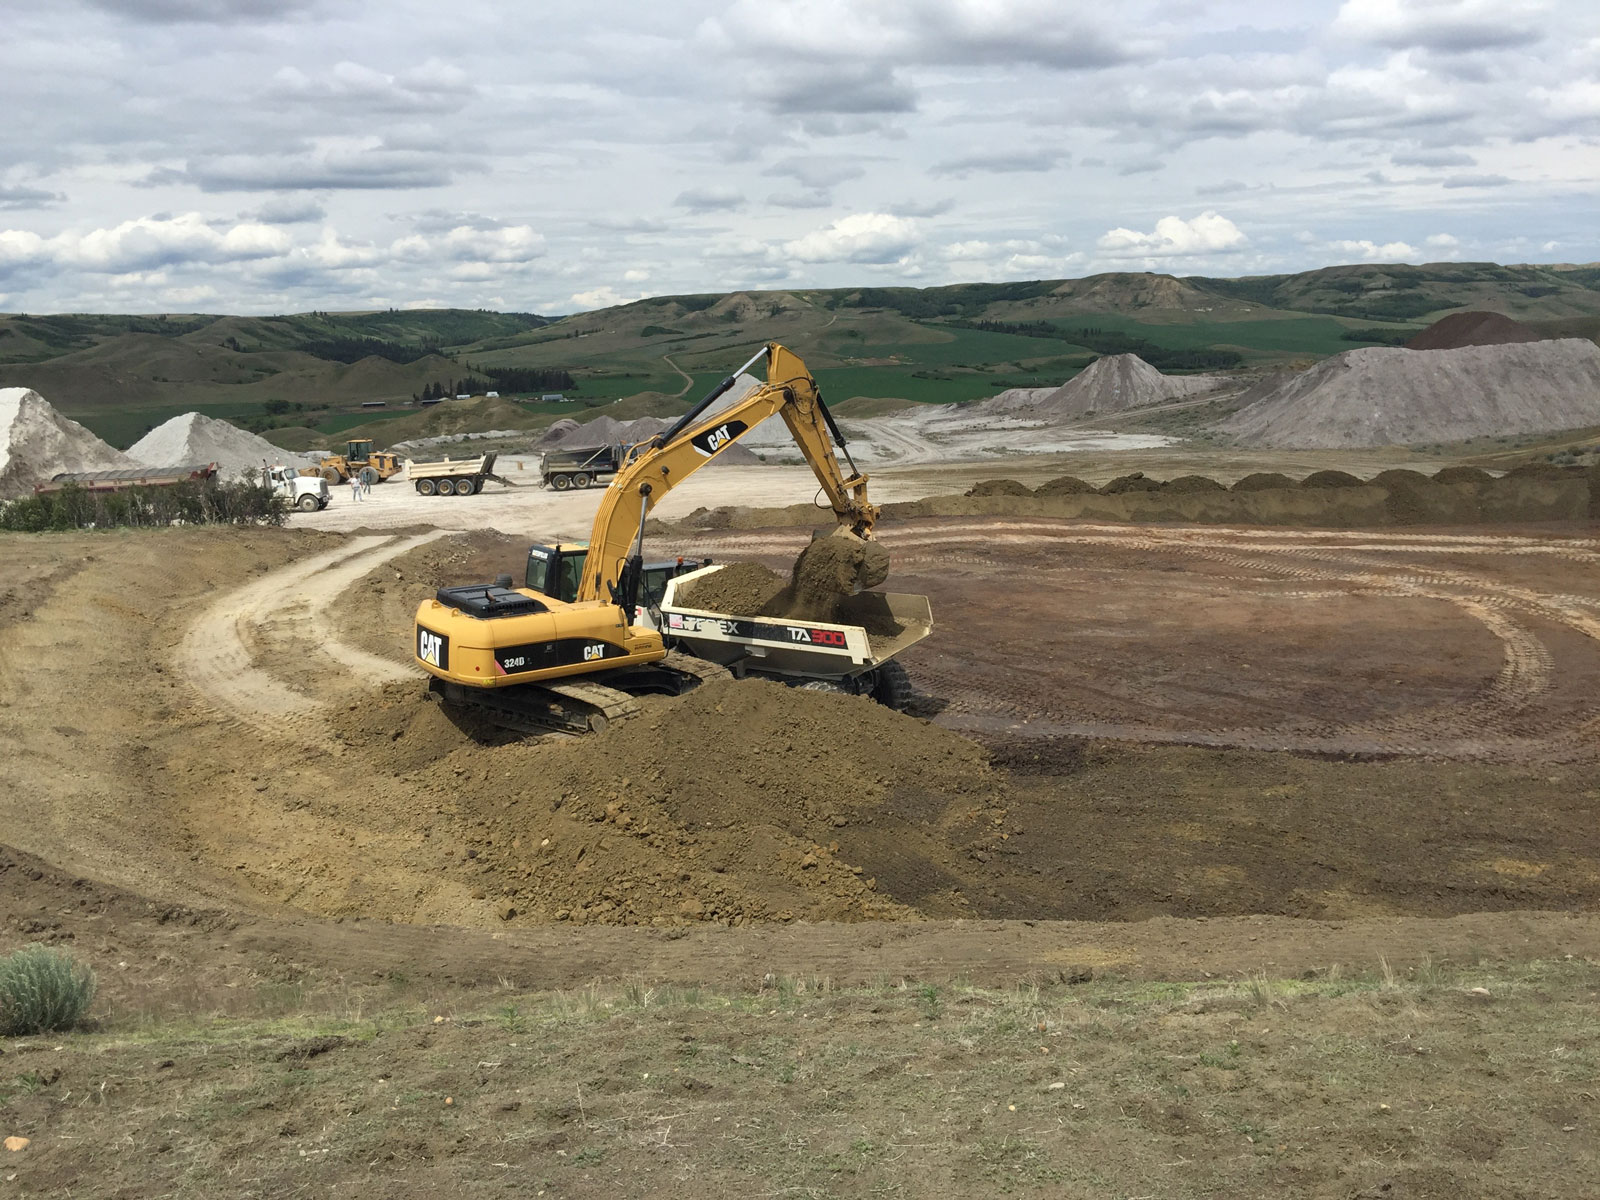
Mining the Battle Formation in Ravenscrag, Saskatchewan - June 2018
Few things are as exciting as finding your own clay materials and then using them to make your own pottery. Especially if the items you make are strong, durable, functional and safe. Given the effort, you likely won't save money compared to buying prepared bodies (unless you use a lot of clay and can scale up the processing). But in some situations, it is better. It can raise the market value of your ware. And give you bragging rights! And satisfaction.
Can anyone evaluate found clay materials? Test them? Yes. If it’s below the topsoil and it’s not sand and it is plastic it is (or contains) clay. Plainsman Clays has mined a wide range of its own clay materials since 1965 and has a very practical set of inexpensive tests to characterize them. My work there inspired the development and refinement of these tests and the creation of digitalfire.com and the Digitalfire Reference Library.
Where do you find clay? Everywhere. Well, almost. If you take a shovel into your backyard, how deep can you dig before you hit rock? In some places, it is only inches. In other places hundreds, even thousands of feet. But almost everywhere, within driving distance, you will be able to find places where there are sedimentary layers (except perhaps if you live on a limestone island!). By the magic of the water cycle, weathering and erosion planet-earth is a sand and clay-making machine! Talk to local people who need to dig in the ground; road construction companies, gravel companies, builders, farmers, electrical and municipal utilities. When you talk to people, listen for terms like 'gumbo', 'river silt', 'sticky', 'stream bed', 'hard to dig; these are your triggers to investigate!
Testing your own native clays is easier than you think
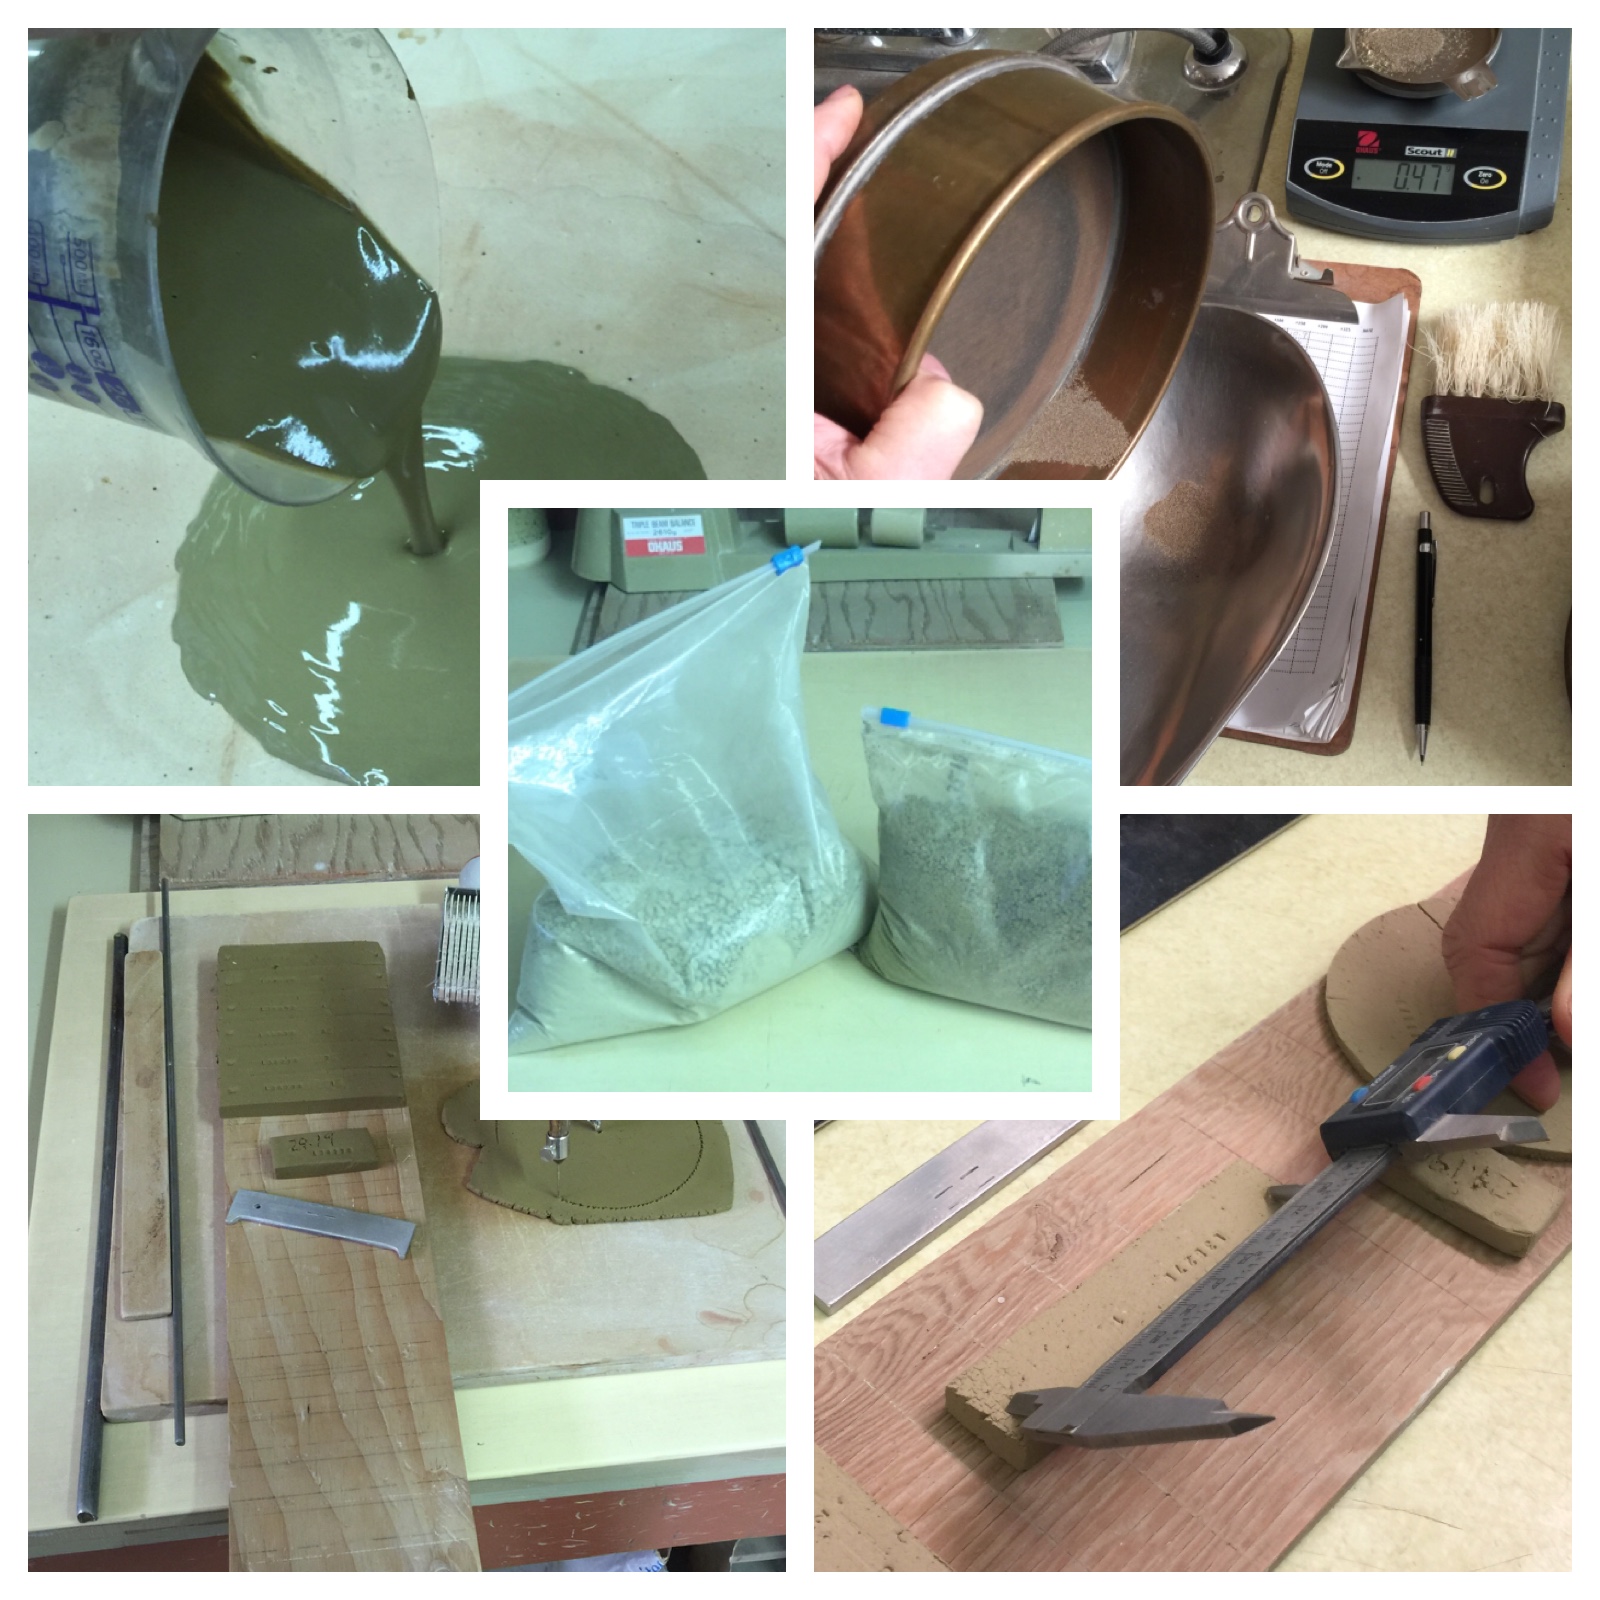
Some simple equipment is all you need. You can do practical tests to characterize a local clay in your own studio or workshop (e.g. our SHAB test, DFAC test, SIEV test, LDW test). You need a gram scale (preferably accurate to 0.01g) and a set of callipers (check Amazon.com). Some metal sieves (search "Tyler Sieves" on Ebay). A stamp to mark samples with code and specimen numbers. A plaster table or slab. A propeller mixer. And, of course, a test kiln. And you need a place to put all the measurement data collected and learn from it (e.g. an account at insight-live.com).
Characterization is a key concept here. It means that you know how to describe that clay you have found. Could you put it on a potter's wheel and make a thin-walled piece? Is it sticky? Does it take a long time to dry? These things mean it is plastic. Does it have high drying shrinkage? Does it crack on drying? Is it fine particled? Does it contain impurities that must be screened out? Does it have soluble salts? At what temperature will it mature in the kiln (that is, be dense and strong)? Does it have a high firing shrinkage? What color does it fire? How does the color, density and shrinkage progress over a range of temperatures? Does it fit your glazes? The answers to all of these questions are a matter of judgement. If you have used plenty of commercial clay bodies, then you already have frame-of-references with which to compare native materials. Knowing the answers to questions like these will tell you what to mix it them (e.g. silica, feldspar, ball clay, kaolin). If you have multiple materials, knowing their individual characters will often enable mixing them to produce a 100% native body. Or, one having as high a percentage of native clay as possible.
Another important factor is to lose whatever fear you have of putting something unknown in the kiln. Fine particled clays are not going to explode! The worst that can happen is they melt. So you just put them on refractory tiles (which you can make using a fireclay (or ball clay/kaolin mix).
Reason 1 for record keeping in an insight-live.com account
Notes. It is a much better place to take notes than that old binder you use. And the chance of losing them is the same as the chance of losing the phone that you access them with. No, wait, it is way less. Because any internet connected phone or device with a browser can be used.
Another factor for success is to learn to think like a mad scientist! That will motivate you. It will also turn you into a compulsive note-taker and record-keeper. And today’s mad scientist takes a lot of before-and-after and this-vs-that pictures, and he/she knows how to use Photoshop (or similar). It will help you weather failures, regarding them as education and a path to eventual success. This is important, especially if you are testing multiple clays. And working over a long period. An audit trail of data, notes and pictures and knowing how to interpret these is a key to being able to characterize a clay. That is why I created Insight-live.com, it is the place where you document all your work. Follow this path and you will learn how to describe your clays to others in succinct and nerdy language! Developing both right-brained and left-brained thinking patterns will make your work as an artist or crafts person so much better. And think of how valuable the data you accumulate will be for those workshops you are going to do?
In doing thorough testing work you will start to look at the commercial materials you have always used with a more critical eye. And understand them better. You will see that the results of the practical tests you can do yourself yield more valuable information than all those numbers on the datasheets for those materials!
Mixing clay bodies is not like mixing glazes. Glaze chemistry is a key predictor of fired results, but with clay materials, it is the physics (e.g. plasticity, color, shrinkage, particle size, maturing temperature). It is exciting when you can start to mentally model the working properties of plastic clays by visualizing the particles, their mineralogy, sizes, shapes, surface area and interactivity with water and each other.
Does it contain much soluble calcium?
This early field test on raw lump clays involves dripping some vinegar (or 50% muriatic acid, HCl) on a specimen. Fizzing is a predictor of serious efflorescence issues. But do not over-react if it is not a lot, some soluble salts are OK. And you can use barium carbonate to precipitate them.
Raw lumps vs. powdered form of the same raw clay
Lump properties
You can learn a lot just from a lump of the material. If wet lumps smell bad they likely contain decaying plant matter, that will cause issues (watch out for clays dug close to the surface where animals graze, obviously these can contain organic hazards). If raw lumps are grey or black they might contain lignite (a classic sign of ball clay). Slake and wash some through a fine screen (e.g. 100 mesh that you can buy on eBay) to see what it catches. During firing, organic particles create gases that can bubble-damage glazes, or bloat or black-core bodies. If you have a big lump, note if it cracks into many smaller ones during drying (this indicates good plasticity). Using a hammer, break dried lumps into smaller ones. Do they resist breakage or turn to powder (non-plastic clays can be very fragile, plastics can be amazingly hard). When there are nodules or stringers of iron, carbon or calcium on broken surfaces you can gauge their impact by firing some of the lumps. That will also provide initial information on firing properties.
Slaking properties
The term "slaking" refers to the breakdown that normally occurs when a dry clay lump is immersed in water (again, it must be dry, damp plastic clays will not generally slake because existing water creates a barrier to further penetration). Clays that slake well will break down completely in water and stir or propeller-mix to a smooth slurry. To be plastic the slaking should proceed as shown.
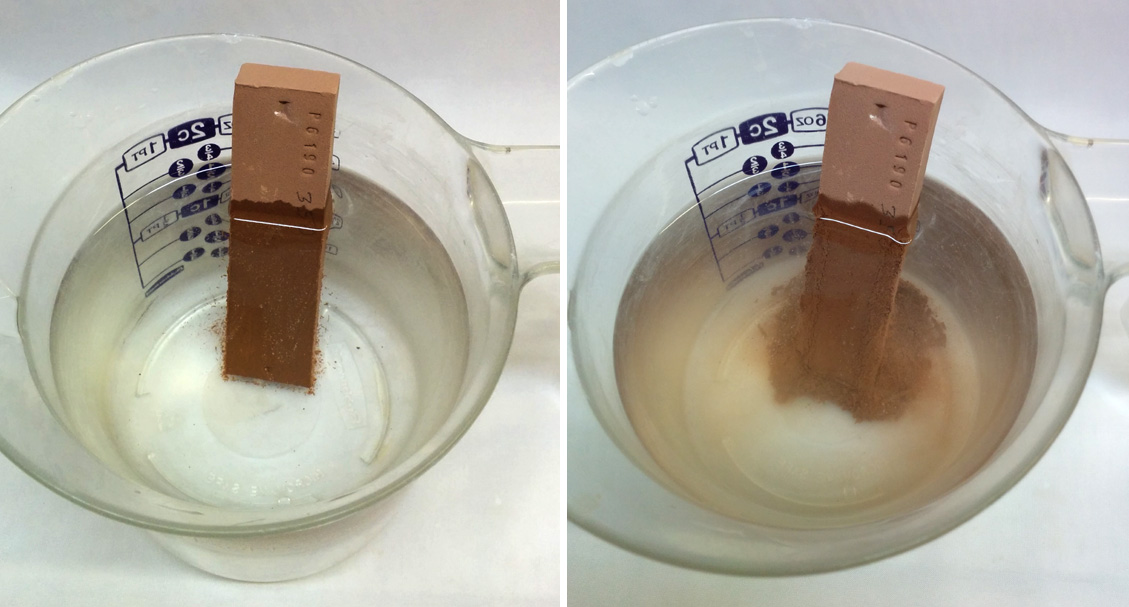
Slaking. What is that?
A slaking clay bar (of a typical pottery clay). On the left, the clay bar has been in the water for around 10 seconds. On the right, after a couple of minutes, the rate of slaking has increased dramatically, the corners are disintegrating. Watching this process can be addictive! In about 20 minutes this bar will disappear into a pile on the bottom. Slaking happens most quickly when the sample is completely dry. High plasticity clays take longer (like this one). Slaking can be used to prepare clays for use: Dry the lumps, break them down using a hammer, put them in water, wait (less than 30 minutes for typical pottery plasticity), propeller mix, screen out impurities, then dewater to plastic state.
If you have a raw lump sample then slaking properties will be evident during the preparation of a plastic sample. Sprinkle 1.5 lb of that material into water (lumps should be small e.g. 1/2 inch). During the process take the opportunity to note if the slurry is lumpy or sandy or if shale and grit settle on the bottom (of course this will mean that screening or grinding could be needed during production processing. Also note if the slurry gels, this indicates thixotropic behavior. Also, is there organic material floating on top?
However it is best to also slake one of the test bars later in the process, as shown here (these are specimens of consistent size and shape enabling comparative observation). Note that if there are soluble salts on some surfaces of the bar these may slow the onset of slaking.
Dewater the slurry
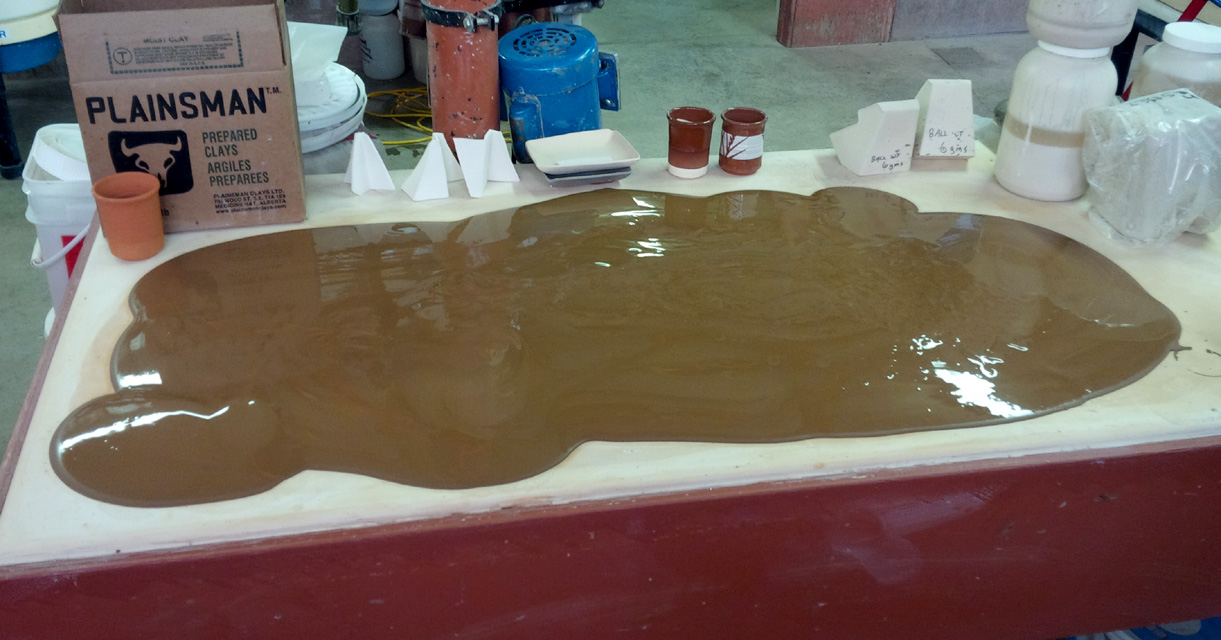
Pouring the slurry on a plaster table to dewater it
Pottery plaster is highly absorbent, it can remove the water from this thick slurry, made from a 5 kg powder mix, in an hour. Slurries of higher water content dewater much quicker, a 1 kg mix can be ready in minutes. This table weighs 400 lbs dry, but smaller ones are equally practical for smaller test batches. Plaster tables are much more practical in arid climates, it is dry here so one this size can supply enough clay for production of a potter. In wetter climates ductwork can be installed within the plaster and air pressure can be used to dewater the table. If you need one of these, photos are linked to our plaster table article.
Pour the slurry onto a plaster bat of sufficient size (if you do not have one make one). It is worth noting the dewatering behavior. Fine-particled clays have ultimate sizes much smaller than a micron (especially bentonitic materials). These can lay on a plaster slab for many hours (even days) while dewatering. And when you peel them up for wedging they will be sticky and messy, requiring smearing them down on the batt again. Larger particled plastic materials (e.g. ball clays) may not be as sticky but will require peel-up, wedging and lay-down multiple times. By contrast, large-particled clays, like kaolins, have 5-10 micron particles. These may dewater in minutes and require vigilance to not end up too stiff. Sandy and silty materials dewater even faster. Clays containing lots of silt and sand often separate during dewatering, the fine clay component migrating against the plaster (with the water) and the silt and particulates layered above.
If a difficult-to-clean film forms on your plaster slab after dry-out it likely means the clay contains soluble salts.
Plastic properties
Sufficient plasticity is indicated if a rolled cigar shape can be bent without splitting. Native clays often have excessive plasticity and pass this test easily. They can be so sticky that they cannot be rolled or shaped. Or they need to have such a low water content, to not be sticky, that they are difficult to work with. It might be necessary to mix these with a non-plastic to continue testing. A standard in many labs is to mix it 50:50 with silica powder (commonly done with ball clays and bentonites). A problem with this approach is getting inaccurate fired property results. So, another option, involving more effort is to powderize some of the test material, calcine it and mix 50:50 calcine:raw (this enables a true picture of the fired properties later). Non-plastic clays present a similar challenge, often they cannot be formed into test bars, or even if they are, the dried bars are so fragile it is impractical to handle them. It is common for labs to mix such clays with ball clay, perhaps 25% to make them workable. However, to get more reliable fired property results it is better to mix with bentonite, typically 5% is enough.
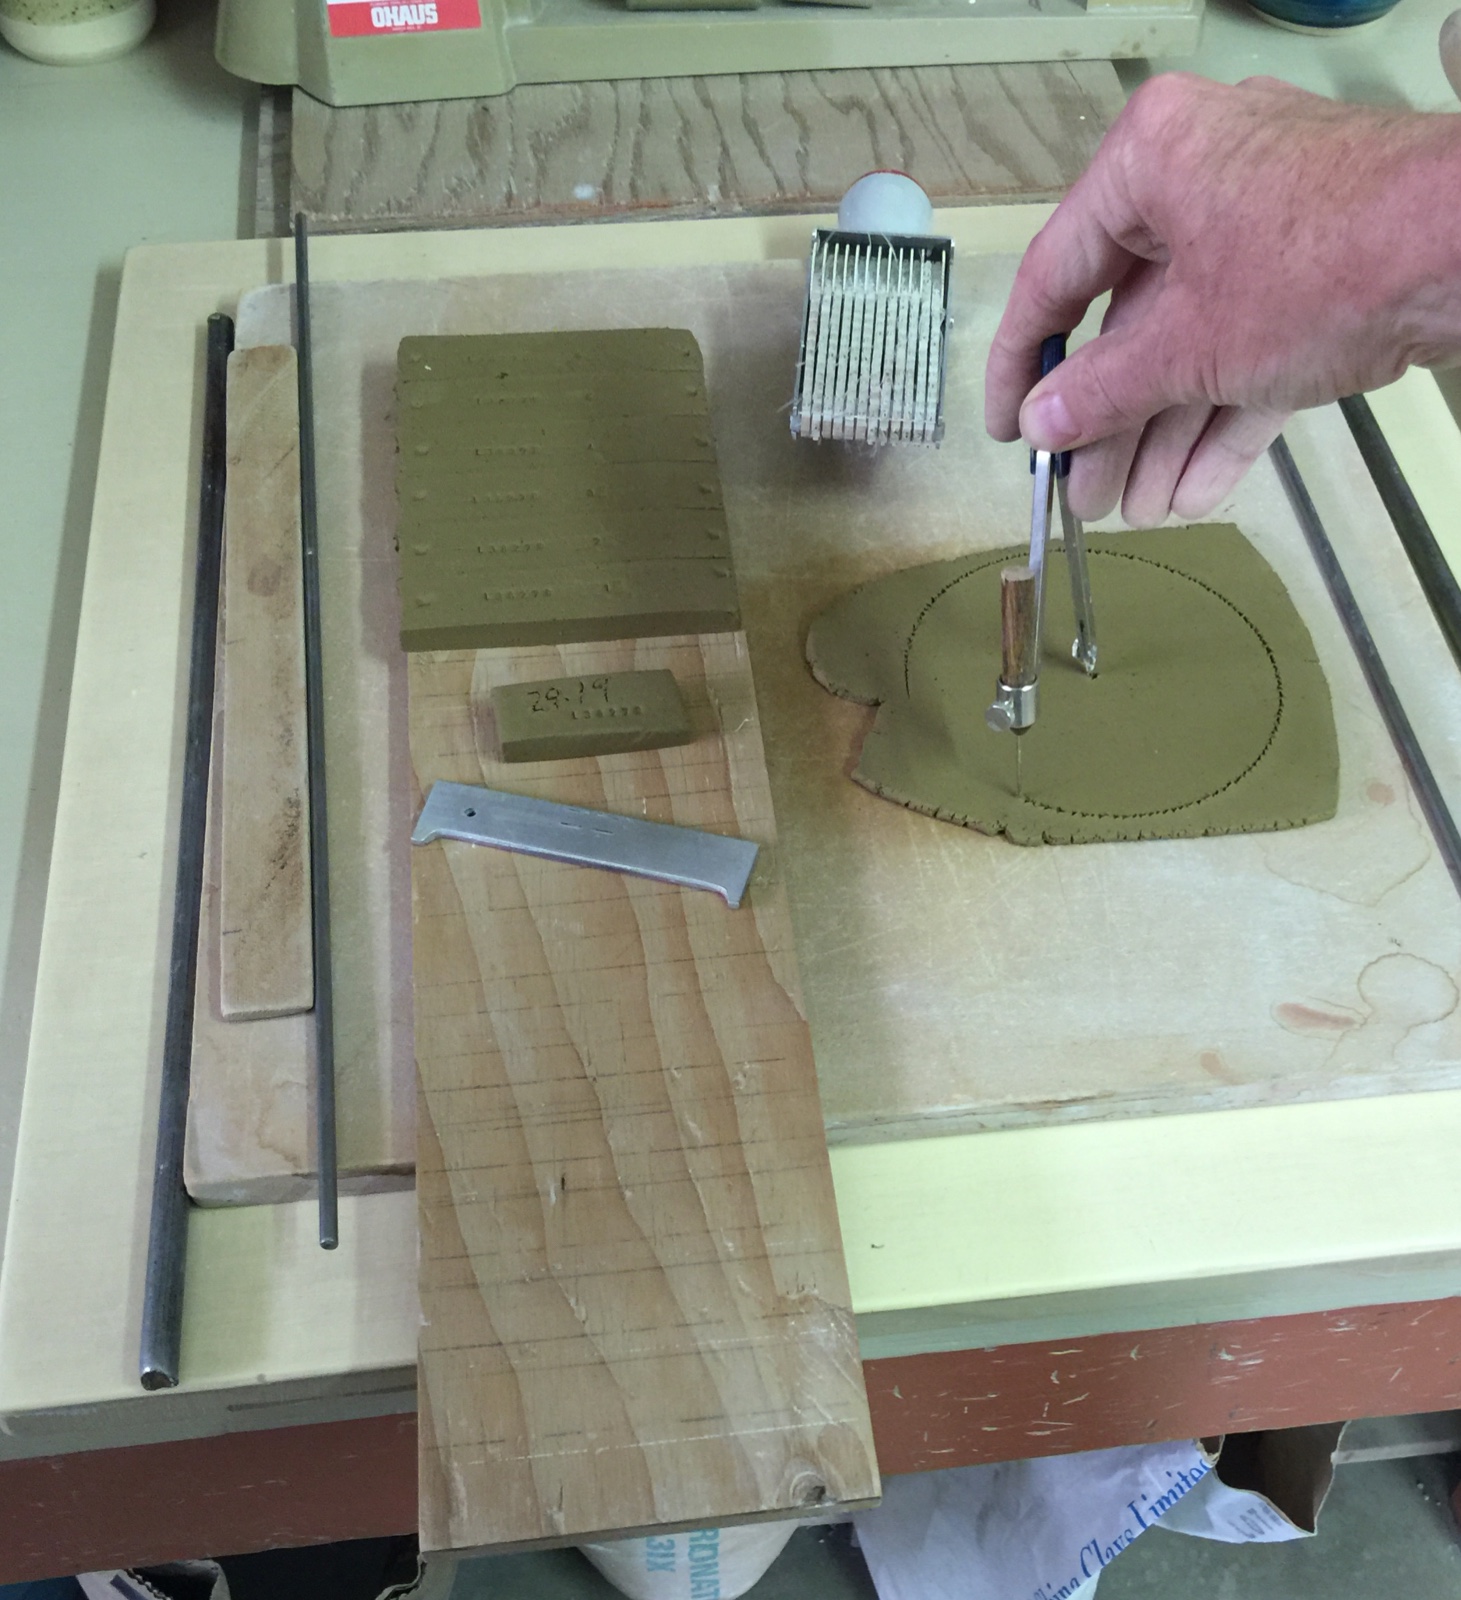
Preparing clay test bars to measure plastic, dry and fired physical properties
This is being done for SHAB, LOI and DFAC tests. The clay was wedged thoroughly, rolled to 3/8 thickness (using the metal rods as gauges) and then cut to 4 1/4" by 1" bars. Code numbers and specimen numbers are stamped on each (these are needed to enter data into our account at Insight-live). For example, notice that the bars have specimen numbers from 1 to 6. These will be fired at six different temperatures (for a low-temperature body, for example, we fire cone 06, 04, 03, 02, 01, 1, 2). The data measured from each, including the temperature, will be entered for each bar (specimen). The 12cm dia. disk is being cut from 3/16" thickness. Notice how these clay tears as cut, this is an indication of the low plasticity of this native clay material. And notice the greenish color, that is typical of terra cotta clays.
Tendency to allow water penetration and water splitting is indicated if you balance a cigar-shaped piece on your finger, put a couple of drops on the top center and splits begin to form quickly (clays with coarser grains and lower plasticity have advantages but can be susceptible to water splitting).
Make test bars
When the clay is suitable for forming, I roll slabs (using metal bars as roller guides) and carefully lay them on 12cm wide boards for cutting. If the clay is sticky it will be difficult to peel up, it might be necessary to roll it on newspaper, or plaster. For very non-plastic clays (that are too weak with withstand peeling up) a similar approach might be needed: Repeat cycles of rolling it a little thinner (between sheets of newspaper), peeling away the top layer and replacing it with a new piece, flipping the board on to another and replacing that newspaper, then repeating. It will split at the edges, so roll the piece big enough so that the final flip onto the 12cm board leaves enough to cut.
Once the clay is on the board, cutting along both sides produces a 12 cm wide strip that can be sectioned, using a wooden ruler and thin-bladed knife, into 2.5cm (1”) wide bars. Be careful to cut vertically so the bars will stand on edge for firing. If the clay is sticky the ruler sticks. If it is very non-plastic it will be difficult to cut the bars without tears (use a compressing rather than cutting motion with the knife for these).
Make 5 or 6 bars. Stamp the identification and a sequential specimen number on each. Carefully make 10cm-apart marks on each bar, ones that can be accurately measured after drying and firing. Make a half-length bar (for an LOI test).
Roll a 5 mm (3/16”) thick slab and cut a 12 cm diameter drying test disk and put it on the board with the bars (place a plaster small soup can in the center, leaving only the outer part of the disk exposed).
Dry the specimens completely.
border
Soluble salts
Many native and commercial clays contain soluble materials (e.g. sulphates) that come to the surface with the water and leave solute behind that melts into a dirty glassy surface layer. This is a universal problem in the ceramic industry. In structural products it is dealt with by the addition of barium carbonate (0.2-0.4%). During clay processing, it reacts with the sulphates to produce insoluble carbonates and barium sulphate.
On the circular drying disk (made above) solubles from the center migrate with the water to the outer exposed section and concentrate there during drying producing obvious differences in the surface coloration. Note the solubles deposits around the edges of the disk. Fire it to see if they visually impair the fired surface (soluble salts usually melt like a glaze so they are actually an asset to fired functionality).
Note the nature and number of cracks on the circular drying disk and record (use the method described for the SHAB test).
Evaluate dry bars
Completely dry the bars (under heat or in the sun). Clean the bars using a knife to remove corner burs. Plastic clays are strong and hard to trim. Highly plastic ones shrink a lot and warp the bars during drying. Super plastics (e.g. bentonite) crack the bars. Non-plastics have soft edges, chip easily and are fragile to handle. Kaolins feel smooth and soapy on cut edges.
Break one of the dried bars and rate it, based on your experience of the strength of kaolin, ball clay, fireclay, etc.
Record the weight of the half-width bar and calculate water content as wet weight – dry weight / wet weight * 100. Kaolins have water contents of less than 20%, stonewares 20-23% and ball clays, even more, bentonites can be 30%+
Record the average dry shrinkage of all the bars (shrinkage is simply 100 minus the dry length). 7% shrinkage is high but can be tolerated if dry strength is good and coarse particles are available to terminate micro-cracks and prevent warping. 5% shrinkage is low and normally accompanied by poor dry strength and low plasticity.
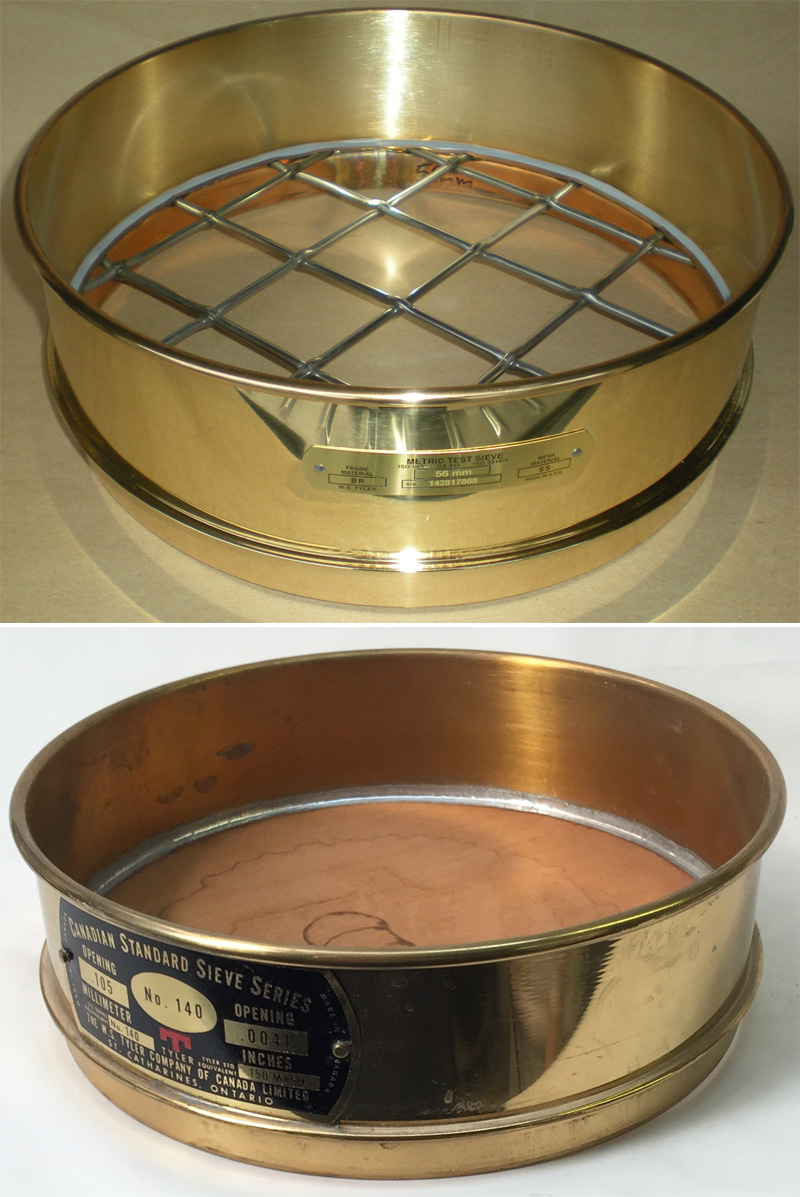
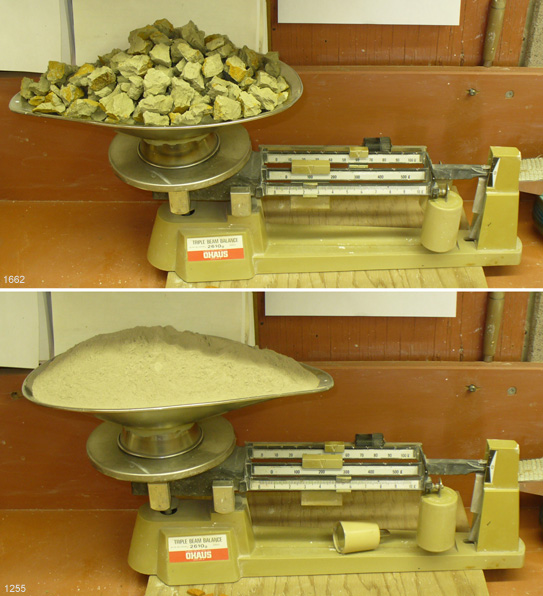
This is what labs use to measure particle size
To measure particle size in a slurry or powder you need sieves. This is the most popular type used in labs. They are made from brass by a company named Tyler. The range of screen sizes for testing particle size is very wide (obvious here: the top screen has an opening of 56 mm, the bottom one 0.1 mm - the wires are almost too small to see). You can often buy these used on Ebay for a lot less than new ones, search for "tyler sieve". The finer sieves (especially 200) are fragile and more easily ripped. For potters it is good to have a 50, 100 and 150.
Particle size
Knowing the identity, amount, sizes, and proportions of sizes of particles in a sample is important (the feel of a material can actually be misleading). Apparent particles and ultimate particles are different (apparent particles are agglomerations of ultimate particles). Clays with a lot of harmful +100 mesh impurity particles (e.g. sand, shale, quartz, iron-bearing rock) may be useable if your ware can tolerate some fired speckle. Even +50 mesh particles can be tolerated for stonewares and earthenware. But for fine functional ware, you will need a way to screen out +100 mesh sizes (see links below). If the clay contains a lot of quartz sand remember that these particles expand and contract suddenly as they pass upwards and downwards through quartz-inversion (about 1050F) producing micro-cracks around each grain in the rigid fired matrix. Such materials obviously must be fired slower.
The apparent particle size is determined by washing material through a series of progressively finer sieves. Wash 50 grams through a 100 and 200 mesh screen (piled on top of each other). Dry the screens and weigh the material on each (and multiply by 2 for percentage). Examine the particles on the 100# under and 50X light scope or microscope (available on Amazon). Are they quartz sand? Hard clay or shale? Lignite? Flakes of mica? Dark particles of iron or manganese material?
Fire the test bars
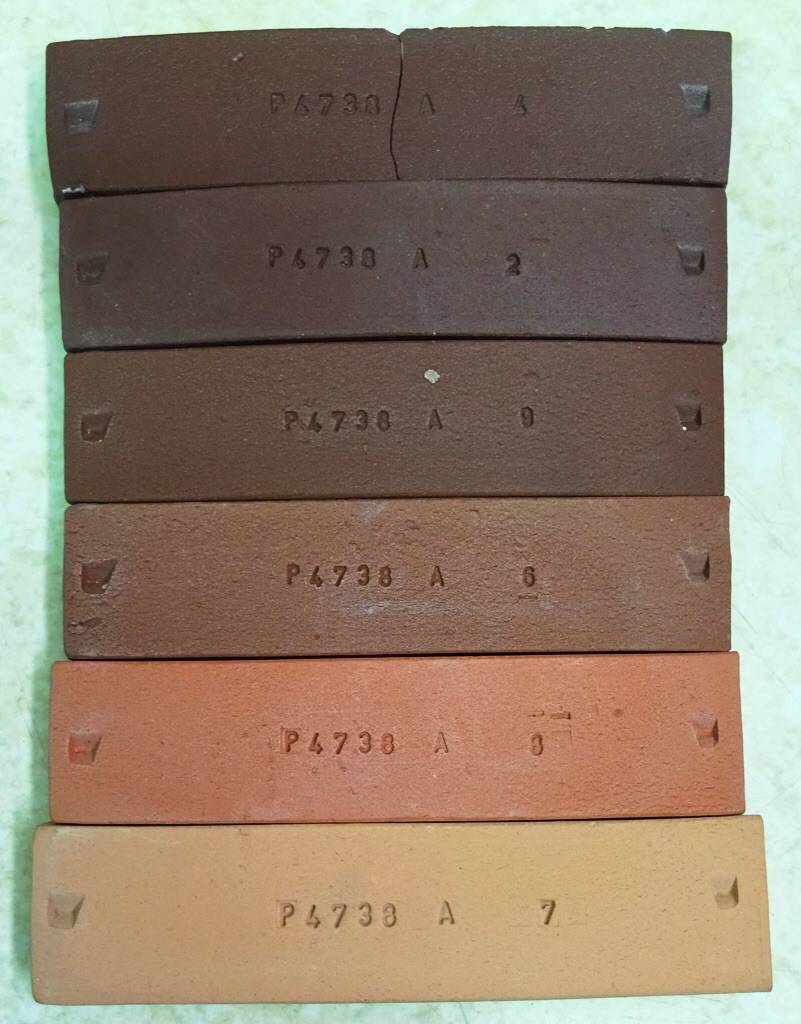
A terra cotta clay fired from cone 06 (bottom) to 4
Terra cotta clays mature rapidly over a narrow range of temperatures, showing dramatic changes in fired color, density and strength. These Plainsman BGP SHAB test bars are fired (bottom to top) at cone 06, 04, 03, 02, 2. At cone 06 (1830F/1000C) it is porous and shrinks very little. But as it approaches and passes cone 03 (1950F/1070C) the color deepens and then moves toward brown at cone 02 (where it reaches maximum density and strength). However, past cone 02 it becomes unstable, beginning to melt (as indicated by negative shrinkage). The second bar up, cone 04, is a good compromise: Adequate strength, good color and low shrinkage. This “single suitable temperature” is completely different than white burning low fire bodies, they are refractory.
For this part of the test it is necessary to have a small test kiln. I would not live, as a potter, without one! Using your experience of firing the initial lumps, guess the maturing temperature. Then fire bars to one or two cones higher and lower. If needed in your application, fire one of the bars at an accelerated rate (compared to your typical firing) up to 500F to see if it can withstand faster firing.
Fire the half-length bar to at least cone 02, record its weight and calculate LOI (Loss On Ignition) as dry weight – fired weight / dry weight * 100. Clays that contain organic matter lose weight on firing, for obvious reasons (often 7% or more). Much of this amount is crystal-bound water, but it is surprising how much smoke can be present in a rising 500F kiln.
Fire all the bars accurately. Record the temperature reached according to the degree-of-bend of the three cones (see my article interpreting cones).
Photo not found
or not published
Evaluate porosity and shrinkage
Measure the distance between marks on each fired bar and record fired shrinkage as dry length – fired length / dry length * 100.
Record the weight of each bar, then boil all fired bars for 5 hours and soak for 19, blot dry and record the weight again. Record porosity is wet weight – dry weight / dry weight * 100. Plot a chart showing percentage porosity and shrinkage against temperature. Compare this chart with one for a standard commercial body you use with success. Vitreous stoneware bodies are best tuned to fire at the point where porosity and shrinkage curves are levelling out before reversing direction. Red earthenwares give the best results at least 2-3 cones before they suddenly change color to dark brown. Sculpture bodies need a compromise of fired strength with resistance to fired warping.
Thermal expansion
The above testing should indicate the best firing temperature for the material. Apply a typical transparent glaze to a dry and bisque-fired bar or disk of the clay, fire and then stress its fit with immersions in ice and boiling water. If it crazes the clay has a low thermal expansion and is likely low in quartz. If it shivers the clay is likely high in quartz and would be a good body ingredient to prevent crazing.
Further evaluation
Now that you know what the material is in relation to kaolin, ball clay, fireclay, stoneware and bentonite; put it into recipes accordingly. Don’t be tempted to use it alone as a body, it should at least be diluted to dampen changes in properties over time. To use as much as possible in a body, find other materials with complementing strengths and weaknesses.
Let's get started
These test bars are an example of how much can be learned from firing a clay to many temperatures.
Do you want to go to the next step and really learn how to test materials and compile the test results in an organized way? There is a lot more information in the Digitalfire Reference Library (including a glossary). And get a subscription to Insight-Live.com so you can start keeping records.
A practical example: Look for the link below: "It Starts With A Lump of Clay". This is part of the Insight-live.com instruction manual. It shows, from start to finish, how I went about testing two lumps of clay. We have done this thousands of times and have several hundred thousand test measurements in our Insight-Live.com account!
Related Information
Dried test bars stacked into an electric kiln for firing

This picture has its own page with more detail, click here to see it.
These have already been measured to deduce drying shrinkage. After firing they will be measured again to calculate the firing shrinkage. Then they will be weighed, boiled in water and weighed again to determine the water absorption. Fired shrinkage and absorption are good indicators of body maturity.
Red burning, customer-found terra cotta clays charachterized
This picture has its own page with more detail, click here to see it.
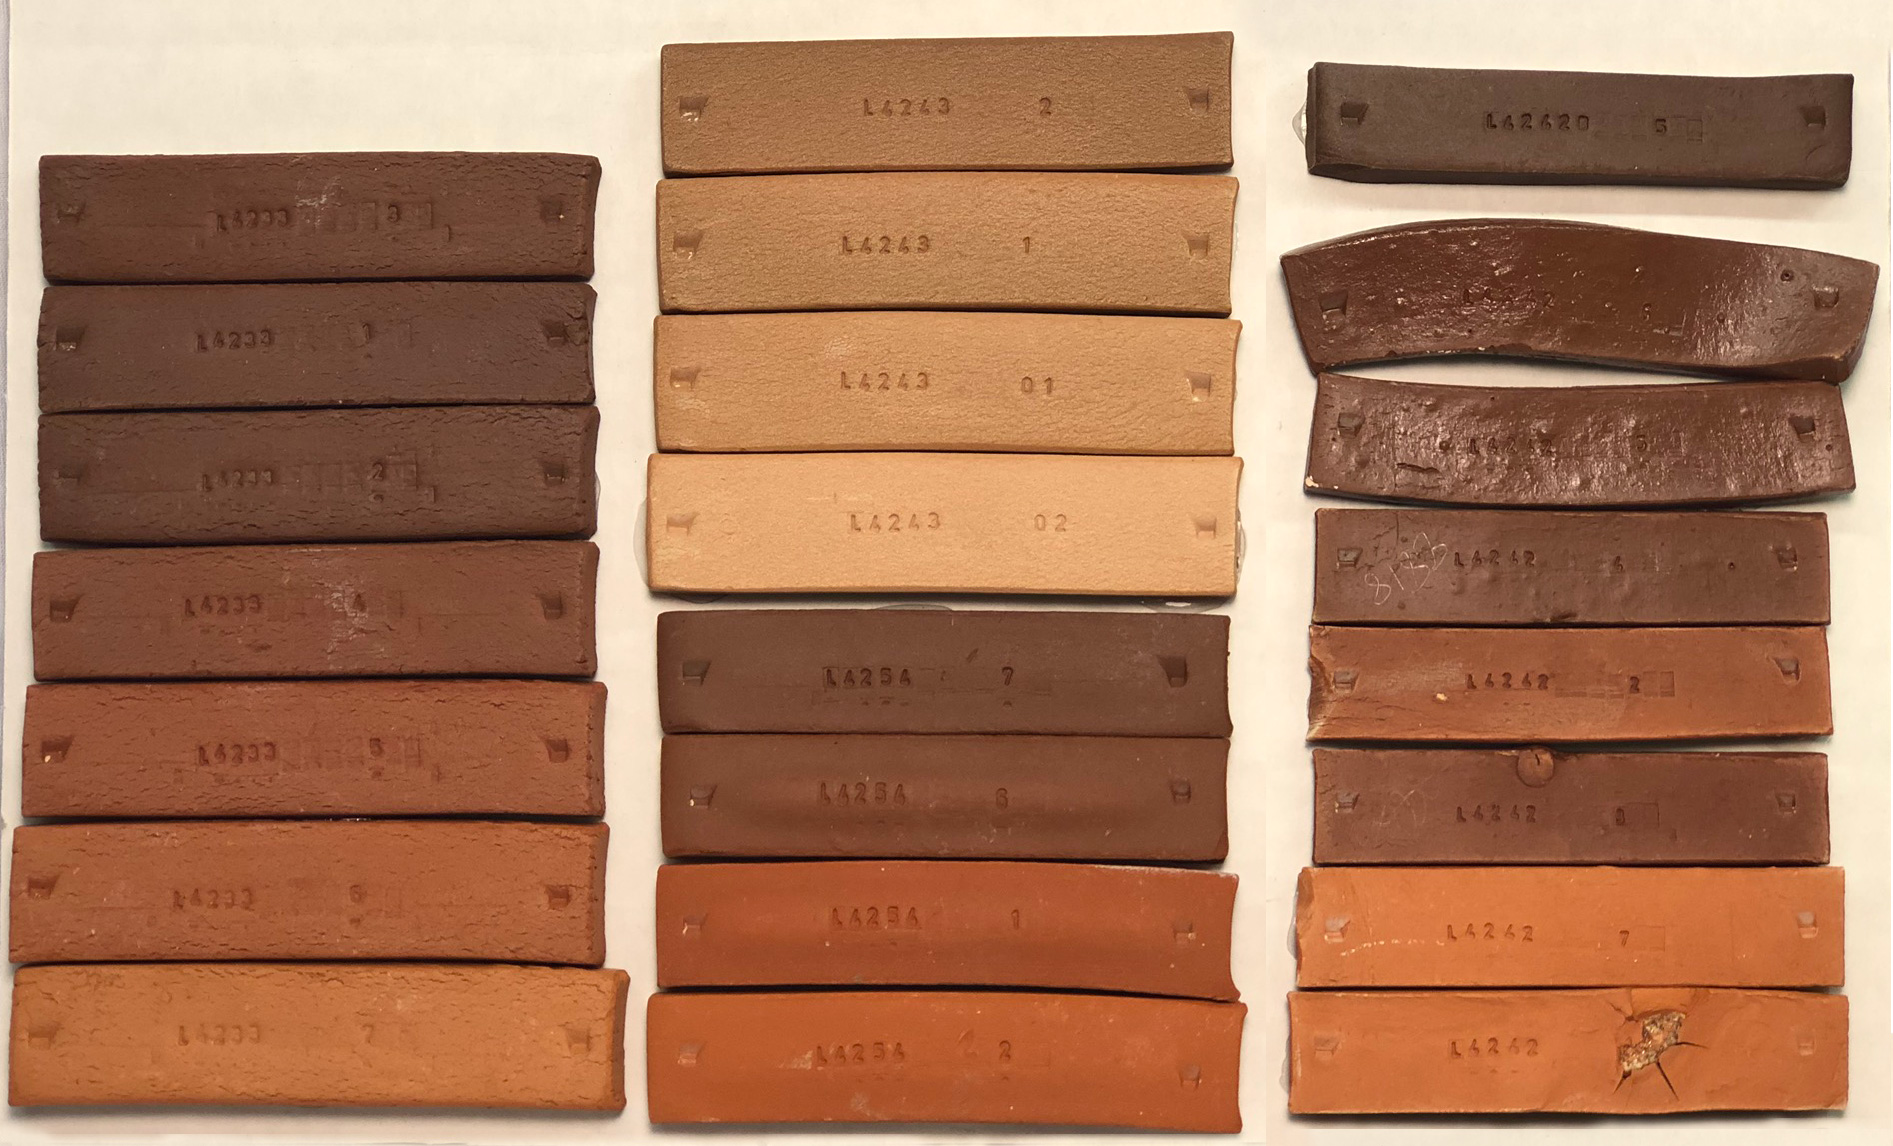
We tested four different clays (brought in by customers). One is from BC and three from Alberta. These fired sample bars show rich color, low soluble salts and high density and strength at very low temperatures. L4233 (left): Cone 06 to 3 (bottom to top). Reaches stoneware-density at cone 02 (middle bar). Plasticity is very low (drying shrinkage is only 4.5%). But, it is stable even if over-fired. L4254 (center bottom): Cone 04,02,3,4 (bottom to top). Very fine particled but contains an organic that is gassing and bloating the middle two bars. L4243: Fires lighter and looks stable here (cone 02,01,1,2 shown) but melts suddenly less than a cone above the top bar (well before vitrification is reached). L4242 (right): Hyper-plastic, with 12% drying shrinkage! Already melting by cone 02 (third from top). Achieves almost zero porosity (porcelain density) at cone 04 (#2 bar). Even when mixed with 20% kaolin and 20% silica it still hits zero porosity by cone 1. What next? I'll mix L4233 (left) and L4242 (right), that should produce stoneware density at cone 02 (about 1% porosity).
Step-by-step how to test and evaluate a new native clay

This picture has its own page with more detail, click here to see it.
"It Starts With a Lump of Clay", a step-by-step Insight-Live.com tutorial (from its help system and the link below) on how to document every step (in an account at insight-live.com) of testing a raw clay. You will learn about drying shrinkage, drying performance, particle size distribution, plasticity, firing shrinkage, fired porosity, fired color, soluble salt content, fired strength, etc. We will not just observe these properties, but measure them. In doing so we will characterize the material. We will answer simple questions about how the material forms, dries and fires across a range of temperatures. In doing the testing I will be generating a lot of data. No single factor is more intimidating to new technicians than what to do with this data, how and where to store it, how it can be searched, learned from, compared.
Mel Noble at Plainsman Clay's Ravenscrag, Saskatchewan quarry

This picture has its own page with more detail, click here to see it.
Six different sedimentary clays are extracted from this quarry. It was opened in the 1970s, the best location available at the time. These test bars were made by slaking select lumps from each layer (thus exhibiting their best performance). The left-most dried test bars show the layers (top to bottom). The A1 top layer is the most plastic and has the most iron contamination (it is used in the most speckled reduction firing bodies). A2, the second one down, is a ball clay (similar to commercial products, although darker burning), it is very refractory and the base for Plainsman Fireclay. A3, third from top, is a complete buff high-temperature stoneware (like H550), although sandy and over-mature at cone 10. 3B, third from bottom, is a smooth medium-temperature stoneware; it contains significant natural feldspar (although fired color and particulate contamination are the most variable). The second from the bottom, 3C. fires the whitest and is the most refractory (it is the base for H441G). The bottom one, 3D, the best product in the quarry. Although the least plastic and most silty, it is also very fine particled and the cleanest (consistently free of particulate impurities and sand), it pairs very well with a ball clay to make a cone 6 stoneware.
Clay from below a bog, ready to throw right out of the ground!

This picture has its own page with more detail, click here to see it.
This little pot on the left is more than it appears. Both of these samples were fired at cone 01 and clear glazed in the green state (without bisquing). The one on the right, a typical unprocessed native terra cotta clay, is full of pinholes, the one on the left has none. But the one on the left has been pre-processed by mother nature: it is from a thick layer of clay found below a bog in northern Alberta. It has 21% water content, you just cut a piece out, wedge it and throw a pot! Although it contains some particulate, it is highly plastic yet dries well and fires to a dense stoneware-like hardness 11 cones lower than we normally make stoneware at.
Mother Nature's Porcelain: The lumps in the quarry

This picture has its own page with more detail, click here to see it.
This 50 lb lump is from a quarry where we are mining the Whitemud Formation in southern Saskatchewan. This layer is extracted from the top of a hill at the bottom of a valley, putting it more than 50 meters below the prairie surface. The lumps are extremely dense and very heavy. They are also quite damp, about 12% by weight fossil water. They exhibit this horizontal layering, a clear indication of the sedimentary nature of the deposit. The clay is exceedingly fine-particled and the silica present exists in rounded grains finer than about 150 mesh. There are flecks of high-carbon material and some tiny iron particles. When lumps like this dry out when exposed to the sun they break down into thousands of pure-white pieces. These dry lumps slake quickly in water to create a creamy smooth slurry from which I can easily sieve out the carbon and iron particles to produce the hyper-smooth natural porcelain.
Mother Nature's porcelain - From the Cretaceous period

This picture has its own page with more detail, click here to see it.
During a 6 week of mining in 2018 in Ravenscrag, Saskatchewan we extracted marine sediment layers of the late Cretaceous period. The center portion of the "B layer", as we call it, is unbelievably fine particled (impossibly smooth, like a body that is pure terra sigillata)! The feldspar and silica are built-in, producing a glassy body surface, starting at cone 4 and lasting to cone 8. Despite this, pieces don't warp in firings! I have not glazed the outside of this mug for demo purposes. I got away with it this time because the Ravenscrag clear glaze GR6-A is very compatible (the thermal expansion is high enough to avoid glaze compression issues and low enough not to craze). With other less compatible glazes these mugs cracked when I poured in hot coffee. To make this body I am slurrying it up as a slip and processing it to 325 mesh (using a vibrating sieve).
Mother Nature's porcelain…
With Mother Nature’s glaze

This picture has its own page with more detail, click here to see it.
These bowls were fired at cone 6. The body is amazingly vitreous, given that pieces are very resistant to warping during firing. In fact, other pieces made from it having walls as thin as 2mm, did not warp either! This comes from a two-foot-thick section of the 3B layer from a Plainsman Clays quarry near Ravenscrag, Saskatchewan, Canada. It is plastic and feels smoother than any commercial porcelain. It does not fire white because Mother Nature included some iron oxide in the clay itself and in the soluble salts that produce the glaze-like surface (these disappear when a clear glaze is applied). It accepts glaze like a porcelain.
Incredible Mother Nature’s porcelain

This picture has its own page with more detail, click here to see it.
This is made from 100% of a natural clay (3B) from the Whitemud formation in Ravenscrag, Saskatchewan. To make this body, which I call MNP, I slake and slurry up the raw clay lumps, sieve it to 200 mesh and then dewater on a plaster table. I rolled the plastic clay into a thin layer, cut it into a cross-shape using a 3D printed cookie-cutter, drape-molded it over a plaster form and then slip-joined the seams. It fires very dense and strong (to zero porosity like glass!). It holds together well and joins well with its own slip. Although not super plastic, it is smooth and fine-grained like a commercial porcelain body. I add 1-2% bentonite to make it more plastic when needed. It can be rolled extremely thin and yet does not warp in the firing! This mug has a weight-to-volume ratio of 2.08 (the weight of water it will hold compared to its own weight).
Michael Cardew might be turning over in his grave!

This picture has its own page with more detail, click here to see it.
This post got a lot of negative reaction on social media. To be clear, I work both sides of the fence, making my living on selling prepared glazes and clay bodies but I get my satisfaction being closer to the materials and processes. That is what enables me to give customer support. I am not an artist, ceramic art is outside the scope of this page. For part of my life in the craft of pottery I am also guilty of what I lament below. In all my years dealing with customer traffic at our store I have never once had a customer that was offended by seeing new clay and glaze recipes we are discovering in the studio and lab, that are better and cheaper than prepared ones. But online some are somehow offended by what follows. 80 manufacturers are selling convenience and encouraging disconnection - although I work for one of them I am a voice of caution about this.
This book was once a “Bible” of hobby and professional potters. They were independent and resourceful. They made their own clays and glazes, knew the materials, built their own kilns. Now we scan social media sites for ideas on layering expensive prepared goopy brushing glazes and hope they melt together into something presentable. Many have even forgotten how to wedge clay properly. We describe processes using mystical art language and exchange likes and poor advice on social media. Those who still know how to retotal a recipe and venture into mixing their own often end up in the online trafficking of an endless parade of recipes that don’t work. Now we even outsource design to AI. Even Nigeria, the very country about whom Cardew wrote, has lost its pottery tradition.
I never appreciated the book back there. Even though he came to visit us in 1973. I have always just taken whatever clay I needed out of our warehouse, but now that I very often make my own clay it really resonates. I got this copy on eBay, I value it as an inspiration to be more closely connected with the planet and the minerals it gifts us (of course I would not do everything as he does). He was no dinosaur, he understood and taught glaze chemistry and material mineralogy, his work was the basis for many prepared glazes we buy today. "Progress" is defined by some as convenience products that make modern ceramics easy. But I believe that, for many, progress is arming yourself with a little more understanding - it enables making better quality ware, in less time, for less expense and time than with prepared products.
Testing your own native clays is easier than you think

This picture has its own page with more detail, click here to see it.
Some simple equipment is all you need. You can do practical tests to characterize a local clay in your own studio or workshop (e.g. our SHAB test, DFAC test, SIEV test, LDW test). You need a gram scale (preferably accurate to 0.01g) and a set of callipers (check Amazon.com). Some metal sieves (search "Tyler Sieves" on Ebay). A stamp to mark samples with code and specimen numbers. A plaster table or slab. A propeller mixer. And, of course, a test kiln. And you need a place to put all the measurement data collected and learn from it (e.g. an account at insight-live.com).
Personal size sieve shakers you can buy on Amazon

This picture has its own page with more detail, click here to see it.
These are small-scale devices that work on the same principles as industrial ones - thus they put industrial methods of clay processing in the hands of a potter or hobbyist. These products are stainless steel and food grade and most can be used with powders or shurries and have interchangeable screens. The most expensive device here costs $5000 and the least expensive is far less than $1000. The suppliers of each of these also have other similar machines (as well as other types of processing equipment potentially valuable in small-scale ceramic production).
Will soil testing help you assess a wild clay for pottery?

This picture has its own page with more detail, click here to see it.
No, soil testing is not helpful. Soils normally contain clay but it is so diluted with sand, rocks, silt and organics that overall plasticity is just a dot on a graph - not even close to what modelling or throwing clays exhibit. Pottery clays easily hold a shape and can be adjusted to a new shape without splitting. They dry slowly with substantial shrinkage. Highly plastic clays need more water to achieve working consistency, silty non-plastic ones need less (typical pottery clays need 18-23%). The reports shown here are typical for soils. But almost nothing here would look familiar to a potter.
-The Shrinkage Limit (SL) is the water content where further loss of moisture will not result in any more volume reduction.
-The Plastic Limit (PL) is minimum water content at which a soil is considered to behave in a ‘plastic’ manner, i.e. is capable of being moulded.
-The Liquid Limit (LL) is the maximum water content a silt or clay can have before becoming a liquid, i.e. turning into mud.
-The Plasticity Index (PI) is the range of moisture contents where the silt or clay remains plastic (PI = LL – PL).
Potters don't care about the amount of water needed, they care about how plastic the clay is once enough water has been added to get the right stiffness.
There’s DIY magic in the ground beneath your feet!
This picture has its own page with more detail, click here to see it.
Place: Vernon, Alabama.
Story: Potter's friend sends a picture of an outcrop of white clay in the ditch near his driveway.
Result: A DIY claybody is born.
This planet is full of accessible clay deposits. Many can be used as-is for stoneware, earthenware and even porcelain. Characterizing this clay is the first step. How plastic is it? What does it look like when fired at different temperatures? Does it contain impurities that need to be sieved out? Does it dry without cracking? Does it work with glazes? Etc.
A journey of clay discovery to a finished piece is one of the most rewarding experiences you can have as a potter. And be more self-reliant. You don’t need special gear, just curiosity, eyes that notice, a few simple tools, and a willingness to experiment and learn to characterize clays. And one more thing: An organized way to keep records of your testing. Think of an insight-live account as a commitment to building experience; it is your memory of everything that worked. And didn't.
Links
| Articles |
Simple Physical Testing of Clays
Learn to test your clay bodies and clay materials and record the results in an organized way, understanding the purpose of each test and how to relate its results to changes that need to be made in process, recipe and materials. |
| Articles |
Formulating a body using clays native to your area
Being able to mix your own clay body and glaze from native materials might seem ridiculous, yet Covid-19 taught us about the need for independence. |
| Articles |
Setting up a Clay Testing Program in Your Company or Studio
Set up a routine testing pipeline and start generating historical data that will enable your staff to understand your source materials and maintain, adjust and troubleshoot your clay body recipes. |
| Tests |
Shrinkage/Absorption Test
SHAB Shrinkage and absorption test procedure for plastic clay bodies and materials |
| Tests |
Drying Factor
The DFAC Drying Factor test visually displays a plastic clay's response to very uneven drying. It is beneficial to show the relative drying performance of different clays. |
| Tests |
Sieve Analysis 35-325 Wet
A measure of particle size distribution by washing a powdered or slaked sample through a series of successively finer sieves |
| Glossary |
Plasticity
Plasticity (in ceramics) is a property exhibited by soft clay. Force exerted effects a change in shape and the clay exhibits no tendency to return to the old shape. Elasticity is the opposite. |
| Glossary |
Slaking
This term is using in ceramics to describe how a dry clay disintegrates when it is immersed in or exposed to water. Different clays have different slaking rates. |
| Glossary |
Efflorescence
A common problem with dry and fired ceramic. It is evident by the presence of a light or dark colored scum on the dry or fired surface. |
| Glossary |
Characterization
In ceramics, this normally refers to the process of doing physical or chemical testing on a raw material to accurately describe it in terms of similar ones. |
| Glossary |
Clay
What is clay? How is it different than dirt? For ceramics, the answer lies on the microscopic level with the particle shape, size and how the surfaces interact with water. |
| Glossary |
Native Clay
A clay that a potter finds, tests and learns to process and use himself. To reduce the costs of importing materials manufacturers, especially in Asia, often develop processes for clays mined in their locality. |
| Projects | Materials |
| Projects |
Slurry Mixing and Dewatering Your Own Clay Body
Weigh out the ingredients, mix them using your propeller mixer and then dewater and fine-tune the stiffness on your plaster table. |
| Projects |
Evaluating a clay's suitability for use in pottery
Would you like to be able to use your own found-clays in your production? Follow me as we evaluate a mystery clay sample provided by a potter who wants to do this. |
| URLs |
https://insight-live.com/insight/help/It+Starts+With+a+Lump+of+Clay-433.html
Case Study: Testing a Native Clay Using Insight-Live.com |
| URLs |
https://www.youtube.com/watch?v=0zXfghDNxUg
ShowerShelf.com vibratory screen that fits the top of a five-gallon bucket The tank, sieve and vibration assembly are all in one piece that fits into the top of the bucket. This unit can handle 1.8SG slurry. |
| URLs |
https://www.amazon.com/Vibration-3600RPM-Industrial-Asynchronous-Vibrator/dp/B07P5CLJLP/ref=sr_1_12?qid=1559306388
Industrial vibration motor at Amazon.com |
 PayPal | No tracking, No ads, No paywall, No transient content! Just organized, concise information constantly updated and improved. Was this helpful? Consider supporting me. |
| By Tony Hansen Follow me on        |  |
Got a Question?
Buy me a coffee and we can talk 

https://digitalfire.com, All Rights Reserved
Privacy Policy