SHAB - Shrinkage/Absorption Test
The SHAB test measures the shrinkage of a dried clay material and the shrinkage/porosities of its fired form across a range of temperatures. The data produced relates to its use in ceramics. This test involves preparing a plastic clay sample, rolling and cutting bars, drying them, recording lengths, firing each at a different temperature, recording lengths and weights, boiling the bars in water and recording the final weights. This procedure assumes all data is recorded in a recipe record in a group account at Insight-live.com. Insight-live calculates the shrinkage and absorption from the data and enables reporting and side-by-side comparisons. Because the data can span many temperatures, it can be plotted on an x-y chart to produce a dynamic picture of how the material develops (and fails) in the kiln.
To get up and running quickly, browse the pictures below and watch the video.
Getting accurate firings in test kilns time after time.
This picture has its own page with more detail, click here to see it.
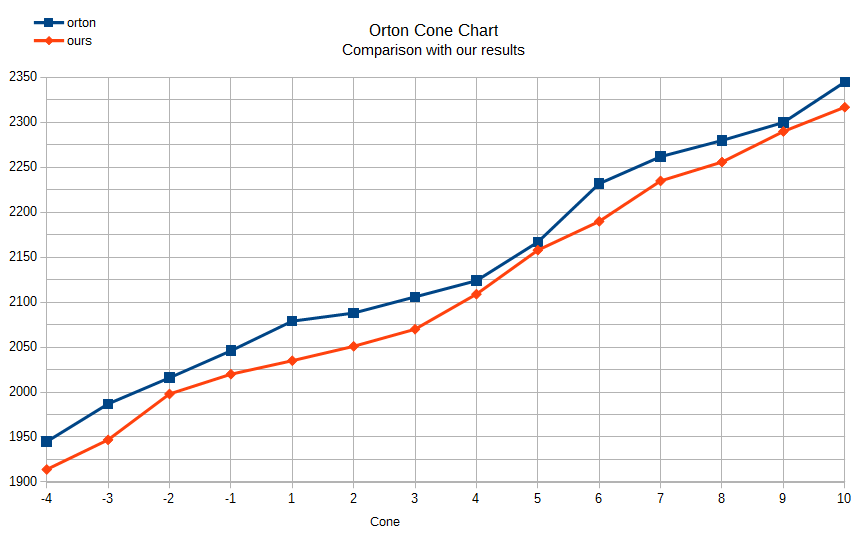
The blue line on this graph is from the Orton cone chart for 108F/hr. But those are not the target temperatures for test kiln cone firings. I use the red line to program the controller for each cone. Where is that red line from? I made it. The self-supporting cones I put in every firing verify it, time after time, for thousands of firings. Only fine-tuning is needed to adjust the top temperature if a cone so indicates. This happens as elements degrade or when they are replaced. Should you use that red line? No. Use self-supporting cones to establish your target temperatures and make your own line.
Video: Making SHAB, DFAC, LDW clay body test bars

This picture has its own page with more detail, click here to see it.
One-minute video. It demonstrates how to make the test bars for measuring plastic clay body (or clay material) drying and firing shrinkage, fired absorption, a bar for measuring water content and loss-on-ignition and a disk for measuring drying performance and soluble salts content. This method requires no expensive equipment and is within the reach of any technician.
Routine SHAB testing creates valuable historical drying and firing data

This picture has its own page with more detail, click here to see it.
Suddenly, ware is coming out of your production kiln warped or cracked or off color. Unless the answer is obvious, the first action should be to compare its drying and firing test data with past runs. If you are doing that as a routine, then SHAB test bars (and the test result data they bring) will already be available. These bars are tests of slip casting bodies, they can be made in a plaster mold and length-marked as shown. That data is a characterization of the clay body. The value of this kind of data-gathering becomes evident when a disaster happens (or better yet, is prevented). Clay bodies have plasticity, dry performance, dry strength, fired density, fired shrinkage, fired strength, etc. If you have historical data (accompanied by firing schedules, recipes, etc), you have an invaluable tool. Where does one gather the data? In spreadsheets? No, in a database. An account at Insight-live.com is specifically intended for this.
Preparing clay test bars to measure plastic, dry and fired physical properties

This picture has its own page with more detail, click here to see it.
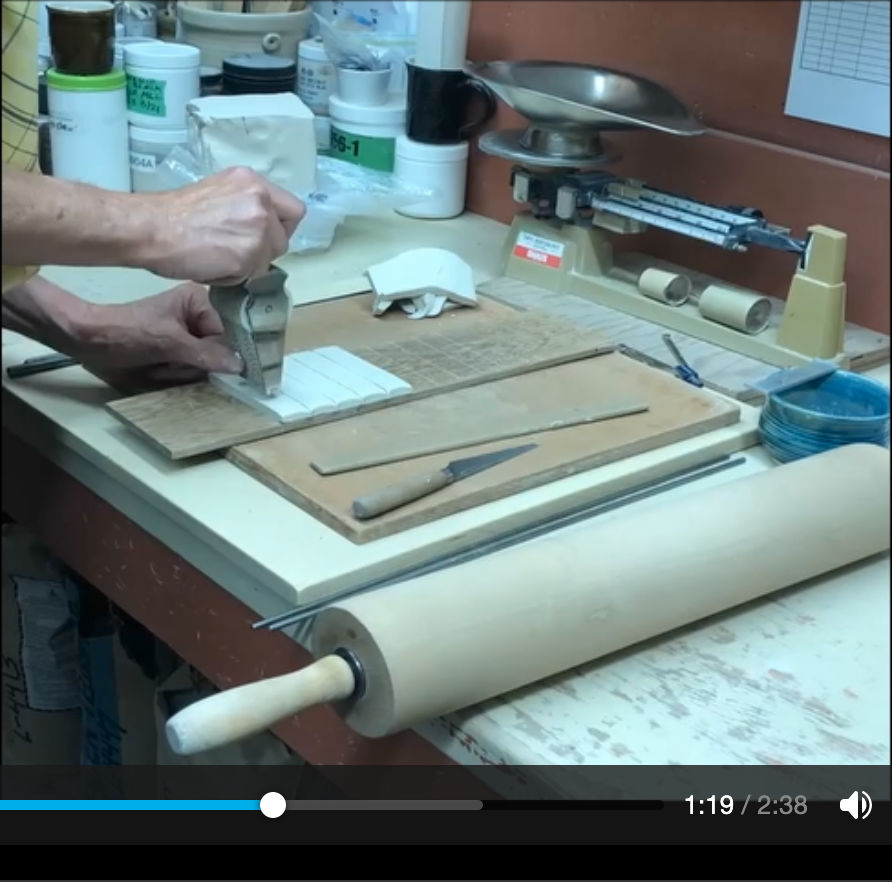
This is being done for SHAB, LOI and DFAC tests. The clay was wedged thoroughly, rolled to 3/8 thickness (using the metal rods as gauges) and then cut to 4 1/4" by 1" bars. Code numbers and specimen numbers are stamped on each (these are needed to enter data into our account at Insight-live). For example, notice that the bars have specimen numbers from 1 to 6. These will be fired at six different temperatures (for a low-temperature body, for example, we fire cone 06, 04, 03, 02, 01, 1, 2). The data measured from each, including the temperature, will be entered for each bar (specimen). The 12cm dia. disk is being cut from 3/16" thickness. Notice how these clay tears as cut, this is an indication of the low plasticity of this native clay material. And notice the greenish color, that is typical of terra cotta clays.
Length marker for SHAB test bars
Available on the Downloads page

This picture has its own page with more detail, click here to see it.
Use this to make length marks in standard SHAB test bars (for testing clay body or clay material drying shrinkage, firing shrinkage and fired porosity). This can be 3D printed. The markers are 10cm apart (outside edges). Most printers can achieve this measurement accurately. To be sure check yours using a caliper, if it is not close to 10cm adjust using sand paper or reprint using an adjusted dimension.
Dried test bars stacked into an electric kiln for firing

This picture has its own page with more detail, click here to see it.
These have already been measured to deduce drying shrinkage. After firing they will be measured again to calculate the firing shrinkage. Then they will be weighed, boiled in water and weighed again to determine the water absorption. Fired shrinkage and absorption are good indicators of body maturity.
Fired clay test bars ready for measuring

This picture has its own page with more detail, click here to see it.
SHAB (Shrinkage, Absorption) test bars ready to unload. These are measured for length after drying and firing and for weight after firing and boiling. This data is plugged into my account at insight-live.com and it calculates shrinkage and porosity numbers. If you fire bars of a clay to a range of temperatures you can characterize key properties of a clay very effectively.
Boiled bars ready for weighing to calculate porosity

This picture has its own page with more detail, click here to see it.
The weight data from these fired test bars is being collected for the SHAB test in Insight-live (they have just been boiled for five hours and soaked for 19). Compiling this type of data for hundreds of simultaneous tests is possible because Insight-live takes care of all its organization.
Step 8: Measuring the clay test bars after drying

This picture has its own page with more detail, click here to see it.
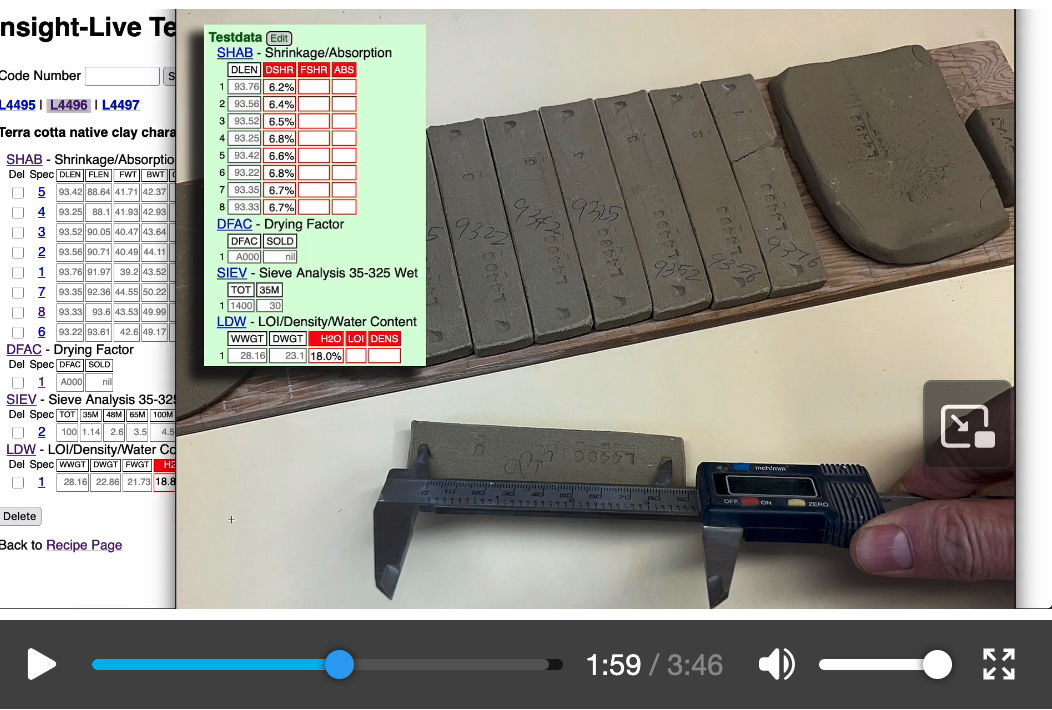
These test specimens dried overnight (this in itself is pertinent - quick drying indicates low levels of superfine particles e.g. bentonite). Here, I am measuring the length of the SHAB test bars, weighing the LDW test sample and recording the crack pattern and soluble salts on the DFAC test disk. All of this data plugs into the recipe I have allocated for this project in my account at Insight-live.com, you can it here on the inset screenshot. Next I’ll set these on our staging shelf for firing in the test kiln (we accumulate test bars for 16 temperatures).
Test bars from recent kiln firings
Here is how to enter the data into Insight-live

This picture has its own page with more detail, click here to see it.
Multiple batches of fired test bars, organized by temperature, have already been weighed and measured (the weights and lengths are written on the sides of the bars). Each batch is accompanied by the cones from the firing in the test kiln (these influence how the temperature is recorded and adjustments to kiln firing schedules). Since I am working on many runs, tests and projects at any given time, these tests pile up rapidly. And they generate a lot of SHAB test data that needs to be input into the Insight-live.com account promptly.
A batch of fired clay test bars in the Plainsman Clays lab

This picture has its own page with more detail, click here to see it.
A batch of fired test bars that have just been boiled and weighed, from these we get dry shrinkage, fired shrinkage and porosity. Each pile is a different mix, fired to various temperatures. Test runs are on the left, production runs on the right. Each bar is stamped with a code number and specimen number (the different specimens are the different temperatures). The measurements have all been entered into our group account at insight-live.com. Now I have to lay out and photograph each pile and upload the picture into the code-numbered record. Upon doing so I compare color and tests results to make decisions on what to do next (documenting these in insight-live).
Fine tuning maturity of a buff stoneware: It is about the data

This picture has its own page with more detail, click here to see it.
I am reformulating the cone 10R stoneware (the top mug) to have the variegated surface of the lower one. The top one is more vitrified and thus has a more homogeneous grey color. While that makes it stronger, it carries the danger of bloating with the materials I use and particle size (and warping). I measure degree-of-vitrification using the SHAB test, which produces fired shrinkage and porosity data. The top mug has a porosity of 1.3% and the bottom one 2.5%. That higher porosity gives protection against bloating and the light/dark variegated aesthetic I also want. The nine test bars on the left each show their porosity/firing shrinkage and recipe (my materials have simple names like A2, A3, 3C, they include ball clays, silts, stonewares). I made these nine mixes trying to find a combination that yields the desired porosity but also does not have more than 7.5% drying shrinkage (to avoid drying cracks), is plastic enough for easy forming and does not have too sandy a texture. The second from the top is the best so far and has given clear direction for the next round of testing. These nine tests were fired at five temperatures, producing 45 specimens to track and 180 measurements to make to get the final data (just for this SHAB test, others were done also). An account at Insight-live.com makes it possible to track this plus 50 other projects on the go right now. And it makes it easier to make decisions based on data.
3D design, printing and use of a casting slip test bar mold
Available on the Downloads page

This picture has its own page with more detail, click here to see it.
This is for making test bars of slip casting clays bodies for use in the SHAB test (to measure drying shrinkage, firing shrinkage and fired porosity). I designed it in Fusion 360 and 3D printed the light-duty rails and case mold. I poured plaster into that to make the two plaster working mold halves (top right). The funnels provide a reservoir so the bars be cast solid. This mold can produce a set of three bars in less than an hour.
COSORI Food Dehydrator as a lab/studio drier

This picture has its own page with more detail, click here to see it.
I use this to dry our SHAB test samples and DFAC test samples. It has many racks, heats to 165F, has a timer and is well suited for the drying factor test (and drying all sorts of things). By adjusting the heat setting, it is possible to tune it to give a slight crack on our best drying clay (all other results are thus in relation to that). This oven is available on Amazon and is inexpensive.
Variables
DSHR - Dry Shrinkage (C)
IF(V1>0, 100-V1,"n/a")
This is the shrinkage due to drying only. Assuming 10 cm marks on the wet bar, drying shrinkage is simply 100 mm minus the dry length in mm.
IF(V1>0 AND V2>0, (V1-V2)/V1*100, "n/a")
This is the fired component of total shrinkage. Note that dry+fired
shrinkage does not equal total shrinkage because fired shrinkage is based on the dry length not the original 10 cm.
IF(V3>0 AND V4>0,((V4-V3)/V3*100),"n/a")
This is a measure of the clays fired maturity as interpreted from its pore space. The pore space is calculated from the increase in weight a bar experiences during boiling in water.
The distance between the outer edges of two marks on the dried clay bar as measured with a set of calipers. These marks were pressed into the wet bar at exactly 10 cm apart on the outer edges.
FLEN - Fired Length (V)
The length between two marks on the fired clay bar as measured with a set of calipers.
FWT - Fired Weight (V)
The weight in grams of the clay bar after firing.
BWT - Boiled Weight (V)
The weight in grams of the clay bar after boiling for 5 hours and soaking for 19 and being blotted on a towel.
CONE - Cone (V)
The Orton cone number to which the bar was fired. Take the highest cone to show deformation and interpret it as follows:
Position Value
~~~~~~~~ ~~~~~
1 oclock n-.4
2 oclock n-.3 For example, if cone 6 is at 3 oclock, then the
3 oclock n-.2 value is 6 minus .2 = 5.8.
4 oclock n-.1
5 oclock n
If the guard cones shows deformation you must increase the figure
appropriately.
Bullers Ring diameter
TEMP - Temperature (V)
The temperature in celcius. This can be derived electronically or from a bullers ring.
Procedure
1. Shrinkage/Absorption/H2O
This test is designed to derive shrinkage and absorption data by drying and firing clay test bars. This test does not account for LOI (use the LDW test for that). Results are very repeatable if your procedure is carried out consistently.
2. Purpose of Test
1 This test is designed to measure dry shrinkage, absorption and fired shrinkage properties.
1.1 DRY SHRINKAGE
As a clay dries the removal of interparticle water causes the mass to tighten up and pack together resulting in shrinkage. Clays of fine particle size and thus high plasticity have high shrinkage. The benefits of plasticity often come at the cost of drying problems. That being said, high shrinkage clays almost always have higher dry strength, that often improves drying outcomes. Variation in drying shrinkage is an indicator of changes in a clay's plasticity (and particle size and mineralogy). Comparing the dry shrinkage of different types of clay is not necessarily an indicator of their comparative plasticity since fine particled silts are not plastic. Higher water content generally means greater dry shrinkage.
For typical modelling stiffnesses dry shrinkage for non-plastic clays is around 5-6.0%. Plastic clays that require care in drying are usually above 6-7.0%. Casting bodies can be as low as 2%. A low drying shrinkage is important to successfully dry larger items or ware of uneven cross-section.
Dry shrinkage is simply the percent change in length between wet and dry. The SHAB test provides the data for this property as follows:
Wet length - dry length / wet length * 100
or where 10 cm marks are stamped on the bar it is simply:
100 - mm dry length
There is some disagreement about this equation, some contend that the divisor should be the dry length. To resolve this consider: It is the wet clay that is shrinking, not the dry clay. It is thus logical that a 10cm wet test bar that shrinks to 9cm has shrunk 10%, for that to be the case we need to use the wet-length divisor formula.
1.2 FIRED SHRINKAGE
As a clay fires, it shrinks and particles continue to pack together. At some point, they begin to break down and react with each other, fluxes begin to melt and flow, and mineral grains seed the development of more stable forms. The amount of shrinkage during firing is thus an indication of the degree to which the complex "maturing" process has proceeded.
Fired shrinkage figures are valuable both in maintaining a clay body's fired properties and formulating bodies to have a good compromise between shrinkage and fired maturity. A body's fired shrinkage plotted against increasing temperature normally describes a graph that rises to a level plateau, then quickly drops off during expansion and melting. Porcelain has a very high fired shrinkage compared to stoneware clays which are in turn much higher than earthenwares.
Fired shrinkage is the percent change in length or width of a test sample from dry to fired. The SHAB test provides dry and fired length data for the calculation of this property as follows:
Fired length - dry length / fired length * 100
As with the drying shrinkage equation, there is some disagreement about the divisor. The reasoning above also applies to this one.
1.3 ABSORPTION
Absorption is an indirect indication of the pore space within the fired clay. Since pore space gradually closes up during the firing process, absorption indicates the extent to which the heat has developed the matrix, that is, the "maturity" of the body. The absorption value also indicates the degree to which pores are interconnected within the fired matrix.
Stoneware clays most often do not reach zero pore space before bloating and melting. Large particles create more pore space than can be filled by fluxes and evolving mineral species. Functional ware can tolerate 1% or more pore space without leaking water. Wall tile makers require resistance to sagging during firing, so density is secondary. However, porcelain-type products require high strength and density, thus zero absorption is often targeted.
This property is a measurement of the percentage increase in weight that a test bar experiences during a normal five-hour period in boiling water (followed by a 19-hour soak). The SHAB test definition provides weight data before and after boiling, so the absorption is calculated:
Wet weight - dry weight / wet weight * 100
As with the drying shrinkage equation, there is some disagreement about the divisor. The reasoning above also applies to this one.
3. Scope
Test bars are made from each production run and from each body or clay material tested for R&D or quality control work.
4. Definitions
SHAB - Shrinkage-Absorption
QC - Quality Control department
5. Responsibilities
Responsibilities are transferred between departments as the test proceeds. These are outlined in section 5.0.
6. Procedure
1. Create a Insight-live Record
1.1. Assign a code number.
2. Take or Make the Sample (Pugmill Operator or Clay Mixer)
2.1. If the test is being done on a production material: Midway through the run take a slug of clay of representative stiffness. If the test is being done on a lab mix make sure that it has been prepared in a standard way (i.e. slurried and dewatered on a plaster batt and thoroughly kneaded) and is of the correct stiffness.
2.2. Put the slug in a plastic bag and mark the bag with the code number (along with the time and date the sample was taken).
3. Make the Bars (QC)
3.1. Take approximately 500-800 grams of the pugged material and knead it thoroughly; change direction once midway through the process. Roll the kneaded lump into a cylindrical mass about twice as long as its diameter.
3.2. Place the lump on a canvas board (or similar absorbent surface) and flatten by hand to about 2cm thick. Straddle it with two 3/8" round metal rods. Using a rolling pin, thin it using enough restraint that it is easy to peel up. Rotate 90 degrees and repeat until the rolling pin runs on the metal rods.
3.3. Carefully lift the slab of clay from both ends and place it on a bar-board lengthwise. Trim the slab to the board width. Using the bar width gauge, cut bars for firing through a range of temperatures (e.g. cone 4-8, cone 7-10, cone 06-2).
3.4. If LDW or DFAC specimens are also being made place them on the free space at one end of the bar-board.
4. Mark and Stamp the Bars
4.1. Refer to the Insight-live recipe record for the code number.
4.2. Prepare the stamp by setting it to stamp the code number along with a unique specimen number for each bar.
4.3. Press the stamp into the middle of the bars. Increment the specimen digit and repeat. It is not necessary to begin numbering the specimens at 1. If, for example, if bars are to be fired at cones 6-12, then numbering the specimens 6-12 is fine.
4.4. Clean and dry the length marker and dip each end into talc powder (as a releasing agent).
4.5. Press the length marker into the middle of each bar being careful to avoid smudging or deforming the impression by lateral movement, pressing too deeply, withdrawing too quickly or using insufficient talc.
5. Dry the Bars
5.1. Within a few minutes of making the bars place them into an air-circulating drying chamber until thoroughly dry (use a setting and placement that enables minimum deformation).
5.2. When dry use a fettling knife to round the corners to remove any burrs or irregularities.
6. Measure the Bars
6.1. Measure each bar using callipers capable of accuracy to 0.1 mm. Enter the measurement into Insight-live or use a ceramic pencil to write the length in mm on the backs or sides (to enter it later).
6.2. Where the cone number to which a bar should be fired differs from its specimen number write the intended firing cones onto the bars.
7. Accumulate Dry Bars
7.1. As sets of bars are measured organize them, by temperature, in a holding area near the kiln.
8. Fire the Bars
8.1. Position bars three abreast and stack them at an angle (rather than perpendicular), so that bar shrinkage is less likely to upset the stack.
8.3. Place a firing cone with the bars.
8.4. Fire the kiln so that it maintains an even rate of rise, slows down near the end and holds for a few minutes (e.g. the C6PLST schedule for cone 6). If the kiln contains bars which are made from heavily bentonitic or ball clay, add extra time to the first step.
8.5. Unload the Kiln
8.5.1. Take the bars and cone to the area where you will measure them and enter the data.
9. Measure the Bars
9.1. Weigh each bar to the nearest hundredth of a gram and write the weight on the back.
9.2. Measure length marks to the nearest tenth of a mm and write that on the backs.
9.3. Enter the information into Insight-live using the Testdata Entry Dialog.
10. Accumulate Fired Bars
10.1. As sets of bars are weighed, measured and recorded collect them in a fired bar holding area.
11. Boil the Bars
11.1. Get the bars from the fired bar holding area and place them on edge in rows and perpendicular layers in a boiler.
11.2. Fill the boiler with distilled water.
11.3. Boil the bars in a steady but not violent manner for 5 hours, topping up the water periodically as it boils down.
11.4. Soak the bars for 19 hours.
12. Weigh the Boiled Bars
12.1. Remove the bars in groups of 10 or 20 and blot them on a towel.
12.2. Weigh each bar and write the weight on the back.
12.3. Enter the information from the bars directly into Insight-live using the Testdata Entry Dialog.
13. Accumulate Fired/Boiled Bars
13.1. As sets of bars are weighed and recorded collect them in a boiled-bar holding area. Organize them in stacks of common code number.
13.2. Allow the bars to dry to ready them for photos.
14. Take Photos
14.1. Organize bars onto a white background (if bars are darker) and a darker background (if they are very white).
14.2. Take photos (where appropriate take side-by-side photos of a previous mix to make any changes in fired appearance more visibly obvious).
14.3. Crop the photos and upload them to their records in Insight-live.
15. Record Notes
15.4. Review each set of fired bars and make notes and recommendations in the Insight-live record as needed.
16. Workmanship
1. Clay Preparation
1.1. Be careful not to knead air into the material when preparing to make bars.
1.2. If the clay will not knead without severe splitting consider the addition of 1% or more white firing bentonite to augment its plasticity so bars are easier to make.
2. Making Bars
2.1. It is important to roll the clay the same way each time to get consistent and comparable results.
2.2. Use a dry canvas board and peel the clay up frequently during rolling to make sure it does not stick to the board (to avoid stretching the clay).
2.3. When cutting the bars be sure that the first cross-cut is done against the edge of the bar board. This cut will act as an accurate perpendicular reference for placing the width guide to cut the remaining bars.
2.4. Be sure that during all cuts the knife is held vertically to get a square cut. This is important to sit the bars on edge during firing.
2.5. When cutting the bars to width, flip the bar width guide end for end and upside down so that it does not become too wet and stick to the bars thus disturbing them as it is lifted off.
2.6. If the stamp does not produce a clean imprint press a little harder. If the clay lacks enough plasticity to make a readable imprint then write carefully with a needle tool.
2.7. All information should be written on the bars before the 10 cm length marks are impressed. The bar should not be moved or stressed in any way after the length marks are impressed.
3. Drying/Firing
3.1. The bars must not be subjected to excessive dry drafts or very high heat while drying to avoid warping them or building in stresses that will affect shrinkage.
3.2. It is important that bar edges be trimmed so that burrs and chips do not fall off during processing and throw out any weight measurements.
3.3. When bars are stacked in the dry-bar holding area be careful not to stack dark colored bars on top of light ones thereby discoloring them.
3.4. Do not fire the test bars by laying them flat on a kiln shelf (to avoid its heat-sinking effect).
3.5. It is important for the bars to be thoroughly dry before they are put into the kiln as some fine-grained clays will explode if fired too quickly.
3.6. The bars must be fired using a consistent rate of temperature rise.
3.7. The bars should be fired right next to a set of cones or rings if fired in a large kiln.
7. Equipment/Tools Needed
1. Equipment
1.1. Bar Making and Drying
1.1.1. Cutting wire.
1.1.2. Needle tool to write on wet or dry specimens.
1.1.3. Large wooden rolling pin and canvas-covered or absorbent wood rolling board.
1.1.4. Gauge for cutting bars to width made from a 25 mm (1 in) wide piece of wood 15 cm (6 in) long. The wood strip should be light and porous so it will not stick to the clay.
1.1.5. 3/8 inch (9.5mm) diameter rods to act as thickness gauges for rolling clay to correct thickness.
1.1.6. A rotary stamp capable of imprinting many digits of any letter or number.
1.1.7. A metal marking template. When pressed into a clay bar it will make two crisp impressions 4 mm square and 2 mm deep whose outer edges are exactly 10 cm apart. Make it accurate.
1.1.8. Bar-boards made from 1/4 inch plywood 115 mm (4.5 in) wide by 400 mm (16 in) long.
1.1.9. A cup of talc powder.
1.1.10. A narrow-bladed fettling knife.
1.1.11. Drying cabinet able to maintain a temperature of 80-100C, bring in outside air and circulate it within.
1.2. Measuring
1.2.1. Vernier callipers accurate to 0.1 mm.
1.2.2. Scale capable of 1/10 gram accuracy or better yet, 1/100 gram.
1.2.3. Ceramic pencil for writing on dried specimens.
1.2.4. Water boiler with timer. An electric slow cooker with an adjustable dial to fine-tune the temperature works best.
1.2.5. Computer equipped with access to an Insight-live group account.
1.4.1. A smartphone with a quality camera
1.3. Firing
1.3.1. Orton cones.
1.3.2. Test kiln with an electronic controller to enable ramp control and repeatability in firing.
8. Revisions
1 Initial Draft
2 Spelling and Grammer check and minor revisions.
3 Adjustment in data collection process due to better data entry facilities in the software.
Related Information
Videos
 |
Entering TestData Into Insight-Live
How to enter physical testing results into your group account at insight-live.com. We will enter data from shrinkage/absorption bars, the drying factor disk and an LOI/water content tester. |
 |
Making test bars for the SHAB, LDW and DFAC tests
We will make bars of a clay body for the SHAB test (for shrinkage and absorption), a specimen for weighing wet, dry and then fired (to get water content and LOI) and a drying disk to measure drying performance and soluble salt content. |
Links
| Articles |
Simple Physical Testing of Clays
Learn to test your clay bodies and clay materials and record the results in an organized way, understanding the purpose of each test and how to relate its results to changes that need to be made in process, recipe and materials. |
| Articles |
Firing Clay Test Bars
Being able to make good consistent test bars and fire them in a consistent and proper way is a basic requirement of getting valid results for shrinkage and porosity measurement. |
| Articles |
Formulating a Porcelain
The principles behind formulating a porcelain are quite simple. You just need to know the purpose of each material, a starting recipe and a testing regimen. |
| Articles |
How to Find and Test Your Own Native Clays
Some of the key tests needed to really understand what a clay is and what it can be used for can be done with inexpensive equipment and simple procedures. These practical tests can give you a better picture than a data sheet full of numbers. |
| Articles |
Formulating a body using clays native to your area
Being able to mix your own clay body and glaze from native materials might seem ridiculous, yet Covid-19 taught us about the need for independence. |
| Articles |
Setting up a Clay Testing Program in Your Company or Studio
Set up a routine testing pipeline and start generating historical data that will enable your staff to understand your source materials and maintain, adjust and troubleshoot your clay body recipes. |
| Tests |
Dry Strenth (Round Bars)
|
| Tests |
Firing Shrinkage
Measure the amount a clay test bar shrinks as it is fired in a kiln |
| Tests |
LOI/Density/Water Content
LDW LOI, density and water content test procedure for plastic clay bodies and porcelains |
| Tests |
Pyroplastic Deformation
How to measure the tendency of a ceramic body to warp during firing. |
| Tests |
Simple Shrinkage/Absorption
|
| Tests |
Water absorption
|
| Tests |
Drying Shrinkage
Measure the amount a clay test bar shrinks as it dries |
| Tests |
Drying Factor
The DFAC Drying Factor test visually displays a plastic clay's response to very uneven drying. It is beneficial to show the relative drying performance of different clays. |
| Projects | Troubles |
| Projects |
Evaluating a clay's suitability for use in pottery
Would you like to be able to use your own found-clays in your production? Follow me as we evaluate a mystery clay sample provided by a potter who wants to do this. |
| Projects |
Testing a New Load of EP Kaolin
Kaolins can vary in many ways. Yet they are the foundation of all porcelain and light stoneware clay body recipes. It is vital to test each incoming shipment of material. Problematic brands can even require some testing on every pallet. |
| Materials |
Kaolin
The purest of all clays in nature. Kaolins are used in porcelains and stonewares to impart whiteness, in glazes to supply Al2O3 and to suspend slurries. |
| Materials |
Ball Clay
A fine particled highly plastic secondary clay used mainly to impart plasticity to clay and porcelain bodies and to suspend glaze, slips and engobe slurries. |
| Glossary |
Clay Body Porosity
In ceramics, porosity is considered an indication of density, and therefore strength and durability. Porosity is measured by the weight increase when boiled in water. |
| Glossary |
Firing Shrinkage
During drying, clay particles draw together and shrinkage occurs. During firing the matrix densifies and shrinkage continues. More vitreous bodies shrink more. |
| Glossary |
Porcelain
How do you make porcelain? There is a surprisingly simple logic to formulating them and to adjusting their working, drying, glazing and firing properties for different purposes. |
| Glossary |
Stoneware
To potters, stonewares are simply high temperature, non-white bodies fired to sufficient density to make functional ware that is strong and durable. |
| Glossary |
Maturity
A term used in the ceramics industry to signify the degree of vitrification in a fired clay. Mature clays are dense and strong, immature ones porous and weak. |
| Typecodes |
Body Tests
Tests conducted on bodies made from materials, as opposed to the materials themselves. |
| URLs |
http://www.astm.org/Standards/C373.htm
ASTM-C373 Water Absorption |
| URLs |
https://insight-live.com/insight/help/It+Starts+With+a+Lump+of+Clay-433.html
Entering test data data for SHAB test bars For a step-by-step example, open the sections for "Measuring the SHAB and LDW Bars" and "Entering data from a fired SHAB test bar". |
 PayPal | No tracking, No ads, No paywall, No transient content! Just organized, concise information constantly updated and improved. Was this helpful? Consider supporting me. |
| By Tony Hansen Follow me on        |  |
Got a Question?
Buy me a coffee and we can talk 

https://digitalfire.com, All Rights Reserved
Privacy Policy