Presentation
Related Information
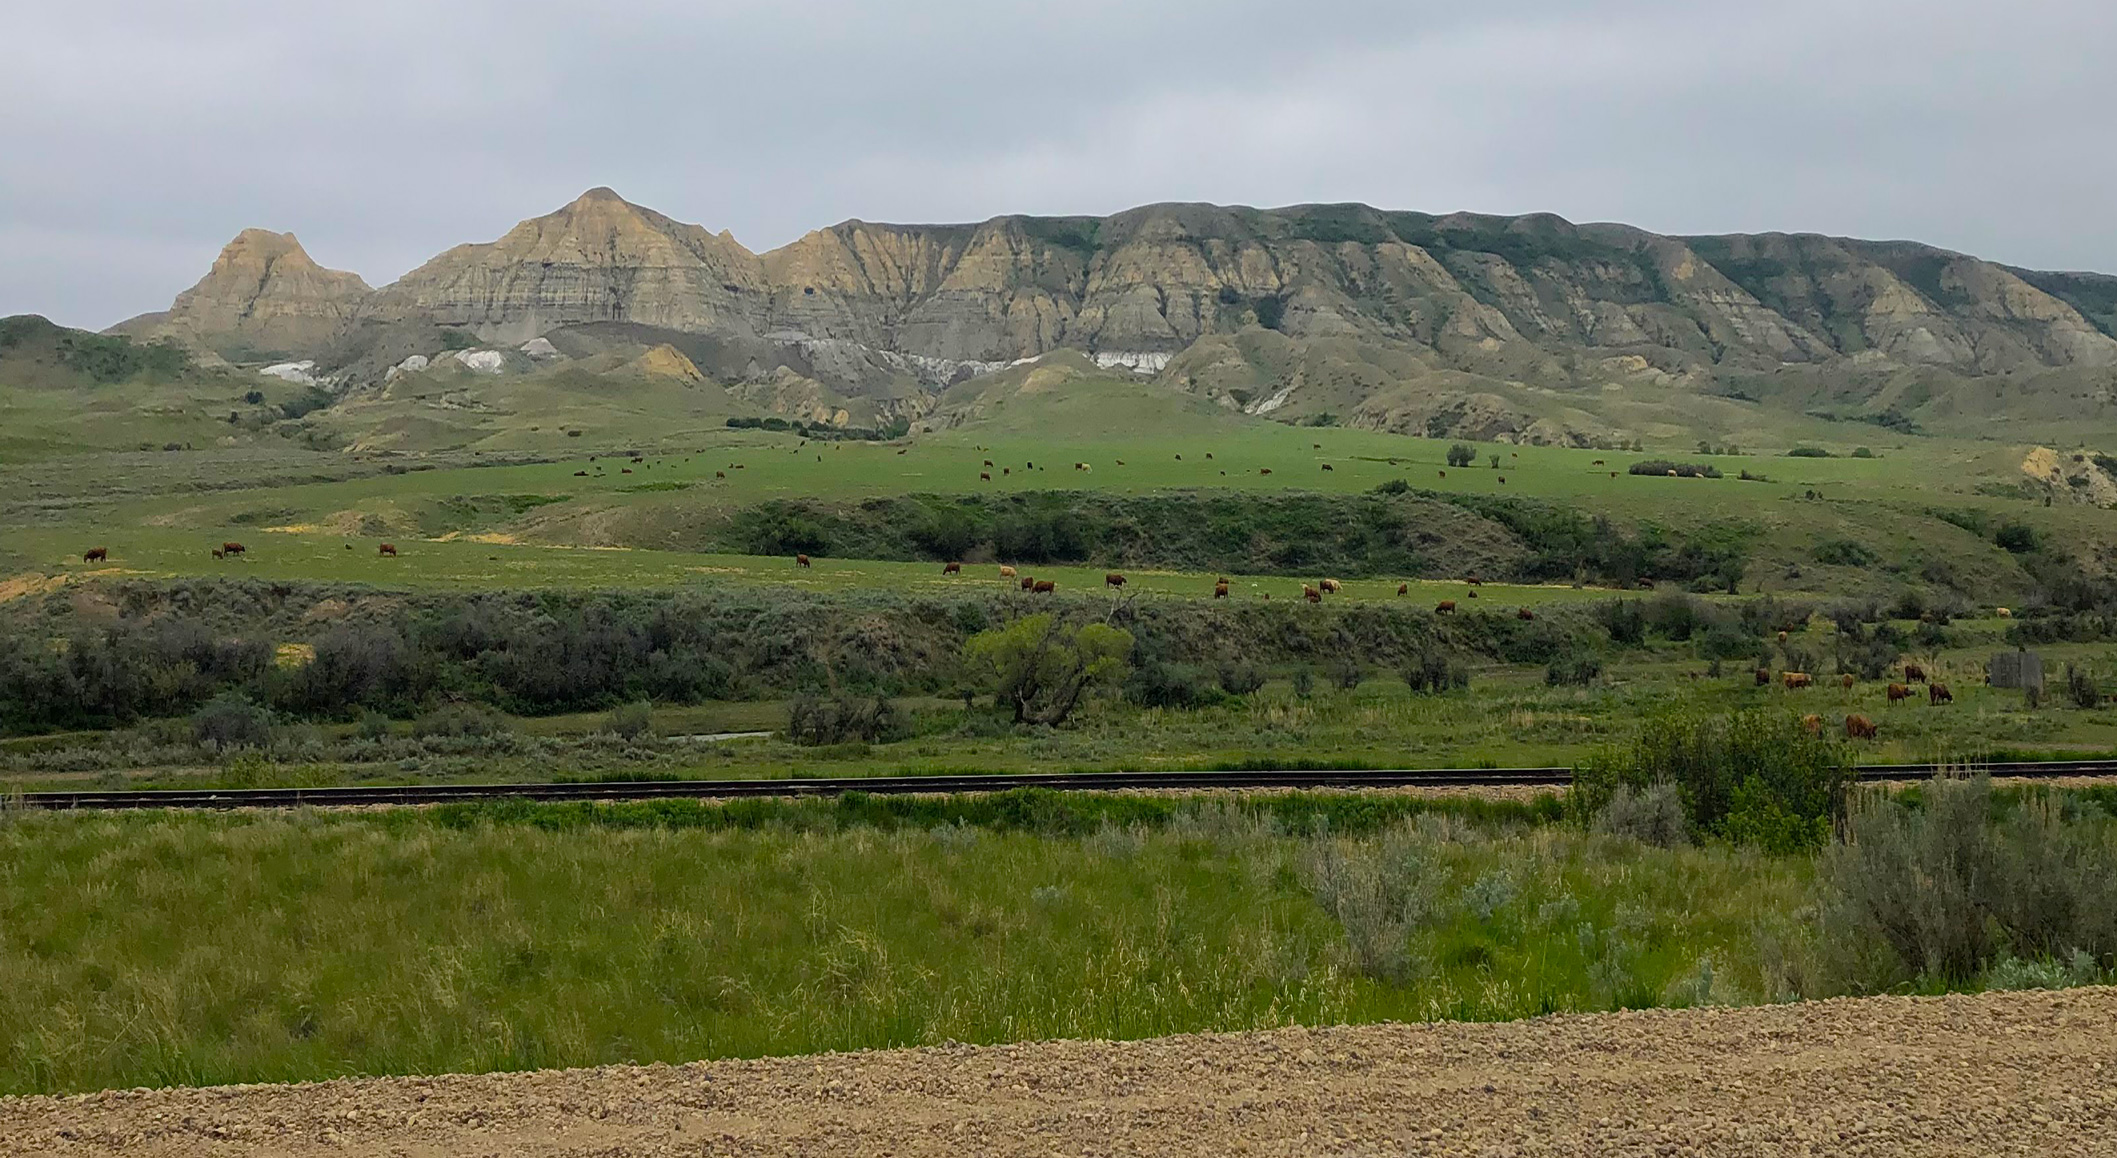
Outcrops of the Whitemud formation in the Eastend river valley - 2021
This picture has its own page with more detail, click here to see it.
In the spring this is what you will see to the north (near Ravenscrag, Saskatchewan on the south road to Eastend). The Whitemud clays are clearly visible. The amount of overburden makes it difficult to find minable sections, so Plainsman Clays mines on the opposite side where gently rolling hills fall to the valley bottom. On that side there are no outcrops, these white layers are largely hidden and can only be discovered by exploratory digging. But on this side they are easily accessed and can readily be sampled. This is the exact location where the Whitemud clays were first discovered for pottery in the early 1900s, there are actually some mineable sections on the front hills to left. I-XL brick mined clay here for many years. This is also the site of a mine for the former Medalta Potteries.
Mel Noble at Plainsman Clay's Ravenscrag, Saskatchewan quarry

This picture has its own page with more detail, click here to see it.
Six different sedimentary clays are extracted from this quarry. It was opened in the 1970s, the best location available at the time. These test bars were made by slaking select lumps from each layer (thus exhibiting their best performance). The left-most dried test bars show the layers (top to bottom). The A1 top layer is the most plastic and has the most iron contamination (it is used in the most speckled reduction firing bodies). A2, the second one down, is a ball clay (similar to commercial products, although darker burning), it is very refractory and the base for Plainsman Fireclay. A3, third from top, is a complete buff high-temperature stoneware (like H550), although sandy and over-mature at cone 10. 3B, third from bottom, is a smooth medium-temperature stoneware; it contains significant natural feldspar (although fired color and particulate contamination are the most variable). The second from the bottom, 3C. fires the whitest and is the most refractory (it is the base for H441G). The bottom one, 3D, the best product in the quarry. Although the least plastic and most silty, it is also very fine particled and the cleanest (consistently free of particulate impurities and sand), it pairs very well with a ball clay to make a cone 6 stoneware.
A typical clay lab report:
Is this really what you need?

This picture has its own page with more detail, click here to see it.
If you are trying to use local clays for brick, tile or even pottery production, characterizing the available materials is the first step. But how? This is the kind of data a lab might return - perhaps you wonder about its value? We feel traditional ceramics technology is fundamentally a relative science. A history of many reports like these, in context with other data, might be good for mining companies to determine if new stockpiles have any shifts in certain specific properties. Or a tile company evaluating a new ball clay. But as a way to understand the utility of a clay for a specific ceramic purpose, this contextless report is of little use. For example, the physical properties, the whole reason for using a clay, are unrelated to the chemistry. This is also a tunnel vision view, looking at only one temperature. On the other hand, simple procedures, like the SHAB test, provide a hands-on way to understand what a clay actually is.
The oven bird knows how to find and use wild clay:
If she can do it, maybe you can
This picture has its own page with more detail, click here to see it.
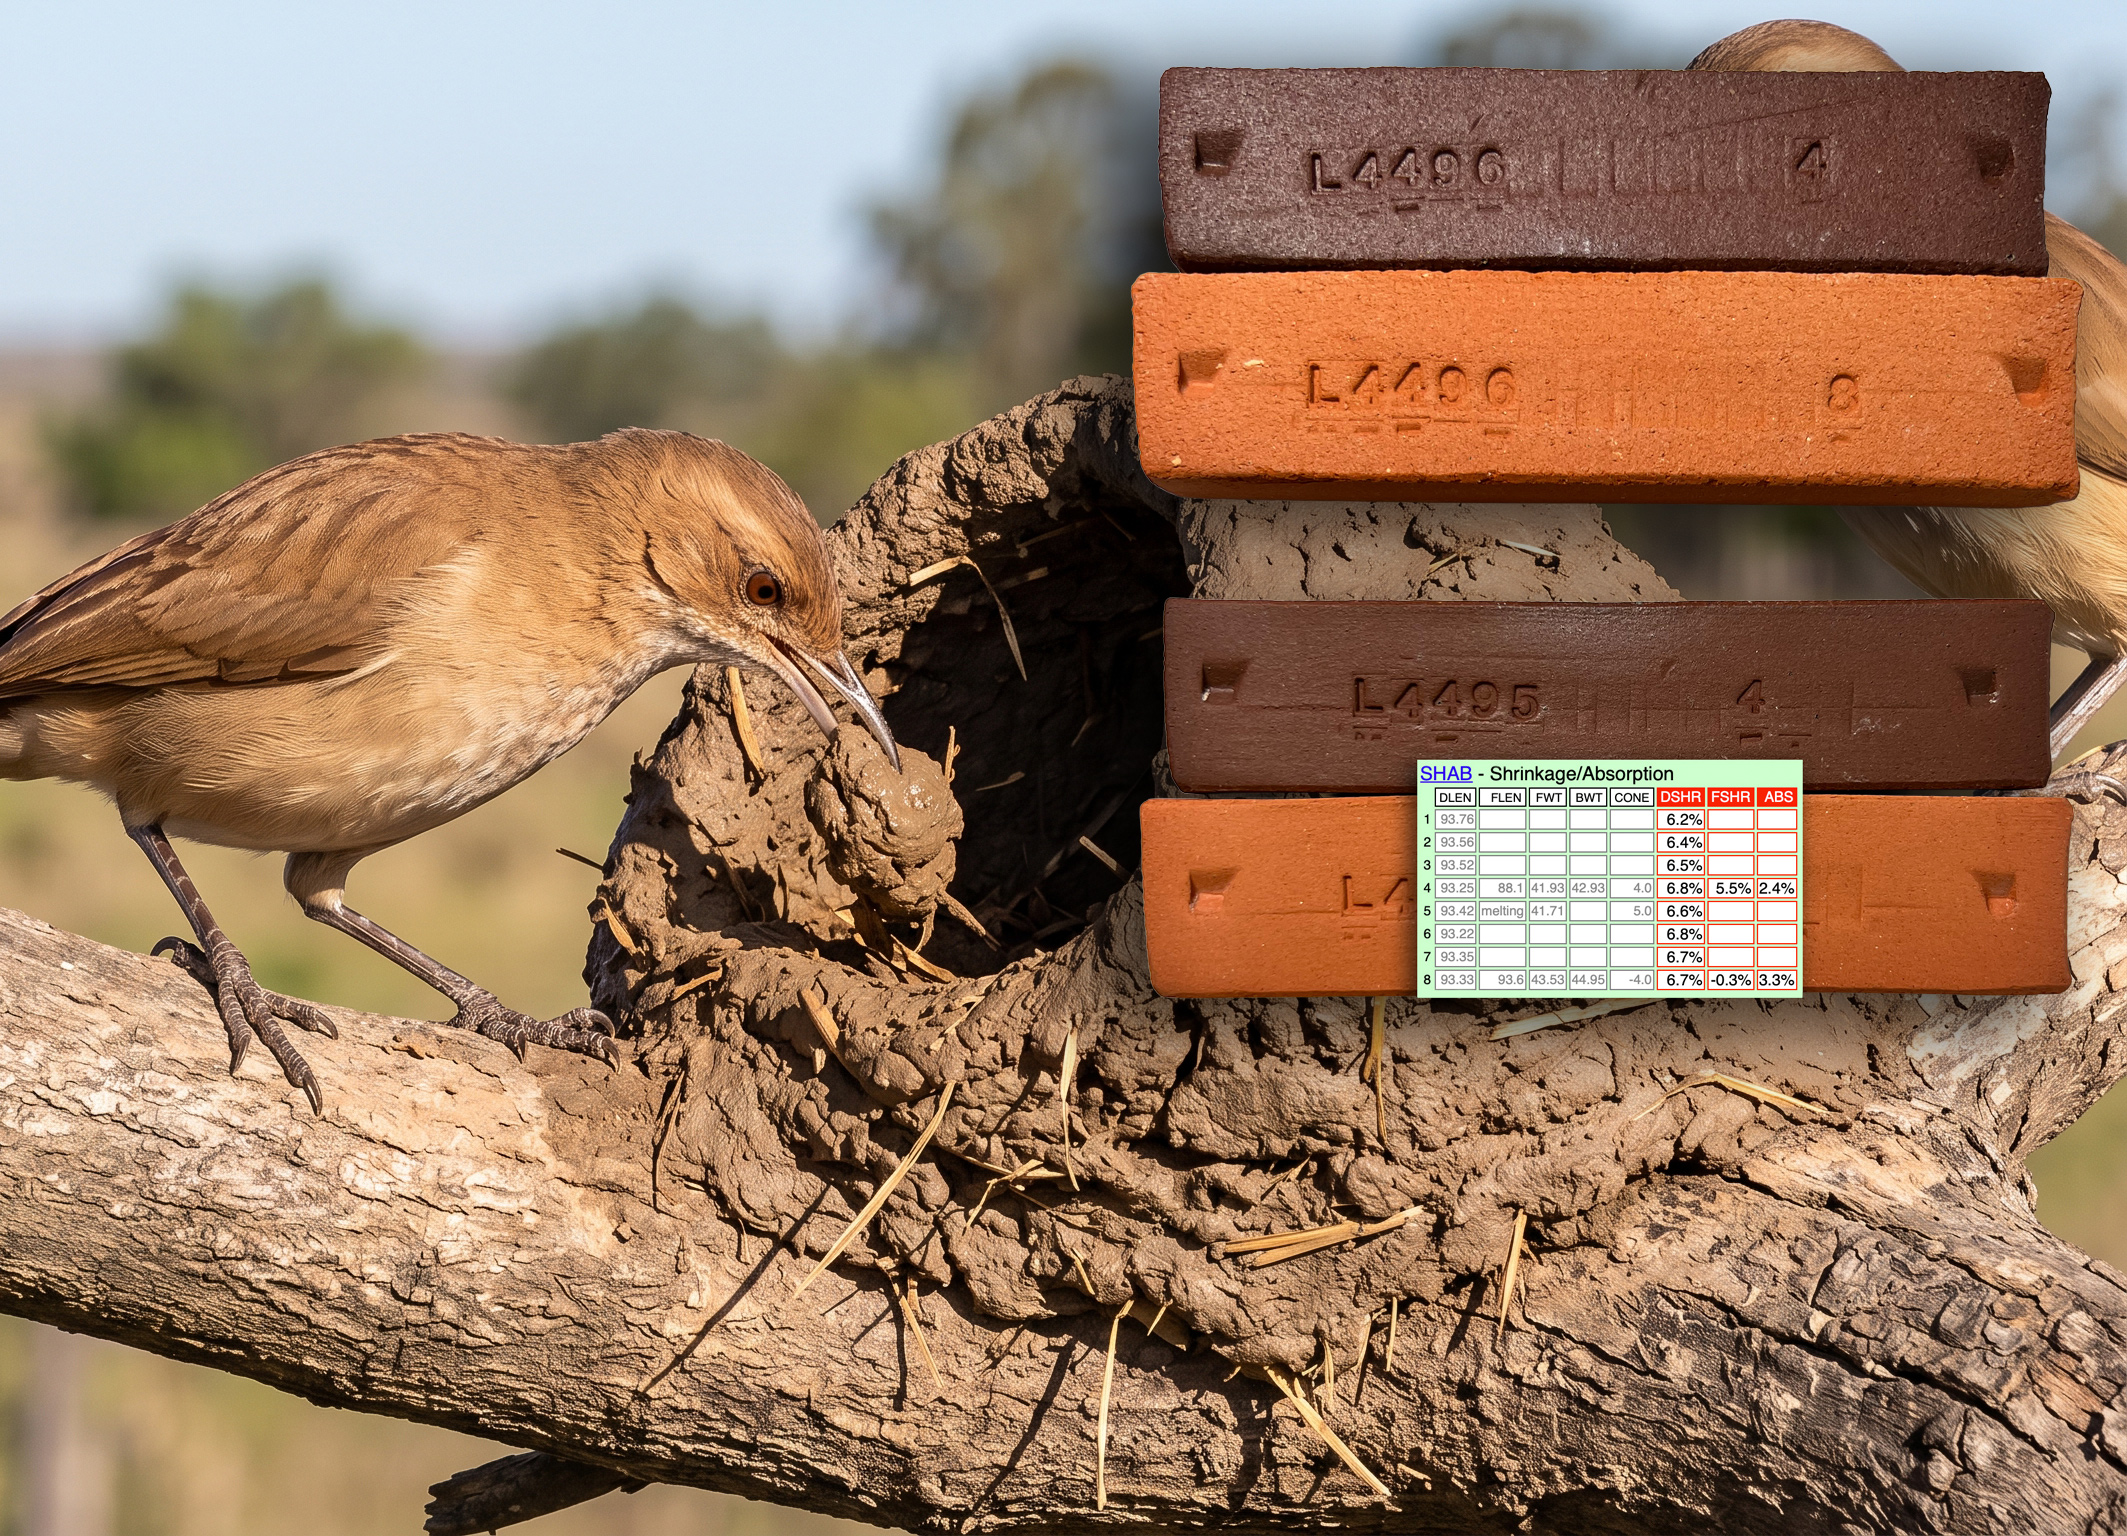
She is likely getting it from nearby. She knows what works: A mix of sand, clay and organic matter. She isn't even the best mud-nester in the bird world. Some species can stick their nests on to walls and cliffs.
If a bird can find and use a native clay, should a potter or even hobbyist be intimidated by the prospect of doing the same? She doesn't overthink it; she likely just samples different spots and uses the one that works the best. The clay appears to be a typical terracotta; if her nest were fired, it could well come out like these overlaid SHAB test bars (the two types, a sandy and smooth, were fired at cone 4 and 04).
Finding a native clay for pottery can begin just as simply: collect small samples from different spots, see how each one works, and watch how it dries. Then take the step the bird has no reason to take—fire test bars. These show how I compare drying shrinkage, firing shrinkage and fired absorption. A nest proves that mud can be built with. Test bars help determine what that mud can become in a kiln.
This bloating is a normal consequence of overfiring
This is how you know it has too much feldspar
This picture has its own page with more detail, click here to see it.
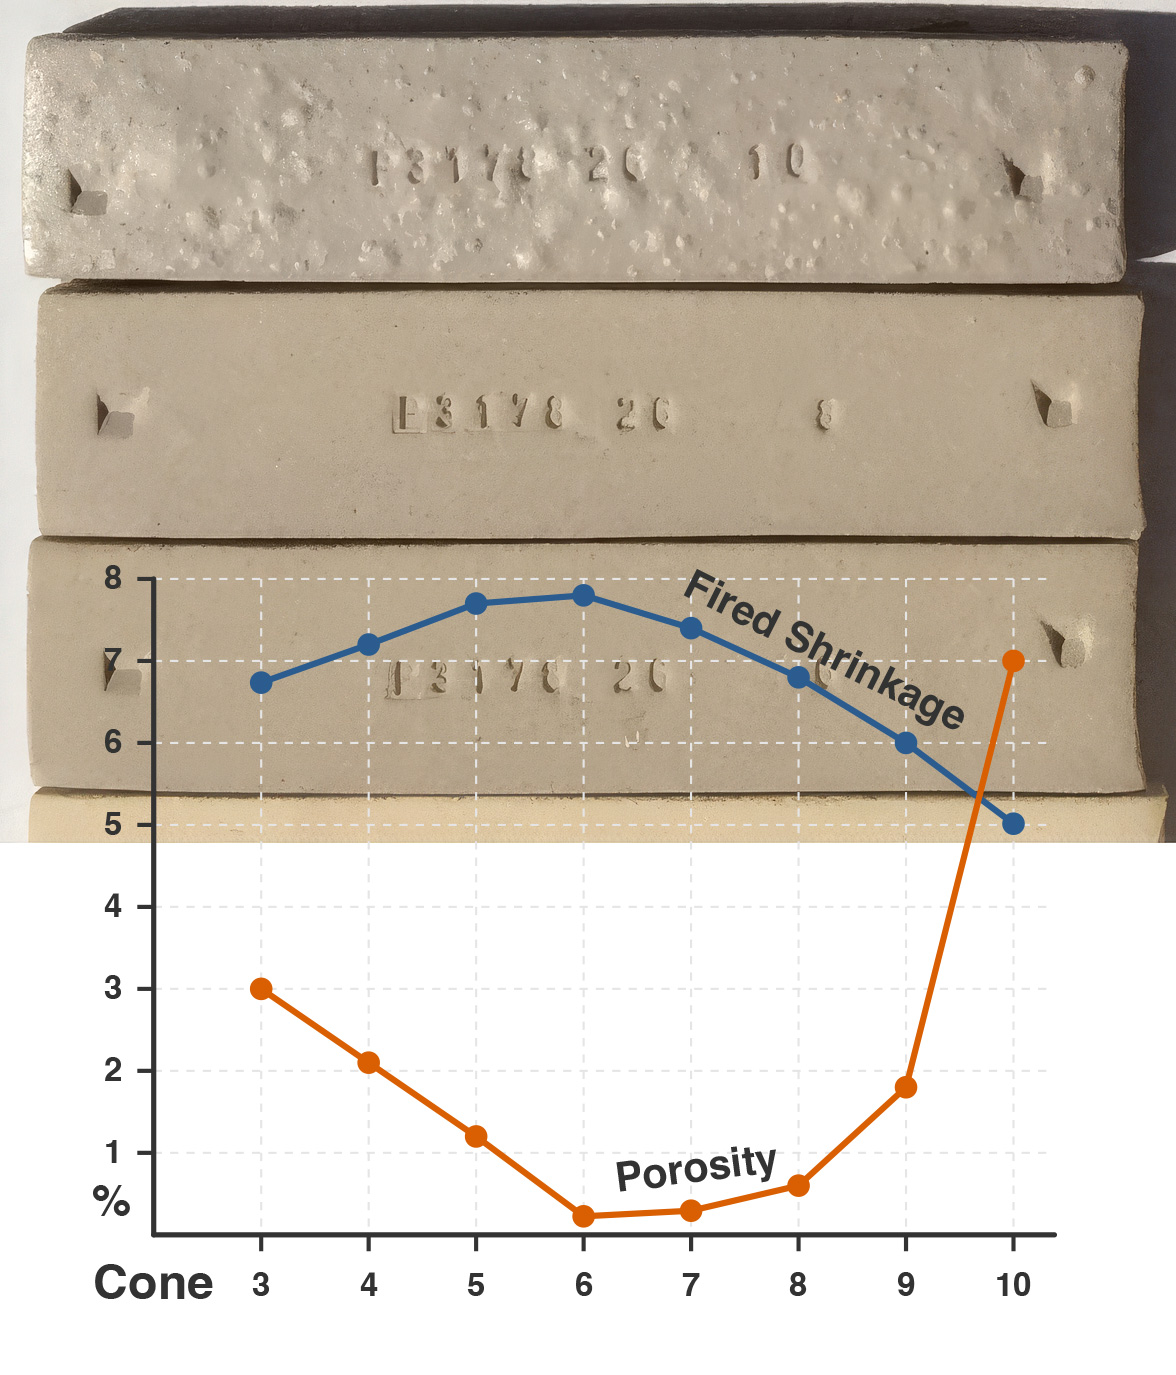
SHAB test bars of a whiteware clay bloating at cone 10 oxidation. While it appears stable at cone 8, it isn't. This is a variation on the 25x4 porcelain recipe. It employs 200 mesh silica, kaolin, ball clay and feldspar. Whiteware bodies like this often soften and melt without ever bloating, but not this one. These fired bars appear to show that this vitrifies at cone 8. However, ware fired at cone 8 exhibits the classic evidence of overfiring: It warps. Overfire it still more, to cone 10, and we enter bloating territory by a new development: The ball clay in the recipe contains soluble salts; these become a thin glaze that glosses and seals the surface, trapping LOI gases which create internal voids (top bar). This line graph shows it as a massive spike in absorption/porosity going into cone 10. It also shows that cone 6, the bottom bar, provides the lowest porosity and highest fired shrinkage, while not being on a volatile part of the curves.
This phenomenon is a reminder that the percentage of feldspar (or feldspar-containing clays) is best tuned such that the body is just reaching (or has just reached) its minimum achievable porosity (assuming it is for functional ware). This can be done by making test bars like this and firing them at a range of temperatures up to and beyond the target to get a broad view of how maturity progresses.
Step 17: Revisiting the test bars - The data

This picture has its own page with more detail, click here to see it.
These screen fragment overlays are from the recipe panel at insight-live.com. The table of data shown here is from the SHAB test only. The row numbers are the specimen numbers of each bar. The first five columns are the data we collected by measuring the bars before and after firing (dry length, fired length, dry weight, fired weight). The last three red columns are the results of calculations it does on that data to produce values for drying shrinkage, firing shrinkage and fired porosity (water absorption). The graph above charts the firing shrinkage (ascending line) and absorption (descending line) against temperature. These two lines are like a "fired maturity fingerprint". Finding meaning in this data enables characterizing the firing behavior of the clay. In the next step, we will compare it to a terra cotta clay body.
Kaolin and ball clay:
Why the uncracked disk is not the whole story
This picture has its own page with more detail, click here to see it.
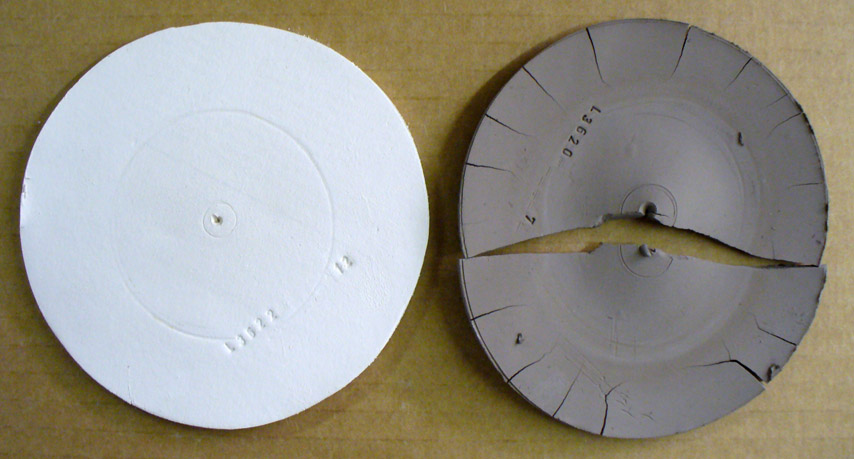
Left: OptiKast, a coarse-particle kaolin intended for slip-casting. Right: Plainsman A2 ball clay. These DFAC test (drying performance) disks were dried with their centers covered, deliberately creating uneven drying. The exposed perimeter dries and stiffens first; the covered center dries and shrinks later. The resulting cracks reveal how each clay responds to that stress. OptiKast feels smoother, yet its individual clay particles are much coarser than those typical of ball clay. This kaolin has low drying shrinkage, so its disk remained intact. The ball clay shrinks more. As its center dried and tried to contract against the already stiff perimeter, stresses developed, splitting the disk and opening numerous cracks around the edge.
So why use ball clay? This particular kaolin has so little plasticity that even making this disk was difficult. And the dried disk is fragile. Yet it is very useful in casting bodies, where plasticity impedes permeability. Ball clays are highly plastic; high drying shrinkage comes with that. Adding some of this to poor-plasticity casting or forming bodies that can tolerate a darker fired color can transform them into ones that both form well and dry harder and stronger.
Here is What Processing a Clay Can Do

This picture has its own page with more detail, click here to see it.
The clay is Plainsman 3B.
Left: Without processing, other than grinding to 42 mesh (currently the finest Plainsman can grind on a practical scale). When fired toward zero porosity (water absorption) it burns like this (at cone 6, 8, 9, 10 and 10R bottom to top). Of course, these are not big issues for non-vitreous rustic bodies fired at cone 6. The speckle and bloating are caused by impurity iron-bearing particles and others having an LOI (they decompose and produce gases that cause the bloats).
Right: The impurity particles make up a small percentage; they can be removed in the lab by sieving to produce a natural porcelain that fully vitrifies by cone 6 (the middle bar). Only about 5% of the material was removed to produce this amazing product (I call it MNP).
Imagine what could be done if this raw material could be mined further east, where clay quality is much better!
Links
| Projects |
Evaluating a clay's suitability for use in pottery
Would you like to be able to use your own found-clays in your production? Follow me as we evaluate a mystery clay sample provided by a potter who wants to do this. |
| Tests |
Shrinkage/Absorption Test
SHAB Shrinkage and absorption test procedure for plastic clay bodies and materials |
| Glossary |
Clay
What is clay? How is it different than dirt? For ceramics, the answer lies on the microscopic level with the particle shape, size and how the surfaces interact with water. |
 PayPal | No tracking, No ads, No paywall, No transient content! Just organized, concise information constantly updated and improved. Was this helpful? Consider supporting me. |
Got a Question?
Buy me a coffee and we can talk 

https://digitalfire.com, All Rights Reserved
Privacy Policy