Use the contact form at the bottom on almost all the pages on this site or let's have a together.
Other ways to Support My Work
Subscribe to Insight-Live.com. It is about doing testing and development, not letting information slip away.
Help Me on Social
Tony Hansen
Follow me on
Login to your online account
Chemistry plus physics.
Maintain your recipes, test results, firing schedules, pictures, materials, projects, etc.
Access your data from any connected device. Import desktop Insight data (and of other products).
Group accounts for industry and education. Private accounts for potters.
Get started.
Download for Mac, PC, Linux
Interactive glaze chemistry for the desktop. Free (no longer in development but still maintained, M1 Mac version now available).
Download here or in the Files panel within your Insight-live.com account.
What people have said about Digitalfire
Your articles have been a great help when explaining glaze and the techniques to amateur ceramic students. Many thanks.
I have thoroughly enjoyed the articles on your web site.
I would like to stay connected to your program. In my glaze workshops, I use your 5/20 glaze as our Cone 6 reference so I often mention you and Digital Fire.com to all
of my students. I also tell them about all the great articles and reference materials you have with the level 2 program.
Your website has been very helpful to me over the past several years. I refer fellow potters to it constantly. Your G1214Z matte glaze formed the basis for the glaze used on my tea bowls.
Your website is phenomenal, I love it to get insight on different oxides. I helps me alot, even though we are pretty specialized.
What a great site! Such a wealth of information. The thing I
appreciate most about the site is the orderly and thoughtful and thought
through approach to glazing. We are learning and earning potters, learning
the craft and acquiring some income from it as we grow, working with cone 6
clays and glazes. I've been visiting your site frequently recently because
we are starting to mix our own glazes, and we wanted to be able to
incorporate the textures, surfaces and colors of our choosing, not hit or
miss due to trying untold numbers of blind recipes. I've found that even a
glaze that I've seen on someone else's work, using the same glaze mix on my
work, does not guarantee the same result in my kiln, due to clay
differences, surely, but also how my kiln fires, what temps it reaches, what
timing, etc. So we want be able to work out glazes that look and feel the
way that we like, in our firing environment, on our clays.
I downloaded Insight as a result of buying your book. WOW, I love that book,
real information.
Thank you for all your hard work.
I found your article http://ceramic-materials.com/cermat/education/226.html about majolica to be a real beacon, about a year ago, and am just producing finished ware now. I read through Magic of Fire yesterday and found the information on whiting causing gas problems/pinholes etc., which was immediately valuable with a problem I have been having.
I have been a teacher of ceramics for twenty years and have always been annoyed with what you call traveling glazes. Tom's Blue, Randy's Red, etc. have been taken from who knows where, are out of context and without history or understanding as you point out.
What people have said about Insight-Live
Yet again, you provide a quick answer not easily found elsewhere (a bowl was befuddling me with wall cracks that never made it to any edges.)
I have been following your Site and posts continually and gained a greater understanding. Thank you for that. It is so exciting to have a positive outcome from your glazes rather then the bought glazes. ... All good and exciting. My pottery clients are excited and have recognized the difference. There is nothing better than to pass on the best work possible to those who love the pots. So much work and testing, but well worth it. Thank you so much.
Awesome program you have!
Thank you for this web site. Really thank you. I live in fear that it will disappear one day, so don’t ever delete it please!
Thanks for sharing your extensive knowlege with the clay community.
Please know that your work is really benefiting me in my work. I really was helped by your information about drop and soak at cone 6. I've had trouble with an otherwise beautiful glaze which develops blisters. Thanks for your 'Insight!'
I am a ceramic manufacturing manager, and before this position, I had no training on ceramics. I was taught our recipes, but none of it was explained. The dragon ran amok. After reading through your articles and descriptions, I feel I have learned so much about my own products, and I have a foundation for changing, improving, and troubleshooting my materials issues that I wouldn't have had otherwise. They taught us in engineering school that we all stand on the shoulders of giants, because we all get to use knowledge and tools at a moment's notice that took others years to develop. Thank you for sharing all that you have, so the rest of us can stand on your shoulders to do our work that much better.
Thank you for your time, and I am totally excited that I woke up to an email from Tony Hansen (I’m a big fan)
I'm accepting the challenge. First: find/develop a good base recipe. One for clear and one for celadon. Then add the colors. And play with "surface." Experiment. Keep impeccable notes. Change one variable at a time. Yada, yada.
I have found your website to be extremely helpful because of your analysis of glaze chemistry and other information too. I have been able to mix all my own glazes and troubleshoot with the information you provide. I want you to know how much you're helping fellow potters all over the country and I truly appreciate your generosity in sharing the information.
March 2026: We are doing major upgrades to code here, please be patient regarding any issues. If any page is not working for a period of hours, please contact us. Thank you.
Blog
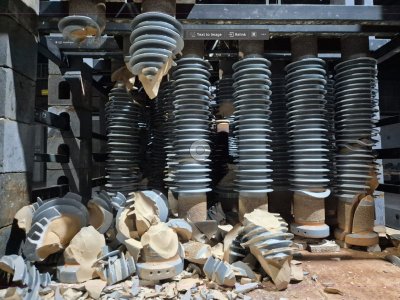
When kilns are not candled long enough
Candling of kilns is the final stage of drying. Driers cannot achieve the temperatures needed to remove all water, so almost all industries rely on early stages of firing to remove it fully. Failures like this are part of the learning curve of every company (because there is always pressure to fire as fast as possible).
Although much more common in heavy clay industries, porcelain insulators are one of the less likely products for this to happen with. This is because machine-forming methods make it possible to use aluminous porcelain bodies having very little clay. Thus, faster drying (with less shrinkage and fewer residual internal stresses) also makes it possible for early stages of firing to be quicker. But there are limits. These insulators are solid, thick and heavy. And they have extreme variations in thickness (thin skirts to solid spindle). So, for even these, early stages of firing must be conducted carefully. For such products, periodic firings of days is often needed.
The cone 6 mug on the left has the G3933A glaze, applied as a dipping glaze. It turned out poorly - crawling from corners and looking thin and washed out. I made a brushing glaze version of this (which adds 1.5% CMC gum), I keep it around for this very purpose. It has a high specific gravity (unlike commercial ones that have high water contents - they will run and go on too thin if you try this). Because of the gum, it dries hard, there is no shrinkage or cracking. On a second firing, using the C6DHSC schedule again, (mug on the right) the surface is transformed - thicker, more vibrant color.
It is possible to make a small brushing batch by simply dewatering some of the dipping glaze on a plaster bat (just for a minute or two, long enough to pull out the water). Then remix it with enough gum solution to get a paintable consistency. It doesn’t have to be precise, just get it to a point where it paints on and sticks in the thickness you need and does not crack on drying.
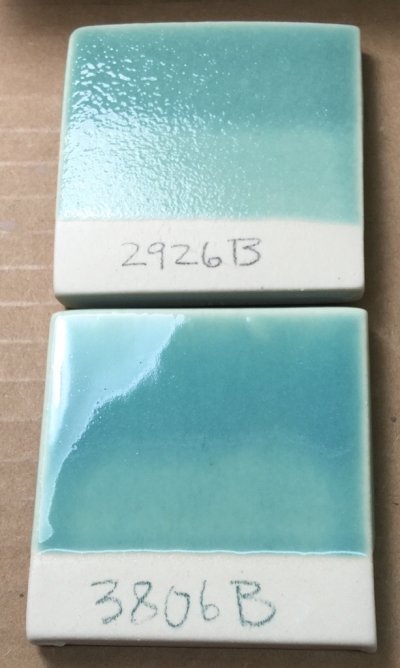
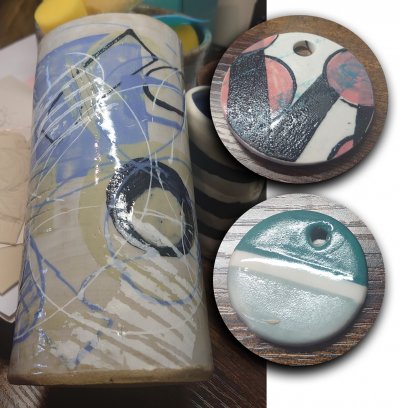
The lower glaze, G3806B, diversifies the fluxes (half the B2O3 in exchange for more Na2O and introduction of SrO and ZnO) and increases their total compared to Al2O3 and SiO2. The result is a more fluid cone 6 melt having lower surface tension. The mixed-oxide effect is also a factor here; the diversity itself improves the melt.
The above factors are enough to solve the problem here. But more can be done. More zinc (in exchange for KNaO) could produce later melting, especially in combination with sourcing some or all of the latter from a feldspar instead of the low-melting frit. The benefit would enable more gas escape until melt-sealing (and reduce the COE).
Knowing about this could debubble your clear glaze.
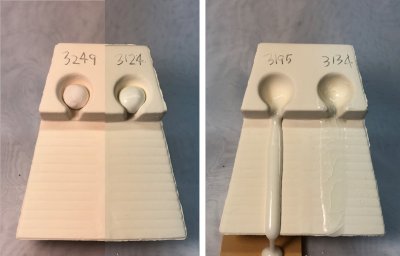
Industry, late-melting glazes are a must for fast fire because there is no time for glazes to debubble. The later they melt (while still melting well at the target temperature), the more LOI gases of decomposition (generated by the body, glaze materials, glaze & body additives) can be expelled first. What about potters? These melt flow tests are of specific interest to anyone making clear glazes using frit 3134. They compare four common Ferro products fired to 1750F: Frit 3249 (29% B2O3), frit 3124 (14% B2O3), frit 3195 (23% B2O3) and frit 3134 (23% B2O3). Surprisingly, the one having the most B2O3 starts melting the latest (more than 200F after 3134), this is because of the amount of MgO in the formula. So, if your transparent glaze contains any MgO (G2926S, for example, contains 0.15 molar), the more that can be supplied using this (instead of 3134), the later the glaze will melt. Likewise, frit 3124 is a better choice than 3134 in cases where the percentage of clay can be reduced (since it supplies much more Al2O3). Glazes containing high percentages of feldspar are least likely to benefit because the main alternative source of KNaO is frit 3110, and it melts even sooner than 3134 (an exception is cases where the glaze also has high MgO and B2O3).
This is a cone 6 transparent fritted glaze (converted from a Gerstley Borate one). Its B2O3 content is high, sourced by Ferro Frit 3134. Bubbles like this plague many potters, many just keep trying new glazes until one works, or give up on never finding one.
The first obvious problem is the frit, it starts melting at 1350°F, while plenty of gases are still being generated. Such a bubble-trapper is a non-starter in an industrial continuous fast-fire kiln. They need late melters. But potters have flexible firing, so what could be done? The firing could be slowed down, leading up to 1350. It could be held at top temp, then either slow cooled or a drop-and-hold. And the recipe? Notice the big bubbles; they started as little ones that merged. Given enough time, big ones break at the surface, but only under the right conditions: Low enough melt viscosity and surface tension. That's not happening. Strangely, old recipes sourcing high boron from Gerstley Borate had surprisingly few problems with bubbles! Why? GB was its own fining agent. And its boron entered the melt much later than this frit. Plus, the melt developed unevenly, creating localized channels and variable viscosity zones for easier bubble escape. The larger bubbles could better move laterally by combinations of surface tension, layer thickness and temperature gradients, and downward movement that created shear. A frit is missing all of that.
Let's assume this glaze melt has high surface tension. It pulls liquid inward around each bubble, stabilizing them round and making rupture more difficult. But, if surface tension drops, even slightly, bubbles deform more easily and adjacent ones merge. What could help? Industrial technicians have found that surprisingly small changes can really help with bubble release.
-A small SiO2 or Al2O3 addition can delay surface sealing or change viscosity timing.
-Sourcing the CaO from wollastonite can help bubble coalescence and reduce melt surface tension.
-Zinc oxide often changes surface behavior more than expected. As little as 2% can alter the viscosity curve, surface tension and melt interface properties, weakening bubble walls and improving near-surface rupture.
-Although MgO stiffens the melt somewhat, it also changes bubble wall elasticity; even small additions can help bubbles merge better.
As usual with solutions found here, methodical testing is needed to find the best answer.
Potters often encounter the problem shown here. These pieces are fired at cone 6. They are decorated with underglazes made from a mix of porcelain powders and stains. The transparent glaze works over certain colors (e.g. the light blue), but over others, it is full of microbubbles and pinholes. The potter has not had success finding a transparent overglaze that works consistently. As can be seen here, stain types used in underglazes behave differently; they are not just inert powders. Also, stain manufacturers do not mix stains with porcelain to making underglazes.
So, although closer control of the transparent glaze thickness or a more fluid melt glaze recipe might help, the real solution lies with the underglaze recipes used here. An ideal bisque-stage underglaze is sinter-bonded but not sealed, accepting glaze water. An ideal fired underglaze also has controlled maturity: enough glass development to bond well to the body and promote glaze acceptance, but not so much that edge-bleeding and opacity loss occur. This state of 'controlled maturity' is also more likely to match body thermal expansion. The cost savings and the potential to fine-tune each color to your exact needs can be powerful motivations to use DIY underglazes.
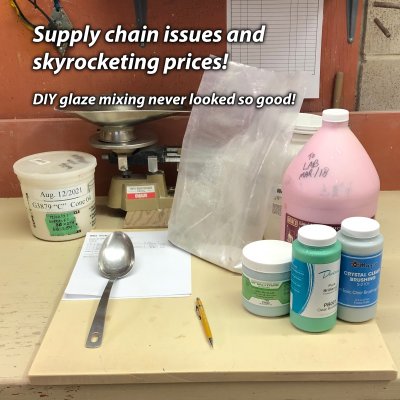
The next supply crisis will hit commercial glazes first.
Cope better this time by knowing DIY glaze mixing.
As potters, we learned that no one is affected by supply chain problems more than prepared glaze manufacturers; they have complex recipes that require complex supply chains. It wasn't just availability; product consistency was also affected. It is again time to think about DIY, to start learning how to weigh out the ingredients to make at least some of your own. Arm yourself with good base recipes that fit your clay bodies (without crazing or shivering). Add stains, opacifiers and variegators to the bases to make anything you want. Admittedly, ingredients in your recipes can also become unavailable! But DIY as about options. When you "understand" glaze ingredients and what each contributes to the recipe and oxide chemistry, you are equipped to go well beyond weathering material supply issues. You will improve recipes, not just adjust them, to accommodate alternative materials. It is not rocket science; it is just work accompanied by organized record-keeping and good labelling.
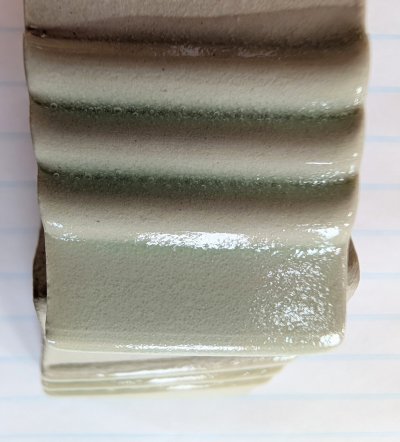
This is a cone 6 oxidation transparent glaze having enough flux (from a boron frit) to make it melt very well, that is why it is running and pooling. Iron oxide has been added (around 5%), producing this transparent amber effect. Darker coloration occurs where the glaze has run thicker (because it absorbs more light). This simple mechanism enables the glaze to automatically highlight contours, emboss and textures on the underlying surface. This mechanism works with any color in almost any transparent base glaze, as long as bubble clouding and crystallization do not occur. Entire lines of commercial glazes (e.g. AMACO Celadons) are based on this mechanism and potters prize it (industry doesn't like it because it is difficult to achieve consistency).
This glaze relies on high levels of K2O and Na2O to produce the brilliant gloss, however the side effect of that is crazing. These are sourced by feldspars, nepheline syenite and are high in certain frits. To achieve this effect, recipes must rely on other fluxes like boron, lithium or zinc.
The more complex your supplier's supply chain, the more likely they won't be able to deliver. And that prices will rise even further. How can you adapt to disruptions, even turn them into a benefit? Historically, pottery has been a shining star of resilience and independence because the materials were in the ground nearby. You cannot likely head out to the nearest hill with your wheelbarrow to get clay, but you can do something even better.
Rather than viewing these containers as full of specific brand-name clays, minerals and man-made powders, it is better to view them as full of materials that supply the physical properties and chemistries needed to make bodies, glazes, engobes, slips, etc. By characterizing your glazes and bodies, using an effective record-keeping system, you can not only adjust recipes to adapt to changing supplies, but even improve them in the process (adjusting glaze thermal expansion, temperature, surface, color, etc). Or, use materials native to your area. It is not rocket science; it is just work and gradual learning accompanied by organized record-keeping, good labelling and interpretation skills.
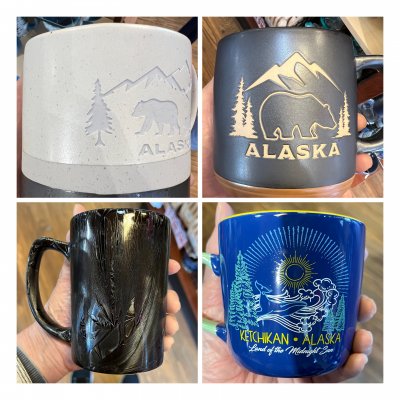
Peggy-potter makes the hand-crafted mugs. Carla-coffee-drinker, needs a mug. This apparent perfect alignment goes off the rails when Carla compares Peggy's $50 price with premium imported mugs costing $5 (shown here). Especially when the imports emulate Peggy's techniques flawlessly while offering better durability and strength!
Peggy has to choose between hyping "kiln drops" on social or cutting costs. DIY techniques and supplies are a first option. Also mold-making and slip casting, even mixing her own casting slips. Mixing her own glazes, underglazes and engobes is the next step. Or learning to use less expensive bodies (e.g. with engobes).
Going DIY is not a big equipment investment. A plaster table, scale, mixing and batching table and a propeller mixer are the most important. And keeping good records (e.g. an account at insight-live.com). Following manufacturers on Instagram to see their glazing and forming techniques can help. Build throwing and drying skills by making hundreds of the same item. Consider: What you do affects other potters, prices cannot keep rising, or there will be no market.