A cereal bowl jigger mold made using 3D printing
Beer Bottle Master Mold via 3D Printing
Better porosity for Brown Sugar Savers
Build a kiln monitoring device
Celebration Project
Coffee Mug Slip Casting Mold via 3D Printing
Comparing the Melt Fluidity of 16 Frits
Cookie Cutting clay with 3D printed cutters
Make a mold for 4-gallon stackable calciners
Make Your Own Pyrometric Cones
Make your own sieve shaker to process ceramic slurries
Making a high quality ceramic tile
Making a Plaster Table
Making Bricks
Making our own kiln posts using a hand extruder
Medalta Ball Pitcher Slip Casting Mold via 3D Printing
Medalta Jug Master Mold Development
Mold Natches
Mother Nature's Porcelain - Plainsman 3B
Mug Handle Casting
Nursery plant pot mold via 3D printing
Pie-Crust Mug-Making Method
Plainsman 3D, Mother Nature's Porcelain/Stoneware
Project to Document a Shimpo Jiggering Attachment
Roll, Cut, Pull, Attach Handle-making Method
Slurry Mixing and Dewatering Your Own Clay Body
Testing a New Load of EP Kaolin
Using milk as a glaze
Yixing Teapots
Evaluating a clay's suitability for use in pottery
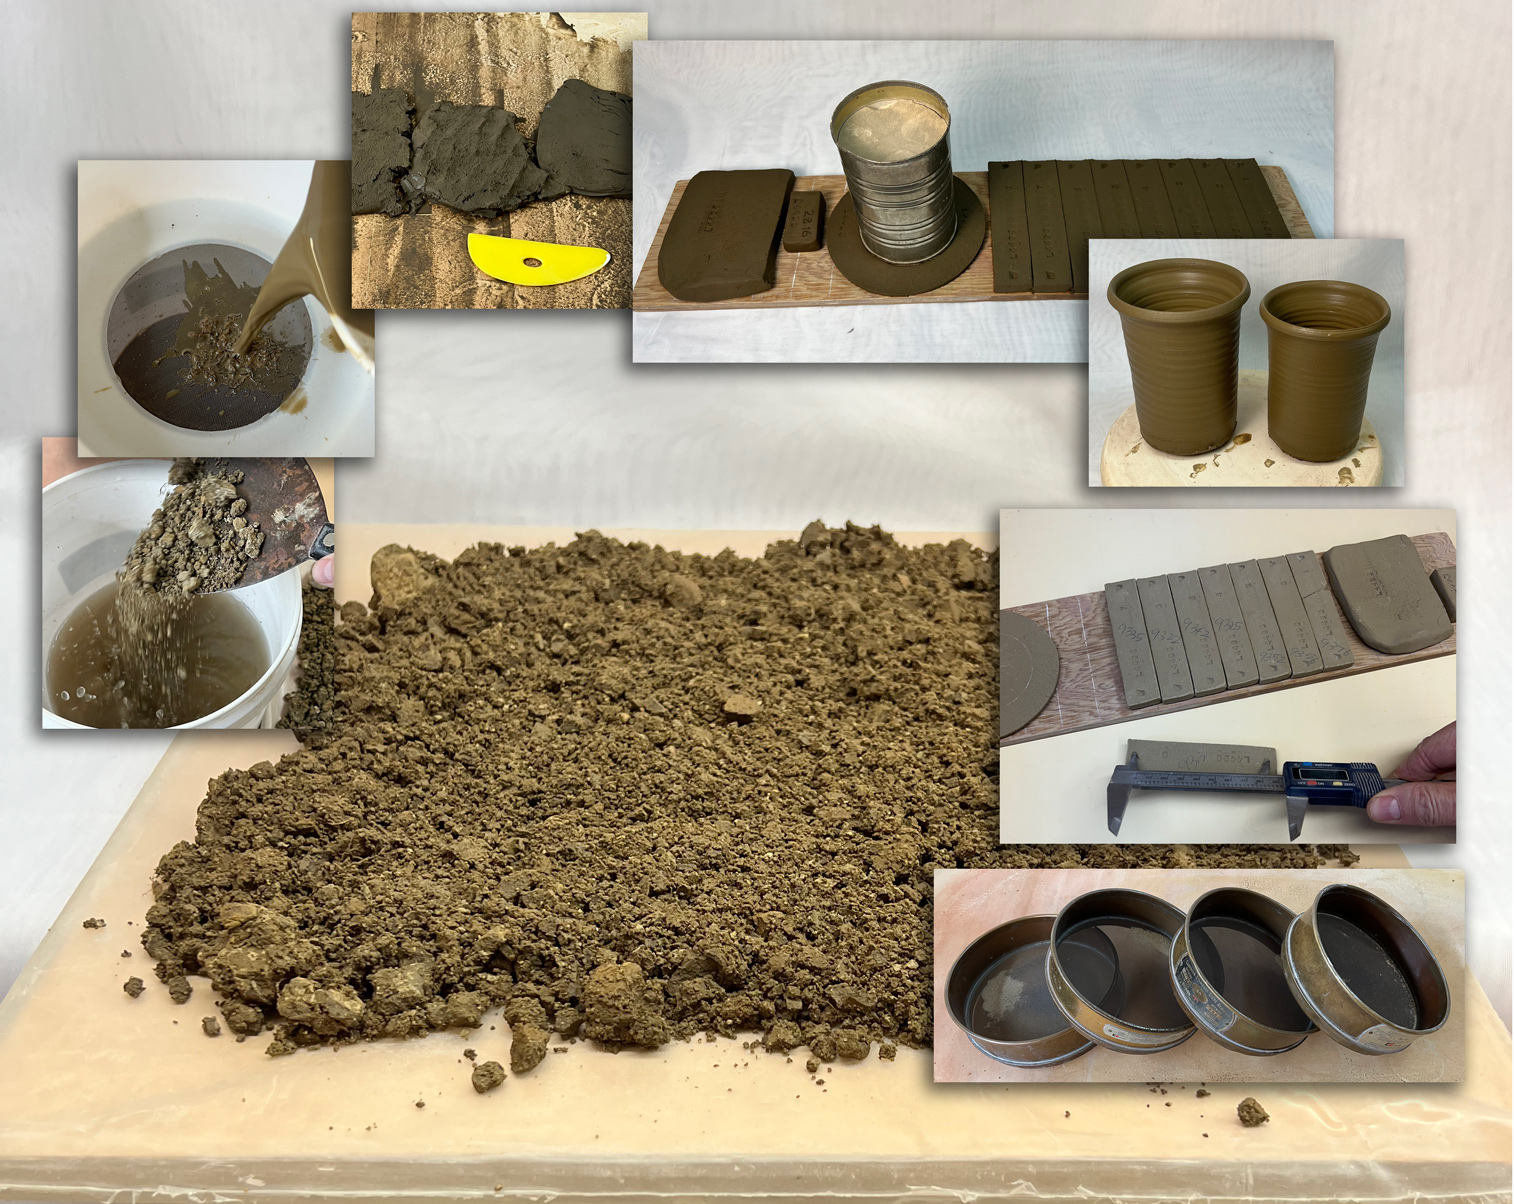
Clockwise: Drying, slaking, 30 mesh screening, slurry up, making test bars, throwing it on the wheel, measuring dried specimens, sieve analysis.
Would you like to be able to use your own found-clays, ones native to your area or even your property, in your production? Follow me as we evaluate a mystery clay sample for use in pottery. The methods and principles shown here apply to clay used in any production process that requires plastic material (e.g. extrusion of brick or tile). I will use ordinary tools and we will describe this clay in terms of plastic clay bodies and common ceramic materials that most potters use. We will "understand" how it behaves, not just from how it feels or looks, but from data we collect and feed into my account at Insight-live.com. The calculations on that data will produce a much more complete picture.
I received this sample for testing during Feb 2022. The potter who submitted it had worked enough with the material to suspect it has potential and he wanted to know how to best utilize it (e.g. at what temperature, with what glazes, mixed with what, processed in what way). In technical terms, we did a "characterization" to accurately describe this clay in terms of other commonly available ceramic materials and clay bodies.
Note that at each step of the way I notice details, about things as simple as how it slakes, how it dewaters, how the slurry stirs and suspends and sieves, how the plastic material wedges, rolls, throws, etc. Strangely, these details are the kind of things that material safety data sheets and even production engineers in large factories ignore!
Early on it became evident this is a terra cotta clay having an unusually low firing shrinkage. Removal of the sand well beyond 30 mesh is needed to improve fired density and stop glazes from shivering. But the plastic nature of the clay makes wet sieving quite difficult. Dilution of the sand is an option, perhaps using a kaolin, that would also moderate the high expansion from the silica sand. If 50 mesh could be accomplished using a vibrating sieve this would be even more practical. The percentage used would be determined by the color loss that could be tolerated. If glazes still shiver the G1916Q base recipe could be adjusted by removing all of the frit 3249 and replacing it with frit 3110. If that still shivers then add more 3110 at the expense of 3195.
Related Information
I Tested a Found-Clay:
Was it suitable for pottery?

This picture has its own page with more detail, click here to see it.
Would you like to be able to use your own found-clays, ones native to your area or even your property, in your production? Follow me as we evaluate a mystery clay sample provided by a potter who wants to do exactly this. I will use ordinary tools that any potter either already has or can buy at low cost. We will describe this clay in terms of plastic clay bodies and common ceramic materials that most potters already use. The potter who submitted it has worked enough with the material to suspect it has potential and he wants to know how to best utilize it (e.g. at what temperature, with what glazes, mixed with what, processed in what way). In technical terms what we are doing is called "characterization".
Step 1 testing a "wild clay": First impressions

This picture has its own page with more detail, click here to see it.
This was found clay was extracted about 4 feet below ground level in central Alberta, Canada. I got about 10 lbs to evaluate. About 1/3 of it has been spread out to dry on a plastic-covered board (it is fairly damp and it needs to be completely dry in order to slake at the next step). The greenish color suggests that we have a terra cotta. It is worth noting that when sampling clays take a cross-section, either up and down through the depth of the layer. Confine the sample to material that has the same appearance and texture, in doing so note the extent of the deposit to which you can get access. If possible dig multiple sample holes to see if the layer is level and of consistent thickness. Be careful to work on a representative sample.
Step 2: Put the dried lumps in to hot water

This picture has its own page with more detail, click here to see it.
Hot water encourages slaking. I am using plenty of water, that encourages better slaking. If the lumps had been larger I would have broken them down to centimeter-size (half inch). After sieving, it will settle overnight so any excess water can be poured off. Dried lumps slake, damp or wet ones do not, that is why I dried the clay thoroughly in step 1. Most clays will slake within minutes (if the lumps are not too large), I left this one for about 30 minutes.
Step 3: Note floating organics, feel the consistency, take out any larger rocks

This picture has its own page with more detail, click here to see it.
It was immediately evident that it was not suspending well, it settled to the bottom quickly and felt fairly sandy. This is not a good sign since it will make slurry processing difficult (because the settling material will immediately clog up the sieve). That being said, a small amount of added bentonite would help to suspend it and make sieving easier. There were a few rocks that were cm-sized. Floating organic material is minimal.
Step 4: Pour it through a 30 mesh screen

This picture has its own page with more detail, click here to see it.
Plastic sieves are available at any ceramic supply store. Better metal ones can be purchased on Amazon or eBay (shown in the inset). I 3D-print supports to mount these on two-gallon buckets. Most sedimentary clays would go right through a screen like this, with little or no residue remaining. But coaxing this particular slurry through the sieve took considerable effort; I had to use plenty of water. Balls of plastic material formed as I brushed (which means this material is a combination of fine-particled clay with much coarser mineral grains). The lesson appears to be: The simple act of trying to sieve this clay through 30 mesh revealed the difficulty that manual DIY processing would present if it were used in any kind of production. That being said, a vibrating sieve could change that.
Step 5: Allow the clay to settle in the bucket overnight

This picture has its own page with more detail, click here to see it.
Notice the water is relatively clear, which means there is a minimum of free bentonitic or colloidal material (that should minimize drying shrinkage). That being said, there could be colloids that are agglomerated. The absence of coloration in the water also means there is a minimum of soluble salts present (salts, like calcium sulfate, are normally iron-stained and reveal themselves by darkening the water). Shown again is the oversize material on the 30 mesh screen (after drying). These pebbles range in size from 7mm down to 30 mesh (remember there were also a few large ones removed at step 3). The existence of these pebbles means that this clay cannot be processed by grinding the dry powder, it likely has to be slurried and screened (that means only a potter would be able to utilize it).
Step 6: Pouring the slurry on a plaster table for dewatering

This picture has its own page with more detail, click here to see it.
In this step, we will slurry up the clay. After pouring off the water, I stirred the remainder to get it all in suspension. During the pour I also had to agitate the slurry with a spatula to keep coarser particles suspended (this is thus a mix of finer clay particles and coarser grains, these grains will be identified later in the sieve analysis). On the plaster, the sand quickly sank against the plaster. The slurry dewatered within a few minutes enabling me to scrape it up, using a rubber rib, then lay it down again for further stiffening (on inset photo). A few minutes later it was stiff enough to wedge and flatten down again. Within about 10 minutes it had reached plastic stiffness and felt similar to a typical, ready-to-use terra cotta pottery body (although sandier and less plastic). The green color is also typical of terra cotta clays, that is iron oxide, Fe2O3, and the reason this will likely burn red in the kiln.
Step 7: Making test bars and using it on the potter's wheel

This picture has its own page with more detail, click here to see it.
I made these test bars in order to guage drying and firing shrinkage and porosity (via the SHAB test), drying performance and soluble salts (via the DFAC test) water content and LOI (via the LDW test) and particle size distribution (via the SIEV test, the piece on the far left is going to be slaked again and washed through a root-of-two series of sieves). Notice all the bars are stamped with the lab code number I assigned. There is nothing like using a clay on the potter's wheel to get a feel for its plastic character. I found it to be quite sandy, but usable. If it could be sieved to a finer mesh, liked 42 or 60, it would be much more pleasant to use. Plasticity is fairly good, enabling me to pull walls quite thin despite the sand increasing friction, thereby increasing the tendency to twist at the base. It is also plastic enough to resist splitting at the rim as I pull it outwards. A closeup of the thrown rim shows the coarser particles.
Step 8: Measuring the clay test bars after drying

This picture has its own page with more detail, click here to see it.
These test specimens dried overnight (this in itself is pertinent - quick drying indicates low levels of superfine particles e.g. bentonite). Here, I am measuring the length of the SHAB test bars, weighing the LDW test sample and recording the crack pattern and soluble salts on the DFAC test disk. All of this data plugs into the recipe I have allocated for this project in my account at Insight-live.com, you can it here on the inset screenshot. Next I’ll set these on our staging shelf for firing in the test kiln (we accumulate test bars for 16 temperatures).
Step 9: Slaking and washing 50 grams through a 100 mesh screen

This picture has its own page with more detail, click here to see it.
During sample preparation, I set aside a piece to use for particle size distribution testing. I broke it up on the concrete floor using my "smoosher", a heavy iron pipe with an inch-thick iron plate welded on the bottom (it was evident during that process that the clay has excellent dry strength and hardness). I then weighed out 50 grams and put it into hot water for slaking (notable is the fact that rewetted clay slakes in minutes, more readily than the original raw material). Then I washed it through the finest of the sieves I am using, 100 mesh. In the next step I will wash the #100 oversize through #40, #60, #80 and #100 mesh (washing it through the #100 first works best, the lower screens often clog and blind if one tries to wash it through all of them at once).
Step 10: A PSD test using 40, 50, 70 and 100 mesh sieves

This picture has its own page with more detail, click here to see it.
These are the four sieves I used to do a subset of the SIEV test. The label on each shows the size of the opening in microns (the top one, for example, is 425 microns, the next one 297 microns). The process is to wash the clay down through these, dry them and weigh the residue on each. I started with 50 grams of clay and entered double the weight for each one (as if I had processed 100 grams). Consider the second one down, #50: It had 2.6g of residue, that means that 2.6% of the material is finer than 425 microns but coarser than 297. The data yielded by this process produces what is called a PSD or Particle Size Distribution. The total residue on all the sieves is 11.74 grams, that means that 88.26% of the material is finer than the 150 microns (the bottom #100 sieve). Compared to most sedimentary clays, this is quite coarse. In the next step, let's look at what these particles are.
Step 11: 40, 50, 70, 100 mesh oversize particles (clockwise)

This picture has its own page with more detail, click here to see it.
These photos were taken by an iPhone 13 at 1-inch distance. They are the residue on each of the four sieves (remember I already sieved the material through 30 mesh, the top sieve thus represents the 30-40 mesh fraction). From these, it appears that the particulate in the clay is mostly rounded quartz particles. Their presence explains the sandy feel of the material during throwing (strangely, round particles generally feel sandier than angular ones). The reason it was difficult to wet-sieve through 30 mesh is that these rounded particles must be clogging the screen. It is a safe assumption that if it was tested down to 325 mesh, the percentage of quartz sand on each sieve would continue to increase. Because these particles are present at all sizes measured, the same clogging issue would occur at any mesh size. The presence of so many quartz grains also means it would be just about impossible to grind this finer than 30 mesh in a hammer mill. This being said, the presence of so many quartz particles likely means glazes will fit well (or possibly even shiver), it will have good drying performance and the plastic material should dewater quickly.
Step 12: First fired bars at cone 4, 04 and the data I have entered for them

This picture has its own page with more detail, click here to see it.
L4496, this clay, is the top two bars, fired at cone 4 and 04. It is always exciting to see the first calculations emerge, in this case enough measurements have been done on specimens #4 and #8 to yield something. The bottom bars are Plainsman L215 terra cotta. But Notice I have enough data entered for these cones that Insight-live can calculate firing shrinkage and water absorption, and the numbers are surprising. Specimen #8 has a firing shrinkage of -0.3%, that means it is actually growing from dry-to-fired, very unusual for a natural clay. Notice also the absorption is only 3.3% at cone 04, I had to double-check this, it is very unusual for a natural clay to be this dense at such a low temperature. Even though the surface of the L215 bar on the bottom is much smoother and denser appearing it is actually much less dense (at 12% porosity). The cone 4 numbers are also interesting. The clay is melting at cone 5 (not shown) but the cone 4 bar is not bloating or bubbling and its firing shrinkage is low.
Step 13: Trying some commercial transparent glazes for fit-test

This picture has its own page with more detail, click here to see it.
I bisque fired these at cone 06 and glaze fired them at cone 04. Left piece outside glaze: Mayco C300 matte, inside: Spectrum 700. The inside glaze is clearly under compression, notice how it is pushing the crack apart (a spiral network of cracks is growing around the piece). The right piece is glazed with G2931H, but despite its higher thermal expansion it too is under enough compression to fracture the piece (notice the cracks beginning at the bottom). The presence of significant amounts of silica sand in the clay is the reason for this, quartz raises the thermal expansion of the clay. That produces this problem of glaze compression. It could be possible to use this clay pure as a terra cotta by screening out more of the silica sand.
Step 14: Closeup of glazed shard cross section

This picture has its own page with more detail, click here to see it.
These were fired at cone 04, top is this clay and the bottom one is L215, a terra cotta from Plainsman Clays. The extra glaze thickness on the top one was done to thermal-expansion-stress it and bring out shivering or crazing. Notice how many more pores there are in the L215 (bottom), this clay is clearly much denser. That appears to account for its very low measured porosity, 3% at cone 04. This is among the lowest we have ever seen for a material like this. I took these photos using the closeup feature on an iPhone 13.
Step 15: The drying performance disk shows no soluble salts

This picture has its own page with more detail, click here to see it.
This is one-quarter of the DFAC test disk (this simple test enables us to rate the drying performance, dry strength and soluble salts). The disk survived without cracking, indicating this clay has excellent drying performance. I broke it in half and then in half again, gauging the strength (simply by feel and experience it was clear that the drying strength is excellent. Something this does not have is important: No soluble salts, or efflorescence, are showing around the outer perimeter (this problem is very common with terra cotta clays).
Step 16: The fired bars have all been processed

This picture has its own page with more detail, click here to see it.
These test bars are fired from cone 5 (top) down to cone 06 (bottom). We are processing hundreds of these bars are any given time, managing the simultaneous testing of dozens of body, glaze and engobe projects in our group account at insight-live.com.
These took about a month to work their way through our system, all the measurement data has been entered (we will look at that in the next step). These bars show visually how this clay matures across a wide range of temperatures, from most-porous at the bottom to beginning-to-melt at the top. One thing is obvious: Most terra cottas shrink much more as they approach cone 2, commonly reaching 8%, then they begin to expand above that. This one is much more dimensionally stable, it is only shrinking about 3% at cone 2 (the #2 bar).
Step 17: Revisiting the test bars - The data

This picture has its own page with more detail, click here to see it.
These screen fragment overlays are from the recipe panel at insight-live.com. The table of data shown here is from the SHAB test only. The row numbers are the specimen numbers of each bar. The first five columns are the data we collected by measuring the bars before and after firing (dry length, fired length, dry weight, fired weight). The last three red columns are the results of calculations it does on that data to produce values for drying shrinkage, firing shrinkage and fired porosity. The graph above charts the firing shrinkage (ascending line) and absorption (descending line) against temperature. These two lines are like a "fired maturity fingerprint". Finding meaning in this data enables characterizing the firing behavior of the clay. In the next step, we will compare it to a terra cotta clay body.
Step 18: Compare data, this and a typical terra cotta

This picture has its own page with more detail, click here to see it.
The fired bars on the left are Plainsman L215 (with the material we are evaluating). These are a subset of the test bars, cone 4, 2, 02, 04, 06 (top to bottom), ~2150F down to ~1850F. The overlay graph shows pairs of firing shrinkage/porosity lines generated from the data we have been measuring, the descending ones plot increasing density with temperature and the ascending ones plot increasing shrinkage. The further the line-pair intersections push left the lower the temperature needed to mature the clay. But the steeper the lines, the more volatile the material. This data shows L4496 is much less mature till 2050F but suddenly vitrifies and then melts beyond that. The appearance of the bars verifies this. The orange lines would be even steeper were it not for the high sand content. The sand is certainly responsible for the unusually low fired shrinkage up to 2050F.
Inbound Photo Links
 Make pottery in Mexico. What should you take? |
 Precrush raw lump clay: Use a large wooden rolling pin |
 Mother Nature's stoneware and glazes! |
Links
| Articles |
How to Find and Test Your Own Native Clays
Some of the key tests needed to really understand what a clay is and what it can be used for can be done with inexpensive equipment and simple procedures. These practical tests can give you a better picture than a data sheet full of numbers. |
| Glossary |
Slurry Up
The process of slurrying a clay body powder and dewatering it on a plastic slab or table. |
| Glossary |
Native Clay
A clay that a potter finds, tests and learns to process and use himself. To reduce the costs of importing materials manufacturers, especially in Asia, often develop processes for clays mined in their locality. |
| Tests |
Shrinkage/Absorption Test
SHAB Shrinkage and absorption test procedure for plastic clay bodies and materials |
 PayPal | No tracking, No ads, No paywall, No transient content! Just organized, concise information constantly updated and improved. Was this helpful? Consider supporting me. |
| By Tony Hansen Follow me on        |  |
Got a Question?
Buy me a coffee and we can talk 

https://digitalfire.com, All Rights Reserved
Privacy Policy