A cereal bowl jigger mold made using 3D printing
Beer Bottle Master Mold via 3D Printing
Better porosity for Brown Sugar Savers
Build a kiln monitoring device
Celebration Project
Coffee Mug Slip Casting Mold via 3D Printing
Comparing the Melt Fluidity of 16 Frits
Cookie Cutting clay with 3D printed cutters
Evaluating a clay's suitability for use in pottery
Make a mold for 4-gallon stackable calciners
Make Your Own Pyrometric Cones
Make your own sieve shaker to process ceramic slurries
Making a high quality ceramic tile
Making a Plaster Table
Making Bricks
Making our own kiln posts using a hand extruder
Medalta Ball Pitcher Slip Casting Mold via 3D Printing
Medalta Jug Master Mold Development
Mold Natches
Mother Nature's Porcelain - Plainsman 3B
Mug Handle Casting
Nursery plant pot mold via 3D printing
Pie-Crust Mug-Making Method
Plainsman 3D, Mother Nature's Porcelain/Stoneware
Project to Document a Shimpo Jiggering Attachment
Roll, Cut, Pull, Attach Handle-making Method
Slurry Mixing and Dewatering Your Own Clay Body
Testing a New Load of EP Kaolin
Using milk as a glaze
Yixing Teapots
2019 Jiggering-Casting Project of Medalta 66 Mug
In 2019 I learned 3D design software and how to use 3D printing. Many things I have made using this I either could not, or would not have otherwise done. It is incredible! And knowing about these enables me to prototype and tool-up much more easily to mass produce a product.
The best accomplishment: 3D Printing the master jigger molds and template and handle-casting molds. It took a year to go from concept to the first production mug. Perhaps the single biggest factor was learning how to use engineering consultants online (at Upwork.com). That helped me getting over the biggest obstacle: Learning to use 3D design (or solid modeling) software. I was lucky, by the second consultant I tried I struck gold. Right at the start he talked me out of using Blender and into using Fusion 360. I needed his help about 20 times throughout the year. He repeatedly made how-to videos. He always drew things parametrically. At the start I gave him a cross-section drawing, that I made using 2D software, everything he later did was based on that.
The exciting events that frequented each stage of this adventure were the adrenaline that kept me going. The first was being able to rotate his 3D drawing in my copy of Fusion 360, that was an eye-opener. Then (after months of struggle building my first 3D printer) I printed a prototype that I could hold in my hand! Other landmarks included seeing those incredible handle molds printing. Another exciting thing was seeing how fast 3D printing evolved in just that year. And how easy it was to adjust drawings and reprint as I learned what did not work.
After scaling it up by 10% (to allow for drying and fired shrinkage), I went through a series of failed ideas on how to print the mold for the master model and then the forms for the block molds for the jigger and handle molds. I ended up printing the mug model mold in two pieces and gluing them together. And the shell mold to fit around it needed to be printed in two pieces and glued also (it splits vertically for easy removal, being held together using simple paper clamps). By the time I got to doing these I had my second 3D printer, it produced much better quality. I was amazed how smooth a surface it could print, plaster poured against can be smoothed in seconds with just a metal rib. My 3D printer nozzle layers down 0.4mm wide paths, so I doubled that and printed 0.8mm thick walls. These were rigid enough that no little deformation occurred when full of plaster (later I went to 1.2mm).
Surprisingly, the jigger molds fit perfectly into the aluminum cuphead the first time! But then the template tip did not clear the far side of the mold as I brought the jigger arm downward! Then magic happened. I printed a new narrow template that just went down the side but not across the bottom. Then I slip-cast a mug in a jigger mold using a 3D printed pouring spout (that I had developed for another project), this spout made it possible for the clay to extend well up from the top of the mold. Then I finished the cast mug, while still soft, by jiggering just the wall and lip. Voila, that lip looked like one on a thrown mug. The mug dropped out of the mold easily.
Then something else magic happened: The template only needed to go down the side-wall part way (the cast surface was smooth). It also became evident that I did not actually need the jigger arm - it was easy to just hold the template in my hand! In fact, it was not even necessary to have the jiggering wheel itself, just a quick spin on a heavy banding wheel and press of the template was enough to finish the lip!
I have found that this process has a number of benefits:
-I can cast, finish and attach handles for a batch of mugs in a couple of hours. There is no need to cover them for trimming later, they are done.
-The cast mugs do not need special drying (no cover or drying chamber), casting clay has such low shrinkage nothing cracks.
-The casting process enables using every scrap of clay.
-Once the molds are made and you have a pail of slurry and a banding wheel, no other special equipment is needed (you can make the actual pieces in your kitchen if you want).
-Wall thickness is totally in your control, thick or thin.
Aug 2024: We are working on this again, incorporating improvements and fitting the mold to an industrial jigger machine. Multiple steps have been cut out of the process and it is better.
Related Information
Hand-tooling a mug model vs. 3D-printing a mold to cast it

This picture has its own page with more detail, click here to see it.
I am creating molds for a 2019 casting-jiggering project to reproduce heavy stoneware mugs manufactured here 50 years ago (I am not a mold maker, just a potter). I have a profile drawing I want to match (upper left). The solid plaster model on the left was my first attempt at manual tooling. The metal template was time-consuming to hand-make, its contour was difficult to match to the drawing and the plaster surface turned out rough and difficult-to-smooth. To make the plaster model on the right I 3D printed a shell, poured the plaster in, extracted it after set and then smoothed it on the wheel using a metal rib and trimming tool. It matches the drawing perfectly and the round is very true. 3D-printing is revolutionary for this type of thing! The drawings: I hired someone on Upwork.com to make them for me (using Fusion 360). The shell-mold (to cast the model) on the upper right: I printed that too, in two pieces.
3D-Printing the Medalta 66 prototype mug
First, we did the 3D drawing in Fusion 360. It took 12 hours on this early inexpensive build-it-yourself Rep-rap printer! Notice the printed supports it creates for the handle, these break away after it is done. Of course, the surface is not smooth enough to use as a model for mold-making. But to be able to hold it to judge size, wall thickness, handle feel and shape was valuable. All other drawings we made (for molds, templates, spouts, etc) were based on this starting point.
My first 3D-printed handle case mold

This picture has its own page with more detail, click here to see it.
These molds were my first effort using 3D design and 3D printing. They served well for making hundreds of pieces. They were part of a 2019 casting-jiggering project to reproduce a Medalta Potteries 1966 mug. Even with a thick handle like this and slip made using kaolin and ball clay not intended for casting, the molds split in less than an hour when casting solid (and in half an hour when casting hollow). As a parting agent on the 3D-printed surface I used Murphy's Oil Soap. The sidewalls had a draft of about 5 degrees and the handle cross-section was round rather than oval, so the plaster molds released without corner breaking.
This mold had spares - they did not provide a big enough reservoir and I later switched to using 3D printed spouts. These also had plaster matches (I later found that no matches worked better on this size and shape of mold). I went through multiple more versions perfecting the process to enable making handles of more difficult shapes and finally using 3D printed natches.
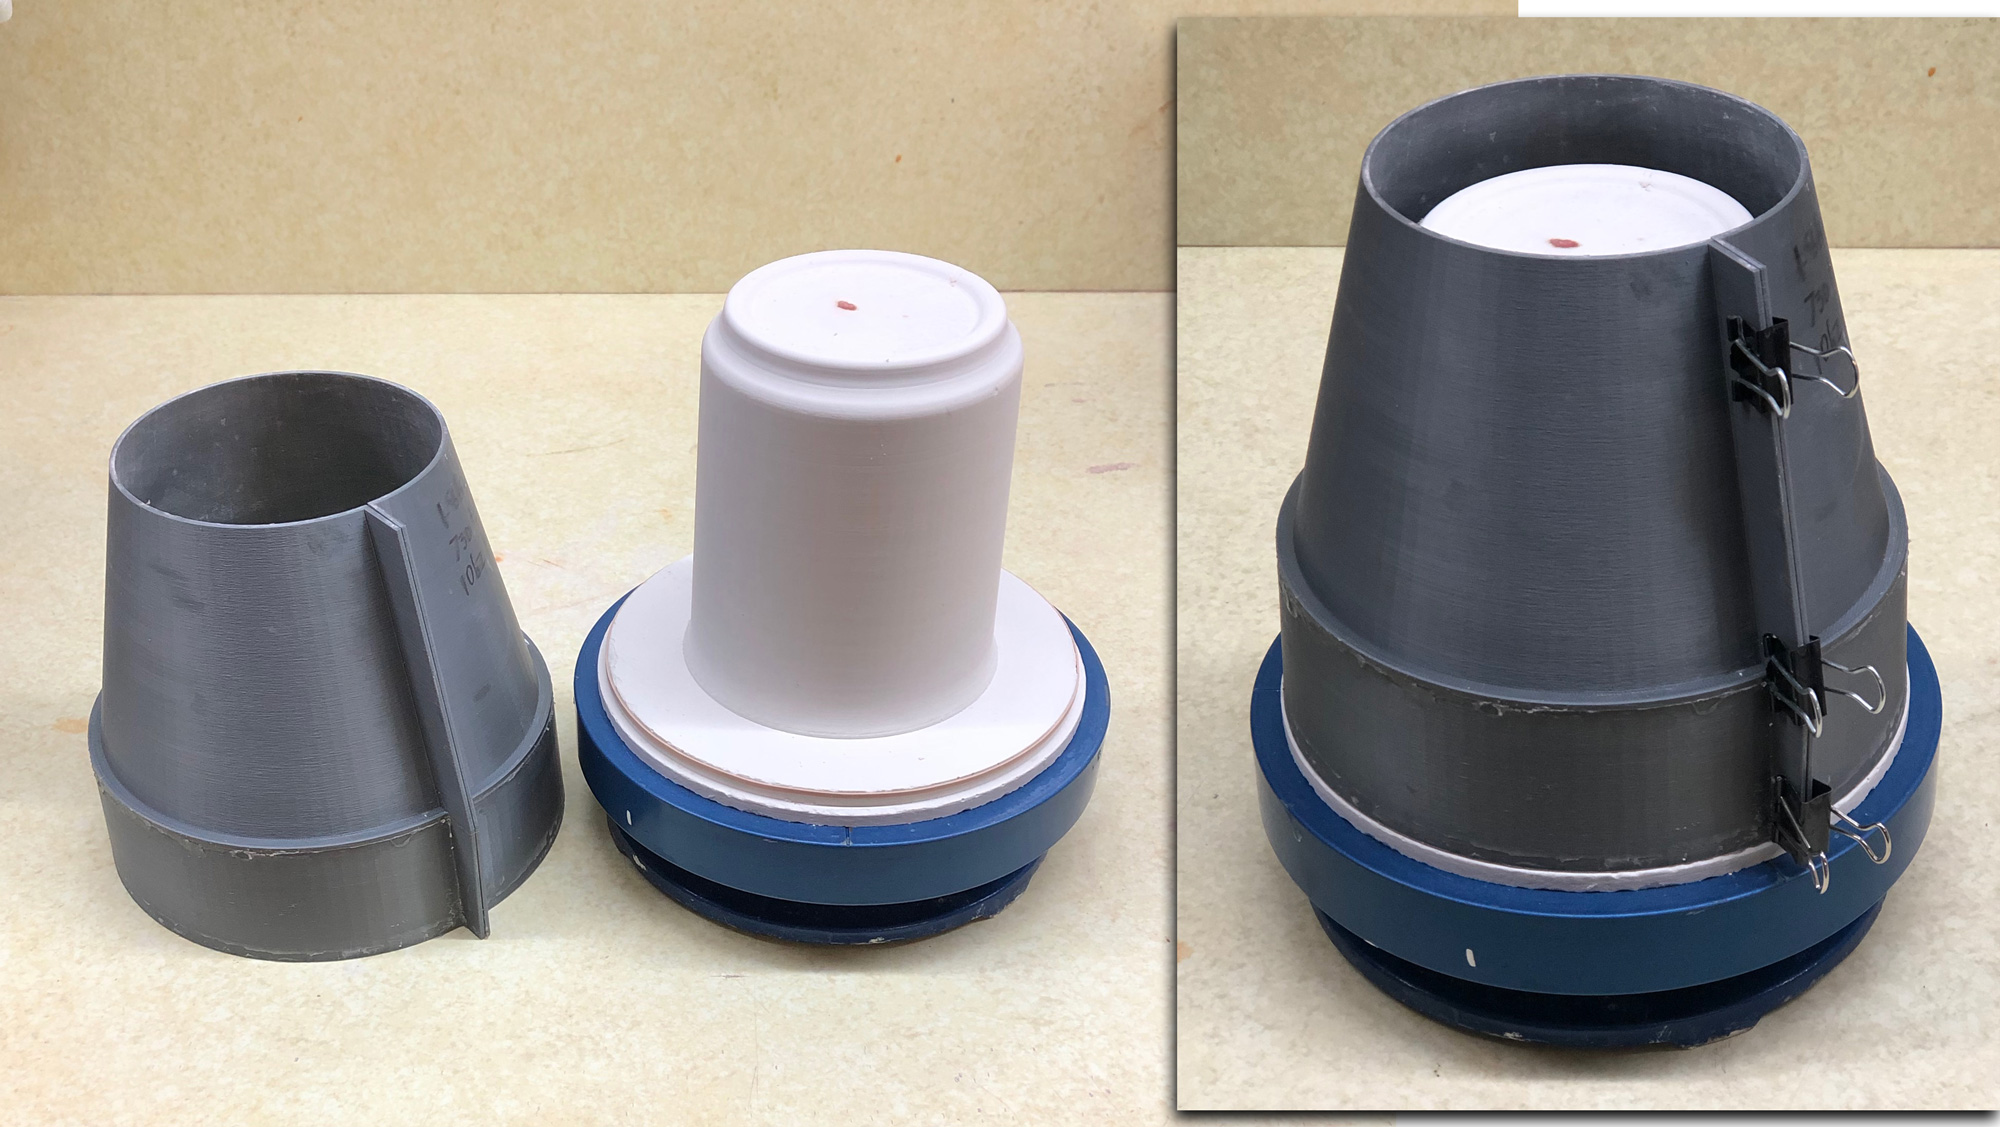
v1.0 3D-printed flanged rail to cast working plaster jigger molds
This picture has its own page with more detail, click here to see it.
The multi-use grey outer rail on the left was printed in two parts and glued together at the shoulder (to avoid the printing of support). The wall thickness is 1.6mm, actually too thick for fast printing. For v2.0 we went to 1.2mm and printed it upside down, in one piece, on a flange (this generated support but new printers to that so well that the step disconnects well and is not rough). The vertical split enables opening the shell a little after the plaster has set, quickly releasing it. The center model, of the inside contour of the mug, is integrated into a two-step base, it was made by casting the plaster inside another two-piece 3D-printed form. After removing that using a heat gun, I smoothed the plaster surface using a metal rib and trimming tool and then soaped it to ready for a pour. The mold shell is held securely in place by stretching a wide rubber band around the first step and clamping the shell into place around it. The assembly is then ready to be filled with plaster to make a jigger mold. Doing this on a turntable is also a good idea - it enables rotating it while filling and agitating after full to dislodge any air bubbles.
Mug mold with pouring spout, handle mold with spare

This picture has its own page with more detail, click here to see it.
The 3D printed pouring spout makes pour-out much less messy. It can be pulled off soon after, while the clay is still soft. This mug mold then drops into a jigger wheel cuphead (for finishing the lip and truing the inside vertical wall). The handle mold is on the right.
3D render of a jiggering template

This picture has its own page with more detail, click here to see it.
I print these using PLA filament, they are strong enough for hobby or studio use (even if not printed solid). The knife-edge prints precise and smooth, there is no need for sanding. Notice that the drawing (far left) includes the contours of the inside and outside of the mug. Making the jigger template/knife only requires adding three straight lines. Then I extrude it forward 1cm and add a 30-degree draft. The top edge can, of course, be extended upward to mount on the jigger arm. The working template has to be narrower than this at the bottom to clear the edge when the jigger arm is lowered. I have also used this to hand-finish the slip-cast mugs (just by holding it, without a jigger arm).
My potter's wheel with aluminum cup-head and jigger mold inserted

This picture has its own page with more detail, click here to see it.
The cup-head was lathed from a block of aluminum and it attaches to the shaft the same as a regular wheel-head. Plaster molds simply drop in and sit on their shoulder. The shoulder is the only point-of-contact, this prevents chattering while the mold spins when under pressure. I am using these molds for a casting-jiggering process (or just casting). For example, I can cast a mug in the mold, then pour out the slip, wait a few minutes and then, as the wheel spins, finish the rim and inside sure using a 3D-printed template/rib. I do not actually use the jigger arm, it is easier just to hold the template in hand. I can finish the rims on any round pieces made in these molds.
3D Printed prototype beside first dried piece

This picture has its own page with more detail, click here to see it.
On the earlier pieces that I made (like this one) I had the walls too thin to be able to effectively round the lip and true-up the inside using the jigger template.
Cone 10R mugs made with the casting-jiggering process

This picture has its own page with more detail, click here to see it.
Very exciting! The easiest batch of mugs I have ever made, no wheel throwing or trimming. These are made from two casting recipes I am working on to match the fired appearance and glaze compatibility of Plainsman H550 and H440 (buff and iron red burning bodies). This is how many you have to make to learn some of the finer points of the process.
Jigger/Cast mugs 2019

This picture has its own page with more detail, click here to see it.
Made from H550 Casting and firing at cone 10R. One of the advantages of this method is to make pieces, not just thicker and heavier as these are, but consistently so.
Final cast-jiggered cone 6 mug beside original 3D-printed mock-up

This picture has its own page with more detail, click here to see it.
This is a product of a casting-jiggering project I did in 2019 to recreate a 1960s Medalta Potteries mug. The first step was drawing a profile in 2D (using Adobe Illustrator) and then working with a Fusion 360 freelancer at Upwork.com to create a quality 3D drawing. 3D printing this mock-up was possible after that, using my favorite 3D slicer, Simplify 3D. The mug was drawn "parametrically", that is, measurements and geometric relationships were built-in such that changing contours and the size preserved the original design. The first production mug, made about a year later, is on the right. Molds were scaled up 10% from this mockup size so that final pieces would be this size, however the firing shrinkage of the clay turned out to be about 12%.
Poor plaster release from 3D printed mug handle case molds

This picture has its own page with more detail, click here to see it.
My objective was to continue skipping the making of a rubber case mold and 3D print them directly. Since 3D printed surfaces naturally part well from plaster and the artifacts, although visible, do not show on the final fired pieces, I even wanted to do this whole process without any sanding or oiling. However, despite printing a dozen or more variations, carefully controlling plaster/water ratios and waiting/mixing the recommended time periods, few good plaster molds were extracted without corner-breaking. Even painting the inner surface, oiling over it and beveling corners did resolve this issues. It seems that a combination of the printing artifacts, sharp corners, the handle perpendicular (because of the oval cross-section) and the inside negative shape all enabled the plaster to get a very firm grip on the PLA print. Although I could have resorted to a heat gun to soften the PLA material enough to pull it away I relented and decided to switch to making a block mold (for rubber) rather than a case mold (for plaster).
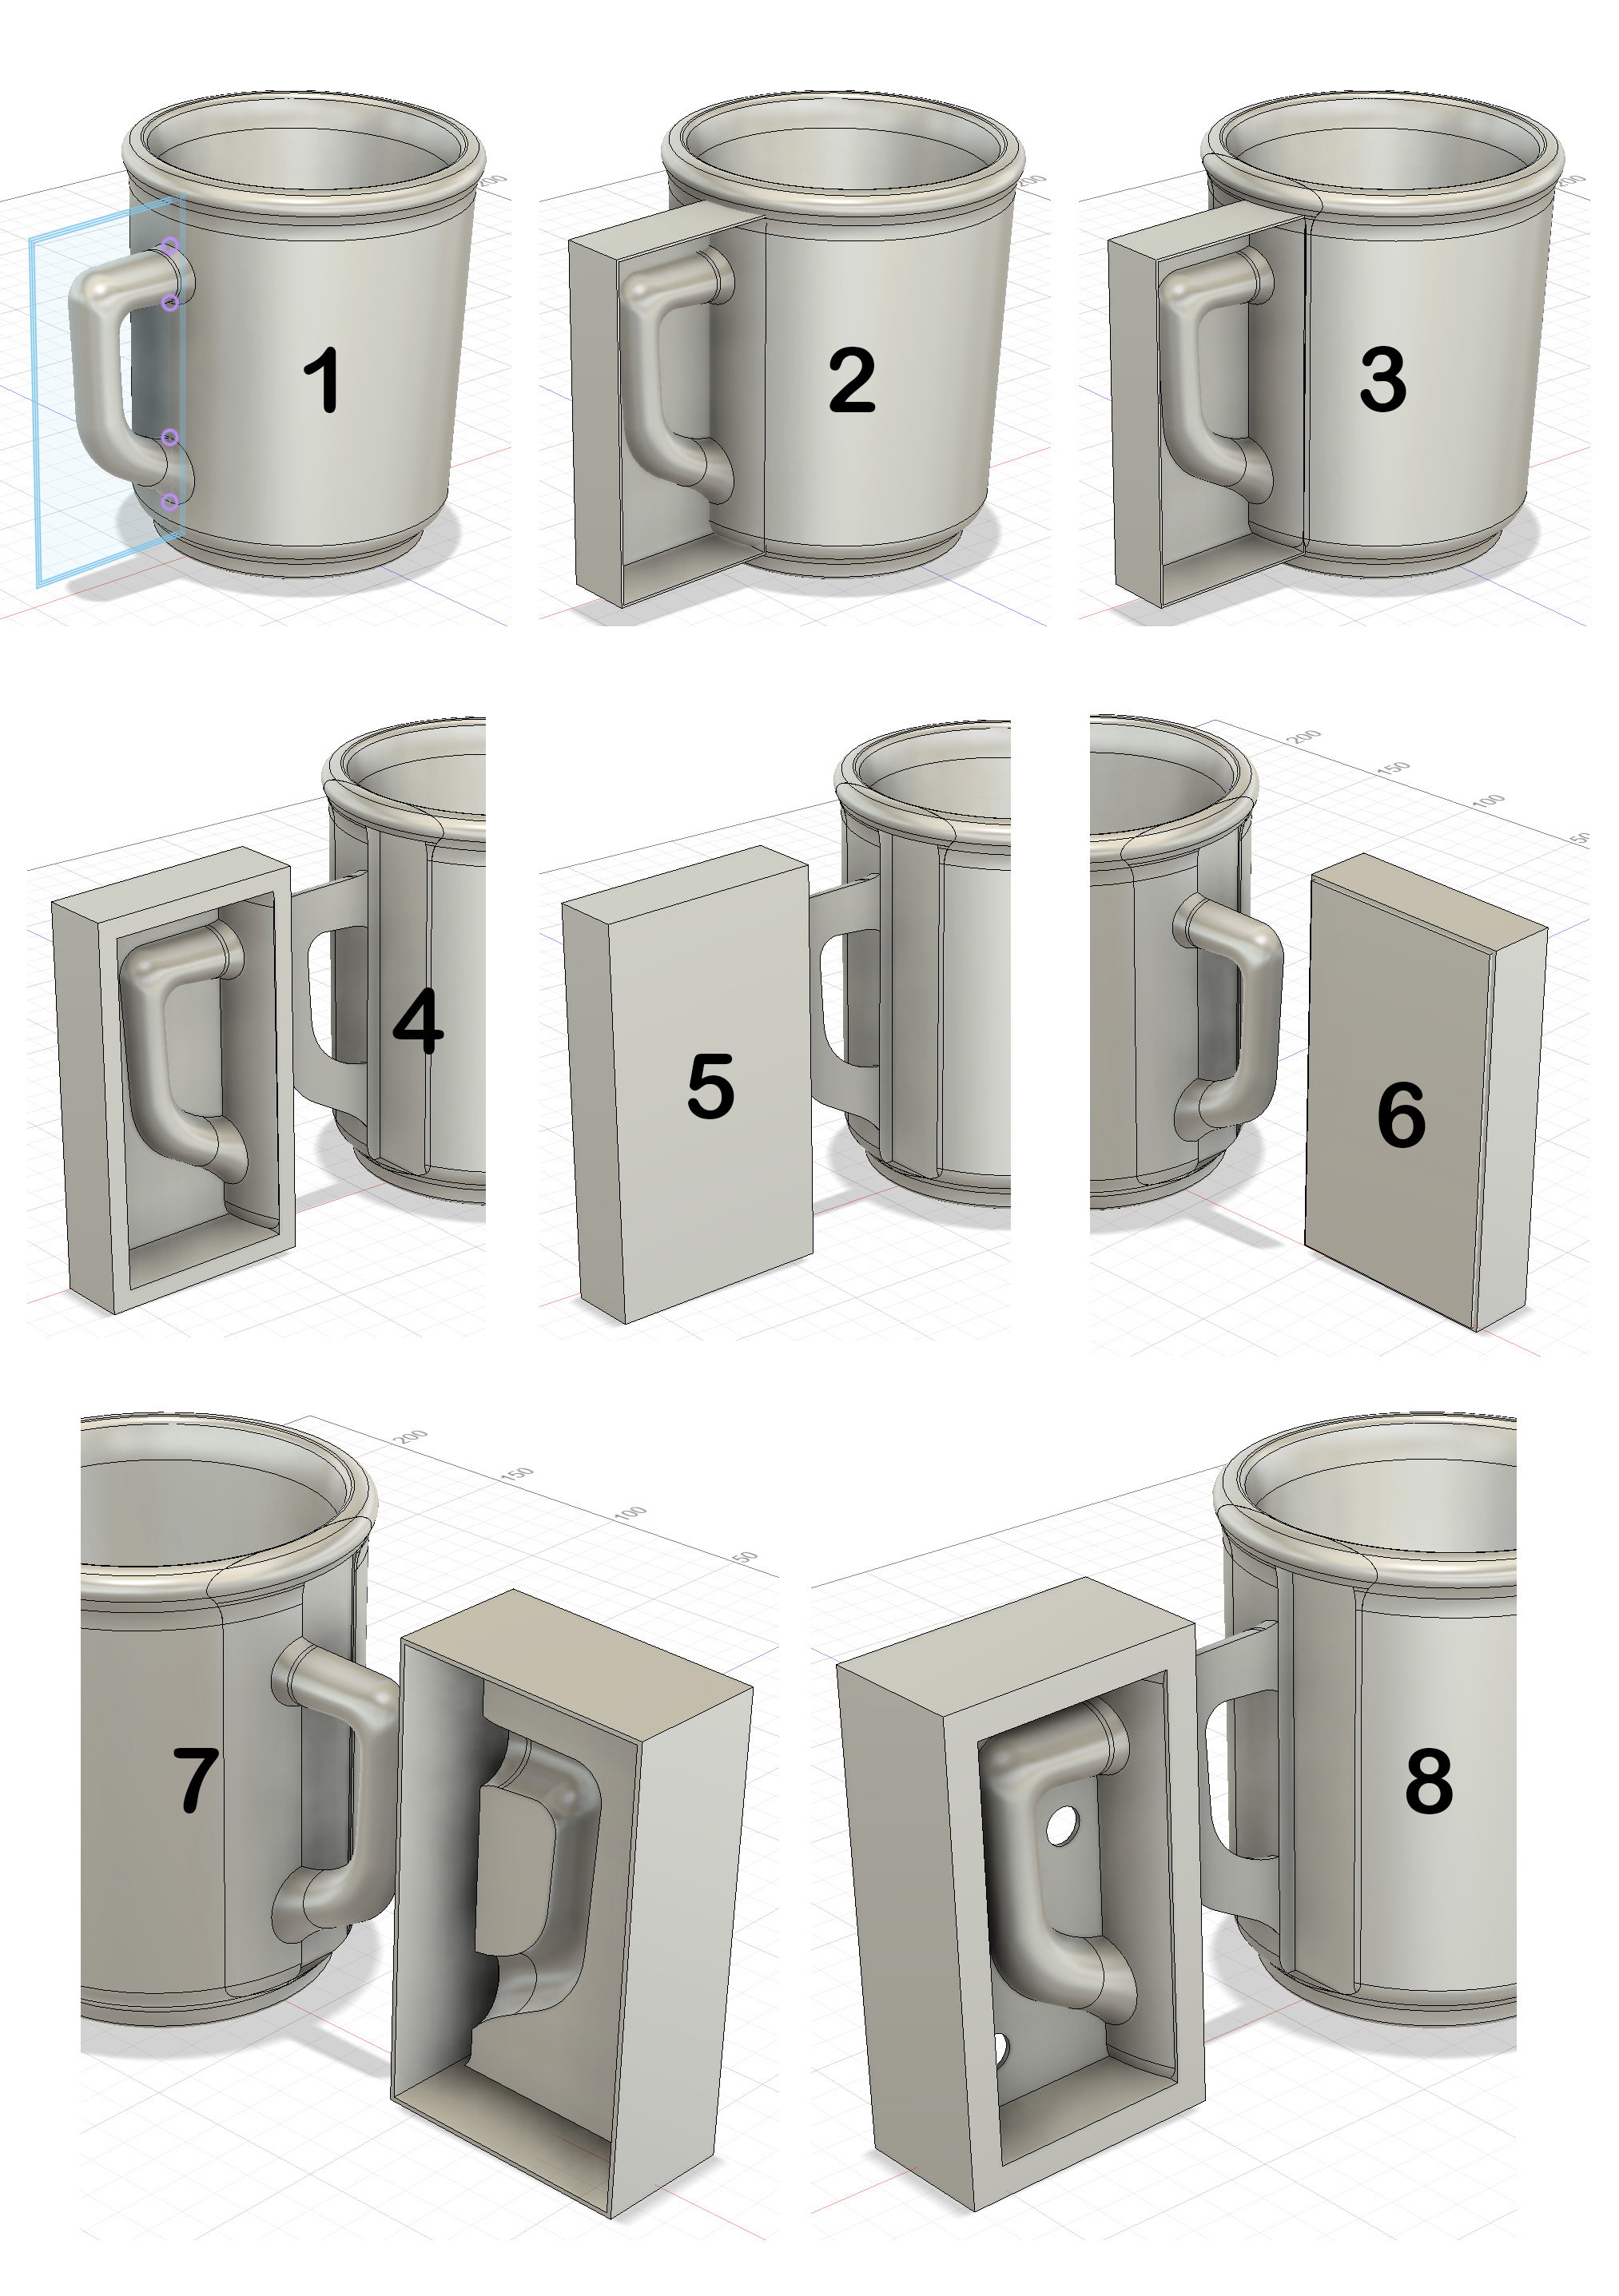
CAD steps for a 3DP block mold to make a rubber case mold
This picture has its own page with more detail, click here to see it.
The objective was to make a rubber master case mold for the production of working plaster molds. 3DP is a great solution. This drawing was done in Fusion 360.
1: A make a sketch of a box, around the handle, on the XY plane. Offset that outward by 1.2mm (my printer prints 0.4mm wide, three passes give good strength).
2: Extrude to create box 1: The base backward by 1mm and the sides forward by 20mm.
3: Use five sides of the box as cutting planes to slice it out of the mug.
At this point I could print this in PLA filament, pour plaster into and then use a hair drier to peel it off. But let’s make rubber molds instead.
4: Move the box-with-handle away from the mug. Pull the four sides out by 5mm to thicken them.
5 & 6: Create box 2 around the outside of it, as a new body, 1.2mm wider and taller, 1mm more frontward and 1mm less backward.
7: Use box 1 as a cutter to remove material from box 2 and then pull the outer 1.2mm sides 5mm backward.
8: Shell out the back side to 1.2 wall thickness and make two 9.4mm holes (to accommodate natch clips).
To make side 2 mirror-image a new body using the front or back as the reflexion plane. The back side is then filled with PMC-746 rubber to make the block mold. Plaster is poured into that to make each working mold.
3D printing case vs block mug handle molds

This picture has its own page with more detail, click here to see it.
Top: Case molds (for pouring plaster into to make working molds) in the slicer about to be printed.
Bottom: Block molds (actually molds of block molds for pouring rubber into) about to be printed.
The top situation would have been a dream for a potter like me, the simplest possible way to introduce mold-making for slip casting into a process. However, my goal of print-and-pour was not met, this shape is not conducive to the extraction of the plaster without corner breaking. The block mold master (lower left) was made by pouring PMC-746 rubber into these molds. That works extremely well, there will be no problems making plaster molds with this. Notice how well it has preserved the printing artifacts, they look like wood grain. The white embeds enable inserting natches (that I make on the printer also).
3D printed three-piece jigger case mold complete
Available on the Downloads page

This picture has its own page with more detail, click here to see it.
It is now practical to make true-round, perfect-fitting, all-in-one case molds for jiggering using a consumer 3D printer and PLA filament. This was a one-off test mold to demonstrate the method but these print so fast this is suitable to make dozens of molds. The process: Create the drawing in 3D CAD (e.g. Fusion 360), print the three sections, glue them, turn the assembly upside down, fill with plaster, let it set and peel out the inside two pieces using a heat gun.
Things to note:
-The outside profile can be adjusted to fit your jigger machine or cuphead.
-This is light and prints quickly.
-The shoulder (C) is printed solid and the PLA printed surface from A to D is left in place permanently, this enables precise and durable fit into the cuphead. I print the outside shell upside down, so no printed support is needed.
-The down-pointing flange (A) embeds it into the plaster providing a durable edge against which to fit the pour spout (F). The glue joint connecting A & B breaks when B+E are removed.
-B and E are printed upside down, no support is needed for B (since the top is open).
-The base E has a flange that enables gluing it precisely into B. Debossed logos are practical on the base. It prints upside down for maximum quality.
You can get this on the downloads page.
3D printed mold tests of embossed logo

This picture has its own page with more detail, click here to see it.
We want to achieve embossed lettering inside the foot rings of slip-cast ceramic pieces by using a standard consumer 3D printer with PLA filament. There are plenty of obstacles to overcome in doing this. Since plaster does not release well at all from lettering having sharp corners, bevelling has to be done. However, our CAD software has problems rounding the corners of many fonts, I had to search for one having no variations in stroke width. Then it was a matter of discovering how much to extrude and how much bevelling it would tolerate - this one permits a 1 mm extrusion with a 0.6 radius bevel.
Left front: A 1mm extrude without bevelling and cold release produced very poor results.
Centre: 1mm extrude, 0.6 radius bevelling, 0.2mm rise of background to minimize verticals and cold release - better but still problems.
Right: Same as center but released with heat gun - almost perfect.
Bottom: A test casting from the first prototype mold - looking really good (albeit backwards!).
Inbound Photo Links
 A 3D-printed pour spout on a mug jigger-casting mold |
 A method to make a two-part slip casting mold in one pour |
Links
| Glossary |
3D-Printing
Standard 3D printing technology (not printing with clay itself) is very useful to potters and ceramic industry in making objects that assist and enable production. |
| Glossary |
Casting-Jiggering
A process in ceramic production where items are slip-cast first and then finished using a jigger wheel. |
| Glossary |
3D Printer
Standard 3D printers (not clay 3D printers) are incredibly useful in ceramic production and design, bringing difficult processes within reach of potters and hobbyists. |
| Glossary |
Upwork
Using the services of online freelancers connects potters and small ceramic producers to expert engineering talent at low cost. |
| Glossary |
Restaurant Ware
If you are a potter and want to make restaurant ware, read this. Many of the things you already think you know will mislead you in this type of venture. |
| Glossary |
Jiggering
Jiggering is a process of forming pottery that employs a spinning plaster mold and a tapered template to press soft clay or porcelain against it. |
| Glossary |
Slip Casting
A method of forming ceramics. A deflocculated (low water content) slurry is poured into absorbent plaster molds. As it sits in the mold, usually 10+ minutes, a layer builds against the mold walls. When thick enough the mold is drained. |
| Projects |
Project to Document a Shimpo Jiggering Attachment
Make your own jiggering attachment for your potter's wheel. Here are the plans and lots of help to get you going with molds and techniques. |
| Projects |
A cereal bowl jigger mold made using 3D printing
A new way to 3D-print your way to making jigger molds and templates. The molds are encased in a 3D printed shell that makes them fit perfectly into the cuphead. And the template is precise and very effectivwe. |
 PayPal | No tracking, No ads, No paywall, No transient content! Just organized, concise information constantly updated and improved. Was this helpful? Consider supporting me. |
| By Tony Hansen Follow me on        |  |
Got a Question?
Buy me a coffee and we can talk 

https://digitalfire.com, All Rights Reserved
Privacy Policy