
Contact MeLet's have a Other ways to Support My WorkSubscribe to Insight-Live.com. It is about DIY testing and development, not letting information slip away. Help Me on Social

Login to your online account Chemistry plus physics. Maintain your recipes, test results, firing schedules, pictures, materials, projects, etc. Access your data from any connected device. Import desktop Insight data (and of other products). Group accounts for industry and education. Private accounts for potters. Get started. 
Download for Mac, PC, Linux Interactive glaze chemistry for the desktop. Free (no longer in development but still maintained, M1 Mac version now available). Download here or in the Files panel within your Insight-live.com account. What people have said about Digitalfire
What people have said about Insight-Live
| May 2026: We are continuing a major code rewrite. Please contact us if you find issues. Thank you. Monthly Tech-Tip from Tony HansenI will send practical posts like these (from thousands I maintain). No ads or tracking. The first email will provide one-click unsubscribe. Signup is being email-bombed by bots. For now, please subscribe inside your insight-live.com account. BlogYixing teapot making. Is it magic?Or highly evolved craft and science?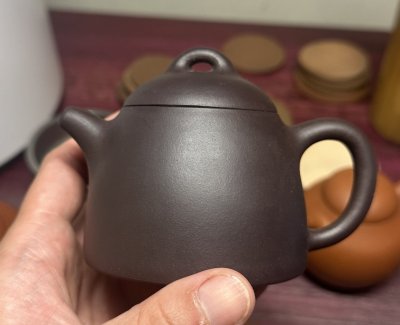
The Yixing teapot craftsmen appear to break all the rules and yet produce impossibly delicate and symmetrical pieces. Hao-Tong Yan, one of those craftsmen, and I have been trying to understand the technical reasons for how this amazing craft is possible. It turns out not to be magic, but actually a highly evolved understanding of a very unusual material. Here are some of the things that we are coming to understand (which is making it possible to create a facsimile of the clay in North America). Context: Yixing Clay Teapots on.., Stunning video of Yixing.. Saturday 30th May 2026 Crystalline glazes normally craze:Here is one way to fix that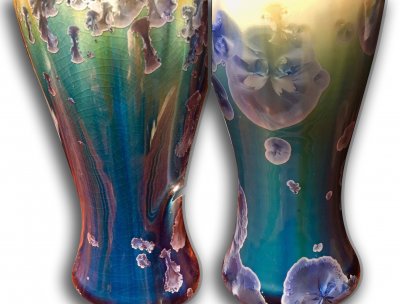
The mug on the left, made by Holly McKeen, is a typical cone 10 Grolleg kaolin mullite porcelain (highly vitrified, low in residual quartz). Its glaze is crazed. Crystalline glazes are high in Na2O, making crazing virtually certain. Since most pieces are decorative, crystal glazers just accept this as part of the process. But these are functional mugs, the glaze needs to fit (if only for ware strength). Context: Crystalline glazes, Calculated Thermal Expansion Tuesday 26th May 2026 Incorrect craze-fixing advice is still common online:Well demonstrated using a fake AI photo!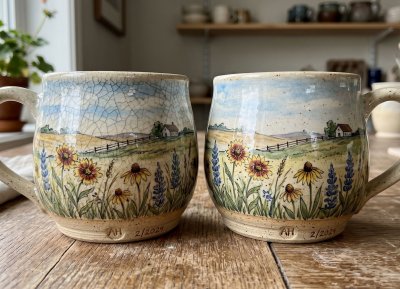
Crazing is one of the most common glaze defects. AI image generators can produce this really convincing photo, but AI explanations often still recycle oversimplified glaze-fit advice from the web. Let's work in reverse to see why using this speckled stoneware, it has lots of ball clay and quartz, it is easy to fit glazes to. What would it take to craze the glaze on the right? A lot. Glazes that craze out of the kiln on quartz-rich bodies are not "slightly misfit"; they are "hugely misfit". Under or over-firing, or holding less time at temperature, would not be enough to craze it. Reducing the silica enough to start severe crazing like this would fundamentally alter the glaze character and functionality. Context: Glaze Crazing Sunday 24th May 2026 Here is what dipping engobes can do:Go on even. In one coat. Stay put.
When you learn to make and use engobes correctly, they make magic possible. Here I am turning a dark rustic body into a smooth white one (rear mugs) and a white body into a dark one (front). The engobes have been applied at the leather-hard stage. That is the perfect time, the engobe and body are clay bodies, designed to fit each other; they dry together and fire together creating an inseparable bond. Context: How stop dripping and.., Here s how we.., Why your supplier does.., Why your supplier does.. Thursday 21st May 2026 Add 6% lithium carbonate to an Alberta Slip glaze:And this happens!
Left is G3933A, it is an 80:20 mix of our matte and glossy cone 6 base recipes (plus a mix of iron oxide, tin oxide and rutile). The body is Plainsman Coffee Clay. Because of repeated issues with crawling a project was started to create the same effect using Alberta Slip to supply as much of the chemistry as possible. Along that road, the opportunity arose to add lithium (to duplicate Amaco PC-32, a classic Albany/Lithium recipe). That is the glaze on the mug on the right, G3933G1, it has 6% lithium carbonate. Lithium is a super powerful melter, turning this into a very reactive glaze! To make a 500ml jar of brushing glaze, in 2023, required about $7 worth of lithium carbonate. Context: Lithium Carbonate, GA6-G, Oatmeal glazed mugs, Amaco achieves the stunning.., Recognize these universal oxidation.. Wednesday 13th May 2026 Covia Nepheline Syenite (from Canada):Here is what it does from cone 3 down to 05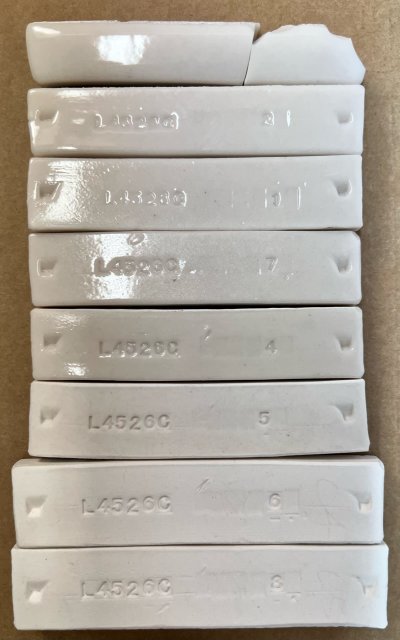
These SHAB test fired bars are 95% nepheline syenite (5% Veegum added). By cone 02 (bar stamped #4) is self-glazing and glass-like with a total shrinkage (plastic to fired) of 15% (less than some porcelains). At cone 03 (the #5 bar) the porosity is 3% (a stoneware). This is not an absolute indication of the materials' melting profile because of the Veegum, it behaves as a powerful flux and melting catalyst. Context: Covia Nepheline Syenite Tuesday 12th May 2026 Bisque temperature can make a big difference with fitting glaze at low fire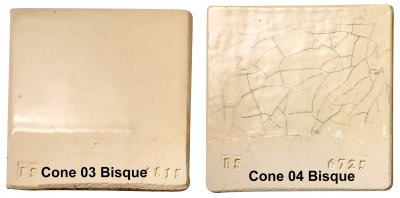
This is Plainsman Buffstone with G2931L glaze fired at cone 06. A hotter bisque not only produces a stronger body but also eliminates crazing (these specimens were glaze-fired one month ago). Firing the bisque just one cone hotter has made the ceramic into a denser matrix having a higher thermal expansion. That has the power to put the squeeze on the glaze, preventing it from crazing. Hotter bisque temperatures can be problematic for dipping glazes (they reduce bisque absorbency and lengthen dip and drying times). But for low-temperature hobby ware, this is not as much of a problem since glazes are gummed and multi-coated (with air drying between each). Context: Earthenware, Bisque Monday 11th May 2026 These two transparent glazes are opposites:In melt fluidity and surface tension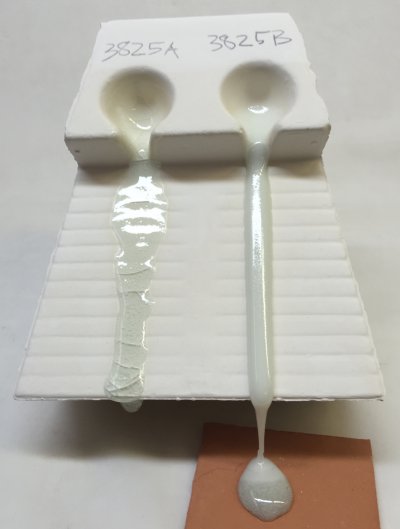
This cone 04 flow tester compares two commercial low-fire transparent glazes. Their different chemistry strategies are revealed by the shape of these melt flows. While 3825B appears to have the higher melt fluidity, it also has much higher surface tension. This is evident in the narrow, rope-like stream and the way the flow meets the runway at a high angle before pulling into a rounded bead. A, by contrast, spreads and wets the runway, meandering downward in a broad, flat and relatively bubble-free river. Context: Ulexite, High and low melt.., Surface tension differences between.., The perfect storm of.., Surface Tension, Melt Fluidity, Transparent Glazes, Terra Cotta, Glaze Blisters, Clouding in Ceramic Glazes.. Sunday 10th May 2026 The ultimate testing instrument to measure plasticity:A potter's wheel. With an experienced potter.
The left two leather-hard mugs were made from a 100% Lincoln 60 Fireclay (from Gladding McBean). By itself, the clay matures into a stoneware at around cone 8. While the pure material has a pleasant, smooth, soapy feel and can be thrown on the wheel, the plasticity is lower than that of typical pottery clay. The mug on the right adds 2% bentonite. That simple addition transforms it into a delight to throw! And only increases the drying shrinkage by about 0.5%. Context: Lincoln 60 Fireclay, A typical clay lab.., Plasticity Saturday 9th May 2026 How stop dripping and running:Add water! Then make it thixotropic.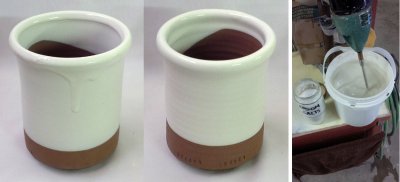
The white slip on the left, L3685Z2, (applied to a leather hard cup) is dripping downward from the rim (even though it was held upside down for a couple of minutes!). Yet that slurry was very viscous with a 1.48 specific gravity. Why? Because it was not thixotropic. The fix? I watered it down to 1.46 (making it runny) and added pinches of powdered Epsom salts (while mixing vigorously) until it thickened enough to stop motion in about 1-2 seconds on mixer shut-off. But that stop-motion is followed by a bounce-back. That is the thixotropy. It is easy to overdo the Epsom salts (gelling it too much), I add a drop or two of Darvan to rethin it if needed. When the engobe is right, it gels after about 10 seconds of sitting, so I can stir it, dip and extract the mug, shake to drain it and then it gels and holds in place. Keep in mind, this is a pottery project. In industry, they deflocculate engobes to reduce water content and then impose thixotropy, but that is more technical than the average potter would want. Context: Epsom Salts, Creating a Non-Glaze Ceramic.., Here is what dipping.., Thixotropy, Rheology, Engobe, Uneven Glaze Coverage Saturday 9th May 2026 |


https://digitalfire.com, All Rights Reserved
Privacy Policy