A cereal bowl jigger mold made using 3D printing
Beer Bottle Master Mold via 3D Printing
Better porosity for Brown Sugar Savers
Build a kiln monitoring device
Celebration Project
Coffee Mug Slip Casting Mold via 3D Printing
Comparing the Melt Fluidity of 16 Frits
Cookie Cutting clay with 3D printed cutters
Evaluating a clay's suitability for use in pottery
Make a mold for 4-gallon stackable calciners
Make Your Own Pyrometric Cones
Make your own sieve shaker to process ceramic slurries
Making a high quality ceramic tile
Making a Plaster Table
Making Bricks
Making our own kiln posts using a hand extruder
Medalta Ball Pitcher Slip Casting Mold via 3D Printing
Medalta Jug Master Mold Development
Mold Natches
Mother Nature's Porcelain - Plainsman 3B
Mug Handle Casting
Nursery plant pot mold via 3D printing
Pie-Crust Mug-Making Method
Plainsman 3D, Mother Nature's Porcelain/Stoneware
Project to Document a Shimpo Jiggering Attachment
Reverse Engineering an Underglaze
Roll, Cut, Pull, Attach Handle-making Method
Slurry Mixing and Dewatering Your Own Clay Body
Testing a New Load of EP Kaolin
Using milk as a glaze
Yixing Teapots
Reverse Engineering an Underglaze
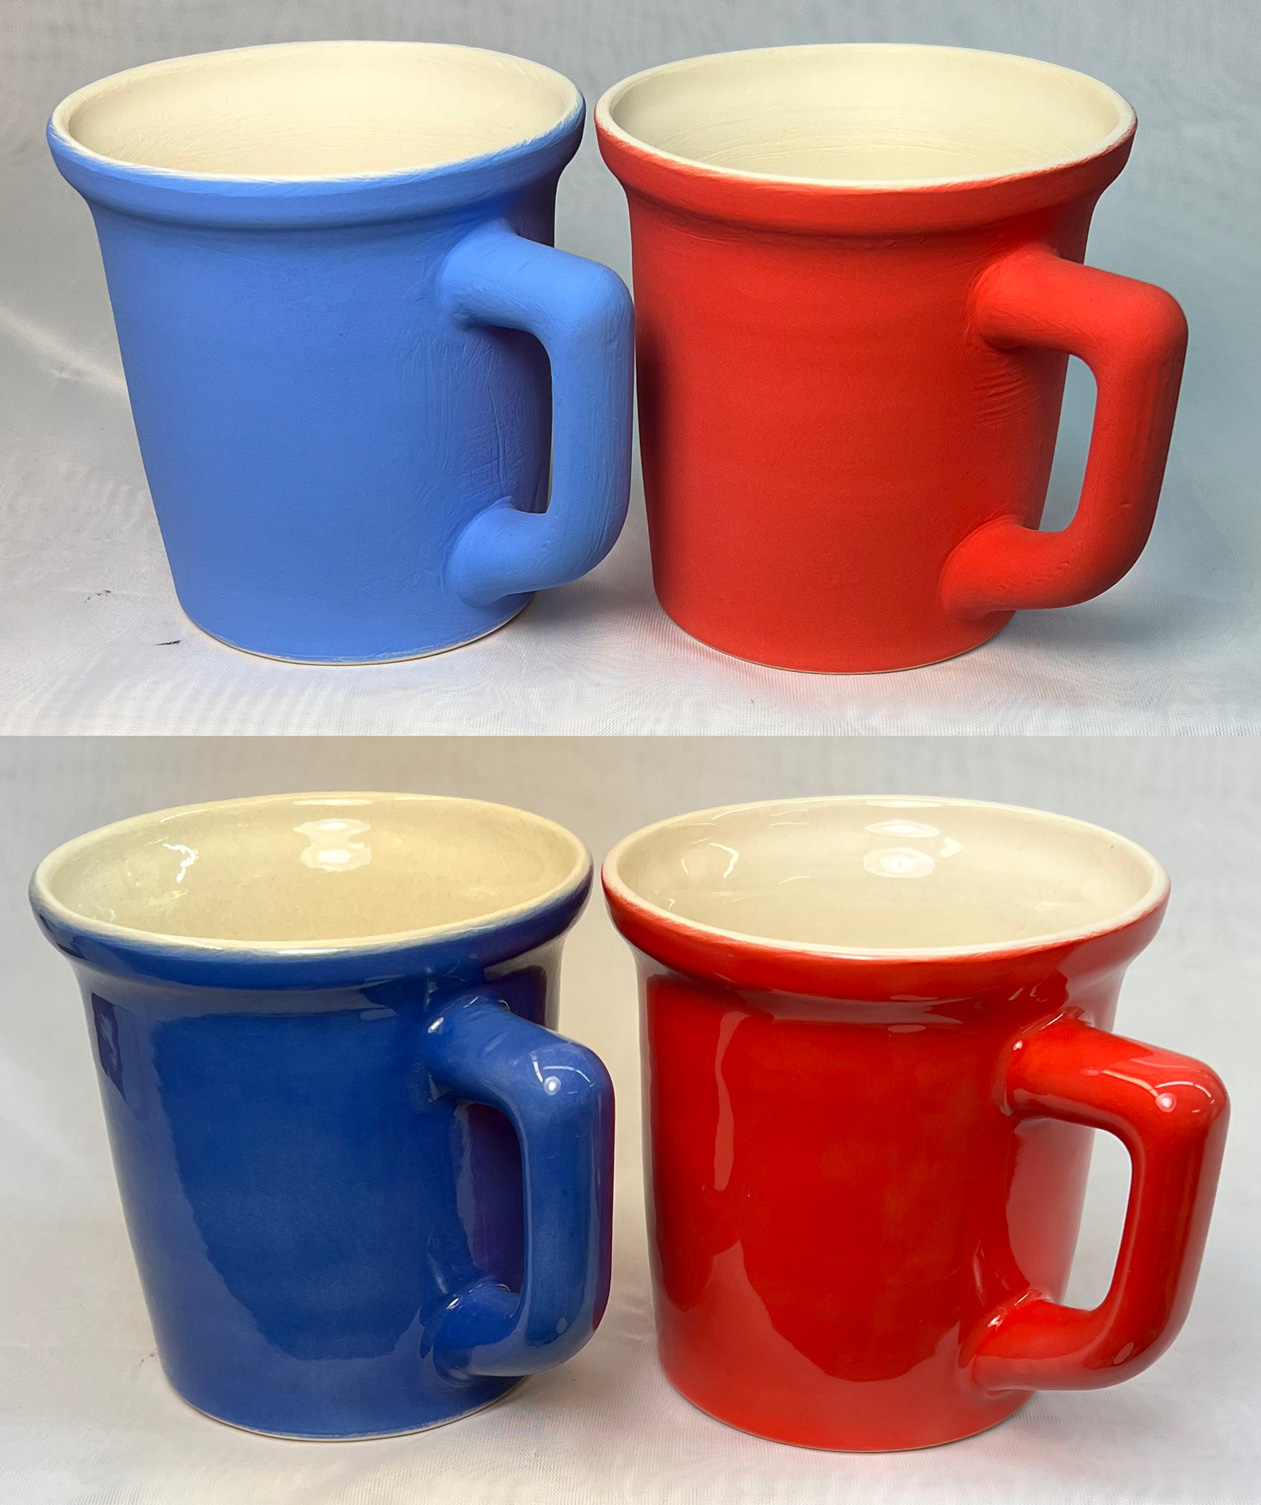
Underglaze colors can be this bright by money-is-no-object percentages of stains!
During COVID, supply chain problems made these hard to get. During and after that the prices shot up! We don't just need a backup supply; we need DIY underglazes that outperform these. Suppliers stock the common stains needed so it is just a matter of determining what the ceramic medium should be.
Underglazes, by definition, are actually easier to formulate than glazes. The objective is clear: Bright color, opacity, and similar fired maturity to the body. These are things that can be tested for, and the direction to move a recipe if not right is normally clear. The process usually involves fine-tuning the percentage of frit in the medium and the stain:medium proportions.
The benefit of reverse engineering this underglaze is that it becomes clear this is DIYable. Rather than providing a clear target, it generates motivation to create a product that is closer to the theoretical ideal and one which can be fiddled with to make it perfect for one's needs.
Related Information
Step 1: Dry out a slurry sample

This picture has its own page with more detail, click here to see it.
This slurry cannot be dewatered on plaster since the gum will seal the pores and possibly ruin it. So I used an Arborite surface. This amount of liquid would take a week to air-dry but under a fan, it took about 8 hours (the process is slow because of the high water content coupled with the gum content). When dry it scraped it off with much difficulty because it set so hard. I then ball-milled the dried material to powderize it, producing enough non-plastic material to making SHAB test bars.
Making test bars of an underglaze:
Firing from cone 04 to cone 6
This picture has its own page with more detail, click here to see it.
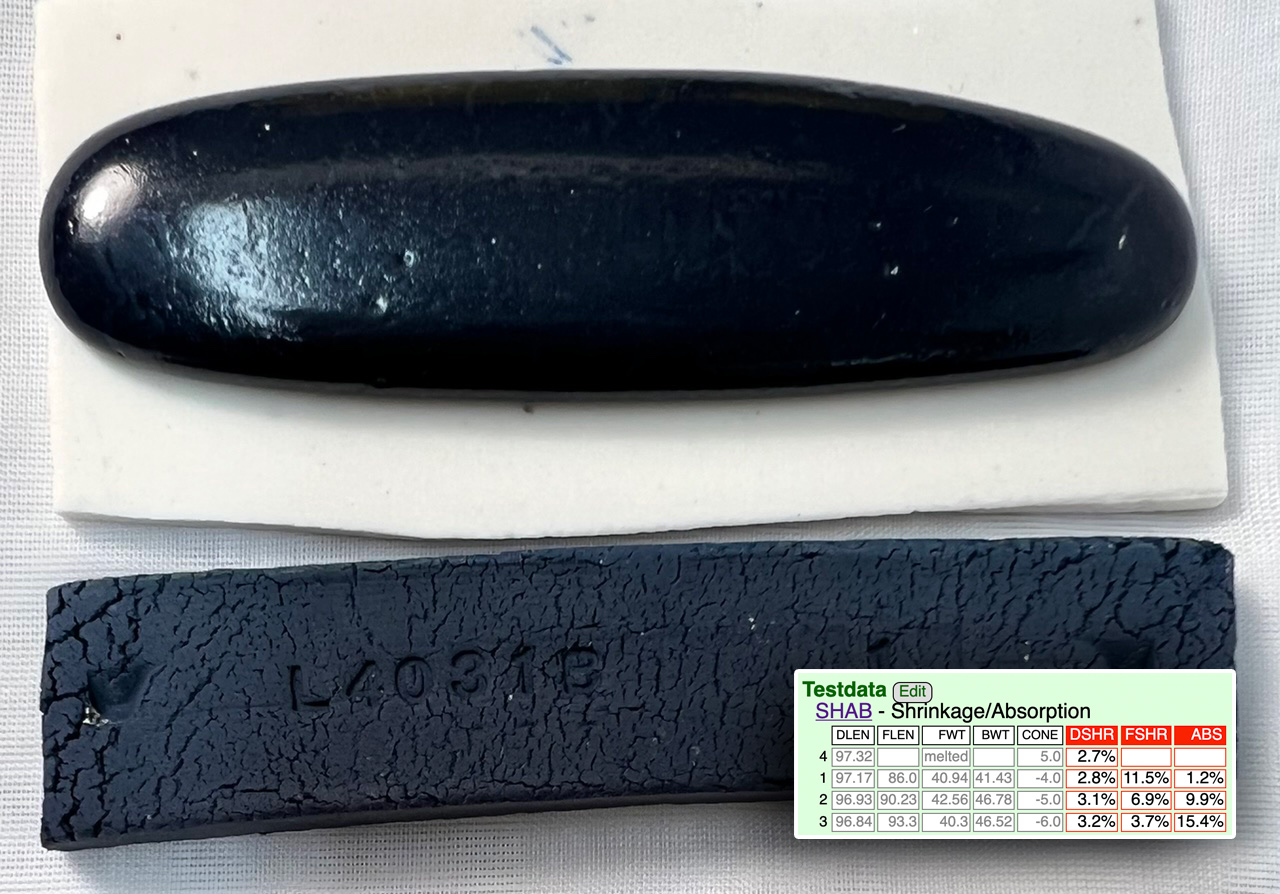
This was an effort to do SHAB test bars, at various temperatures to form a fired maturity profile of a blue commercial underglaze. It did not go as planned. It was very difficult to make these bars because the product has such a high content of gum. This dramatically impedes drying and it is impossible to form and dry them (they split and crack into many pieces). So I crushed and ball milled the dried scraps, roasted the powder to 1000F to destroy the plasticity, then added enough bentonite to be able to make them plastic enough to form the test bars.
Notice that at cone 06, the absorption is 15.4% with 3.7% fired shrinkage. By cone 04, the bottom bar, that is down to 1.2% porosity and up to 11.% shrinkage (basically a colored porcelain). The top bar is fired to cone 6, and melts (like others at previous cones).
These are claimed to work cone 06-6. What do they mean by "work"? They mean "true-to-color", it is the same color throughout the range.
Another reason for DIY underglaze: Black!
Better coverage, control of bleeding

This picture has its own page with more detail, click here to see it.
Black brushwork needs to go on thick enough in one brushstroke. Commercial products we have don't do that - thus my motivation to work. I am experimenting on cone 6 Polar Ice porcelain jiggered bowls using G2926B dipping glaze. The ceramic medium here is a 90:10 MNP:nepheline syenite mix (use a ballclay/feldspar mix as an alternative). To that, I add 15% black stain, 1.5% CMC gum and 5% bentonite. With the CMC gum and bentonite, and blender mixing, a brushable consistency that stays put can be achieved at a fairly low water content compared to commercial products (enabling it to go on thicker in a single brush stroke). Assuming application at leather hard state, the drying and firing shrinkage can be matched to the body by varying the percentage of bentonite. And the percentage of stain can be tuned for enough color but no bleeding, bubble clouding or crystallization. And I can adjust the degree of maturity by varying the proportions of MNP and Nepheline (commercial underglazes often melt too much by cone 6 and fade and diffuse as a result), this one stays opaque black.
Another good reason for DIY underglazes:
Commercial products don't adapt the medium

This picture has its own page with more detail, click here to see it.
All of these commercial underglaze colors. Underglazes are not pure stains; they are a blend of stain powders with a host recipe (a ceramic medium, which is a porcelain-like mix of clay, frit, silica). But the recipe of that medium should be different for each stain type because they have different potencies, effects on rheology and influences on fired maturity. The stain/medium mix is supposed to mature enough to fuse to the body but not so much that it loses opacity, or worse, melts. For each temperature!
They all have a powder carrier; that is, they are suspended in a water/gum solution so they brush like paint and dry slowly. Suppliers have got the carrier working great. But the medium is a work in progress! Adapting or optimizing the medium recipe to each color is beyond the ability of most. It is so much easier to use one medium and the same percentage for each stain.
To demonstrate, I fired these to cone 8 in a melt flow tester. The blue, green and red are from one manufacturer. The pink/maroon one needs a lot less flux, the blue a little less and the green needs more. The black underglaze (D) has liquefied, gassed out and is about to head down the runway! The E black (a third manufacturer) has not even started to melt or even sinter. The black engobes were plastic; the colored ones were not (likely because a much lower stain percentage is needed).
Another good reason for DIY underglazes:
Percentage of stain needed

This picture has its own page with more detail, click here to see it.
These four commercial hobby underglazes were fired side-by-side in melt-fluidity testers at cone 8. The blue and green remain comparatively refractory, the pink has begun to soften and flow, and the black has become highly fluid. These differences reflect the behaviour of the complete formulations, not just the stains. But ceramic stains themselves differ greatly in color strength, refractoriness, particle characteristics and interaction with a ceramic medium.
Manufacturers face a difficult compromise because many underglazes are advertised for use across a very wide temperature range. Some colors need much more stain than others to remain intense, and each stain can change the suspension, drying and fired properties of the product. A broadly useful base will therefore be underfired for one color and excessively melted for another. While manufacturers can compensate by adjusting the base, stain loading or opacity, the results at any one temperature can still differ dramatically.
A DIY approach can target your actual firing temperature. Begin with a compatible engobe or underglaze base (e.g. L3954B) and estimate the stain requirement—for example, relatively little for a strong blue or black and considerably more for some yellows and pinks. Then adjust the frit/feldspar until the underglaze bonds well without developing enough to lose opacity. Finally, fine-tune the stain percentage and adjust the medium. Done well, strong blues and blacks can be bright and opaque with less than 10% stain.
Another reason for DIY underglazes: Cost
An expensive 2oz jar dries down to 21g of powder!

This picture has its own page with more detail, click here to see it.
At current prices, that costs 75 cents/g! Only half is actual stain powder. Before considering cost, note that the high water content of these is actually a benefit; the thixotropic gel has excellent brushing properties, enabling very thin layering. However, more than one layer is needed to achieve opacity and even color.
Because I am all-in on DIY, the elephant in the room is price. In one scenario, using encapsulated red stain and assuming 50% in my underglaze recipe, I calculated a 1500% saving (assuming the same specific gravity)! But it gets better. I make mine with a higher specific gravity and a much lower stain percentage (e.g. 20%) to get the same result. It goes on in one coat. I also fine-tune the degree-of-melt by adjusting the feldspar. And I optimize bisque hardness, and thus overpaintability, by adjusting the clay percentage. With my setup, I can weigh and make a 1-pint jar of underglaze in ten minutes. Another bonus: When I find ways to improve, I edit the notes in its recipe record in insight-live (and adjust the procedure or recipe for next time).
Another good reason for DIY underglazes:
Higher specific gravity to go on thicker

This picture has its own page with more detail, click here to see it.
Underglazes should normally be made as high specific gravity slurries. This is so that they will go on as thick as possible with one brush stroke (an obvious need for fluid brushwork designs). Something went wrong with this commercial red product, it is painting on far too thin and has very poor physical covering power and adhesion compared to the black underneath (of the same brand). Why? Because the specific gravity is only 1.22! A practical solution is to allow it to evaporate for a few days to raise that as high as possible while still being brushable.
 PayPal | No tracking, No ads, No paywall, No transient content! Just organized, concise information constantly updated and improved. Was this helpful? Consider supporting me. |
| By Tony Hansen Follow me on        |  |
Got a Question?
Buy me a coffee and we can talk 

https://digitalfire.com, All Rights Reserved
Privacy Policy