Monthly Tech-Tip from Tony HansenI will send practical posts like these (from thousands I maintain). No ads or tracking. We are troubleshooting the confirm email, for now you will be subscribed immediately (the first monthly email will provide one-click unsubscribe). BlogMetal saturated glaze after lemon test
The manufacturer warns that these cone 6 metallic glazes are not food-safe. That being said, many potters use them on food surfaces anyway. This can be deliberate or just because the warning label gets ignored, the product has no webpage or the QRCode on the bottle is not clear enough to scan. To demonstrate I did an overnight lemon juice immersion on the bottom end of this tile. Then I washed and thoroughly dried it. The amount of dissolution is amazing! Metallics are made using manganese, nickel, cobalt, chrome and iron - which of these would you like in your diet? To get a good effect 20-40% metal oxide is required. Context: Commercial glazes on decorative.., ASTM D-4236 - Standard.., Metallic Glazes Tuesday 23rd July 2024 CMC Gum does not work well in a glaze if an important ingredient is missing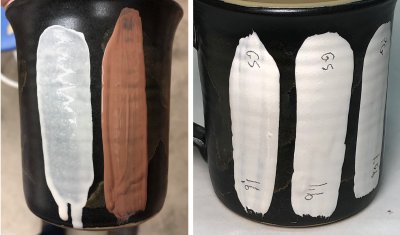
On the left, the brush-strokes of gummed glaze, which I batched myself, have been freshly painted onto an already-fired glaze. Notice the brown brush stroke holds its character. It has a high specific gravity (SG): 1.6. And contains 1.5% CMC gum. The white one to its left, whose brush stroke has flattened and it is running downward, has the same gum content but an SG of 1.5. Is it running because of its lower SG? No. Commercial glazes with an SG below 1.3 still hold in place well. How? Because they also have a gelling agent (e.g. Veegum - it has an unfortunate name, it is not a gum). That reveals a secret: Gums and gelling agents need each other. CMC Gum needs particle surface area to work its magic and bentonite, the gelling agent here, supplies that. And, the gelling agent needs the gum to slow down drying and enable a hard and crack-free dried surface. The dried strokes on the right demonstrate that - 2% bentonite has been added to the drippy one on the far left. They held in place because of the bentonite and hardened without cracking because of the CMC gum. Context: CMC Gum, Bentonite, Veegum, Brushing Glaze Monday 15th July 2024 Cone 10 Reduction with Alberta and Ravenscrag SlipsOutside is the GR6-A recipe (made using 50:50 roasted and raw Alberta Slip), there are no other additions. The inside is pure Ravenscrag Slip GR10-A (also a 50:50 mix of roast:raw), with no additions. The clay is Plainsman H550. The firing schedule is C10RPL. Friday 5th July 2024 Variegating effect of sprayed-on layer of titanium dioxide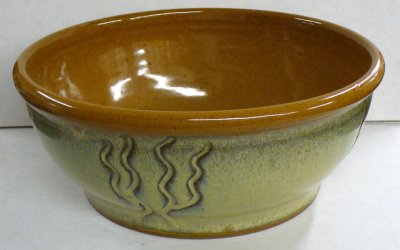
The base glaze (inside and out) is GA6-D Alberta Slip glaze fired at cone 6 on a buff stoneware. However, on the outside the dried-on glaze was over-sprayed with a very thin layer of titanium and water (VeeGum can be used to help gel the sprayable titanium slurry and suspend it). The dramatic effect is a real testament to the variegating power of TiO2. An advantage of this technique is the source: Titanium dioxide. It is a more consistent source of TiO2 than the often-troublesome rutile. Another advantage is that the variegation can be selectively applied in specific areas or as a design. This effect should work on most glossy glazes having adequate melt fluidity. Context: Titanium Dioxide, GA6-D, Reactive Glazes, Crystallization, Glaze Layering, Variegation Thursday 4th July 2024 A mug cracks before your eyes because of glaze compressionThe glaze on this highly vitreous, thin-walled mug is normally perfect, it is under enough thermal compression to really increase ware strength. But, since this mug is glazed inside only, the compression is too great. While it looks OK, the glaze is constantly pressing outward, looking for relief. Watch as a tap with a spoon is enough to trigger a sudden crack. And it opens under the pressure, clearly revealing the piece was spring loaded. This is a simple test. A typical mug of this clay would survive hundreds impacts of this nature. Further, this did not happen just because it was not glazed on the outside. A mug with glaze under compression on the inside and under tension on the outside would fail this test even more dramatically. Context: Is inside-only glazing a.., Glaze Compression Monday 1st July 2024 The same glaze fires very differently depending on kiln cooling rate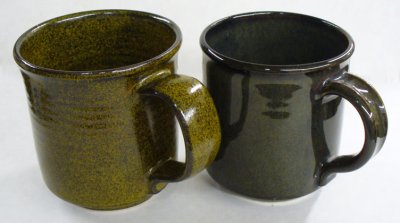
Both mugs use the same cone 6 oxidation high-iron (9%), high-boron, fluid melt glaze. Iron silicate crystals have completely invaded the surface of the one on the left, turning the gloss surface into a yellowy matte. Why? Multiple factors. This glaze does not contain enough iron to guarantee crystallization on cooling. When cooled quickly it fires the ultragloss near-black on the right. As cooling is slowed at some point the iron will begin to precipitate as small scattered golden crystals (sometimes called Teadust or Sparkles). As cooling slows further the number and size of these increases. Their maximum saturation is achieved on the discovery, usually by accident, of the likely narrow temperature range they form at (normally hundreds of degrees below the firing cone). Potters seek this type of glaze but industry avoids it because of difficulties with consistency. Context: B2O3, Fe2O3, Ravenscrag floating blue color.., The matteness of this.., Alberta Slip GA6-A glaze.., Cooling rate drastically affects.., Same glaze fires hyper-matte.., The appearance of this.., Melt Fluidity, Glaze Chemistry, Crystallization Monday 1st July 2024 Is inside-only glazing a good idea? We say it is not.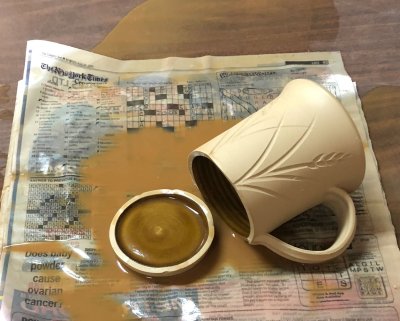
This mug is made from 325 mesh MNP, the strongest porcelain I have. Since the walls are of even thickness with no abrupt corners or contour changes and the glaze is thinly and evenly applied I thought I could follow a social-media-driven trend and glaze only on the inside. But I got glaze compression time-bombs waiting for hot coffee triggering! Three other mugs failed this same way! But four with this same glaze inside and out were fine. Why? The outside glaze counters the inside one pushing outward. And it closes crack initiation points. Context: Drip glazing and bare.., Example of COE curves.., A mug cracks before.., The handle is strong.., Here is how far.., Glaze Compression Thursday 27th June 2024 A down side of high feldspar glazes: Crazing!
This reduction celadon is crazing. Why? High feldspar. Feldspar supplies the oxides K2O and Na2O, they contribute the brilliant gloss and great color but the price is very high thermal expansion. Scores of recipes being traded online are high-feldspar, some more than 50%! There are ways to tolerate the high expansion of KNaO, but the vast majority are crazing on all but high quartz bodies. Crazing is a plague for potters. Ware strength suffers dramatically, pieces leak, the glaze can harbor bacteria and customers return pieces. The simplest fix is to transplant the color and opacity mechanism into a better transparent, one that fits your ware (in this glaze, for example, the mechanism is simply an iron addition). Fixing the recipe may also be practical. A 2:1 mix of silica:kaolin has the same Si:Al ratio as most glossy glazes, this glaze could possibly tolerate 10% of that. That would reduce running, improve fit and increase durability. Failing that, the next step is to substitute some of the high-expansion KNaO, the flux, for the low-expansion MgO, that requires doing some glaze chemistry. Context: Feldspar, Na2O, ChatGPT is completely wrong.., Cone 1 mug is.., Celadon Glaze, Calculated Thermal Expansion, Limit Recipe, Glaze Crazing Wednesday 26th June 2024 The Prusa MK4 3D printer is worth the upgrade from MK3
It is 2024 and I just got this. This time I paid extra and bought it fully assembled. It arrived in Canada quickly and was packed very well. I have already made hundreds of things on it, it is the reason for current projects (I use this to make molds for ceramics). Context: It is 2 18.., Prusa 3D Printers made.., Prusa 3D printers at.., Beer Bottle Master Mold.., Medalta Ball Pitcher Slip.., Coffee Mug Slip Casting.., 3D Printer Tuesday 25th June 2024 Here is some motivation to make your own underglazes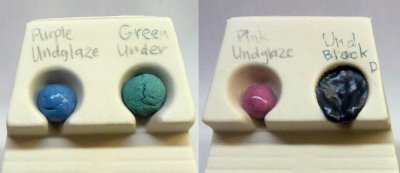
Commercial hobby underglazes are high in stain and very expensive. But does expensive mean suitable? To help answer we have over-fired these commercial products in a melt fluidity tester (to cone 8). They are recommended for use from cone 06-6 (some can go higher e.g. the green). Underglazes need to melt enough to bond with the underlying body, but not so much that opacity is lost (any melting loses opacity). Excessive melt can also cause design edges to bleed. To work well at greater thicknesses, underglazes need to have a firing shrinkage similar to the body (an ill-fitted underglaze and body forced into marriage are eventually going to divorce, in the form of flaking or cracking at their interface). Thus, while a regular glaze would melt enough to go well down the runway on this tester, an underglaze should not flow at all. At this temperature, none of these have achieved the right degree of maturity (the green is too refractory, the others over-melt to varying degrees). The only one that has a chance of suitability at cone 6, two cones lower than this, is the blue. Clearly, the base recipe and stain percentage in each underglaze recipe color needs attention, if that can be achieved all of these would mature to the same degree. Context: Is your underglaze forming.., When making your own.., Here is why you.., Underglaze, Silk screen printing, Bleeding colors Monday 24th June 2024 | Contact MeUse the contact form at the bottom on almost all the pages on this site or let's have a Other ways to Support My WorkSubscribe to Insight-Live.com. It is about doing testing and development, not letting the information slip away. Starts at $15 for 6 months.
Login to your online account Chemistry plus physics. Maintain your recipes, test results, firing schedules, pictures, materials, projects, etc. Access your data from any connected device. Import desktop Insight data (and of other products). Group accounts for industry and education. Private accounts for potters. Get started. Download for Mac, PC, Linux Interactive glaze chemistry for the desktop. Free (no longer in development but still maintained, M1 Mac version now available). Download here or in the Files panel within your Insight-live.com account. What people have said about Digitalfire
What people have said about Insight-Live
|

https://digitalfire.com, All Rights Reserved
Privacy Policy


