3D Printing a Clay Cookie Cutter-Stamper
A 3-minute Mug with Plainsman Polar Ice
A Broken Glaze Meets Insight-Live and a Magic Material
Accessing Recipes from "Mid-Fire Glazes" book in Insight-Live
Adjusting the Thixotropy of an Engobe for Pottery
Analysing a Crazing, Cutlery-marking Glaze Using Insight-Live
Compare the Chemistry of Recipes Using Insight-Live
Connecting an External Image to Insight-Live Pictures
Converting G1214M Cone 6 transparent glaze to G1214Z matte
Create a Synthetic Feldspar in Insight-Live
Creating a Cone 6 Oil-Spot Overglaze Effect
Design a Triangular Pottery Plate Block Mold in Fusion 360
Designing a Jigger Mold for a Bowl Using Fusion 360 CAD
Downloading and 3D-Printing a 3MF file
Draw a propeller in Fusion 360 for use on an overhead propeller mixer
Drawing a Mug Handle Mold in Fusion 360
Drawing a Mug Mold Using OnShape CAD
Enter a Recipe Into Insight-live
Entering TestData Into Insight-Live
Fine tune the thixotropy of a glaze or engobe slurry
Getting Frustrated With a 55% Gerstley Borate Glaze
How I Developed the G2926B Cone 6 Transparent Base Glaze
How I Formulated G2934 Cone 6 Silky MgO Matte Glaze Using Insight-Live
How to Apply a White Slip to Terra Cotta Ware
How to Paste a Recipe Into Insight-live
Importing Data into Insight-live
Importing Desktop Insight Recipes to Insight-live
Importing Generic CSV Recipe Data into Insight-Live
Insight-Live Meets a Silica Deprived Glaze Recipe
Insight-Live Quick Tour
Liner Glazing a Stoneware Mug
Make a precision plaster mold for slip casting using Fusion 360 and 3D Printing
Making ceramic glaze flow test balls
Making test bars for the SHAB, LDW and DFAC tests
Manually program your kiln or suffer glaze defects!
Mica and Feldspar Mine of MGK Minerals
Predicting Glaze Durability by Chemistry in Insight-Live
Preparing Pictures for Insight-live
Replace Lithium Carbonate With Lithium Frit Using Insight-Live
Replacing 10% Gerstley Borate in a clear glaze
Same Beer Bottle Mold Using Fusion 360 and OnShape CAD
Signing Up at Insight-live.com
Signing-In at Insight-live.com
Slip cast a stoneware beer bottle
Substitute Ferro Frit 3134 For Another Frit
Substituting Custer Feldspar for Another in a Cone 10R Glaze Recipe
Thixotropy and How to Gel a Ceramic Glaze
Use Insight-live to substitute materials in a recipe
Watch Thixotropy Happen With a 20kg Batch of Dipping Glaze
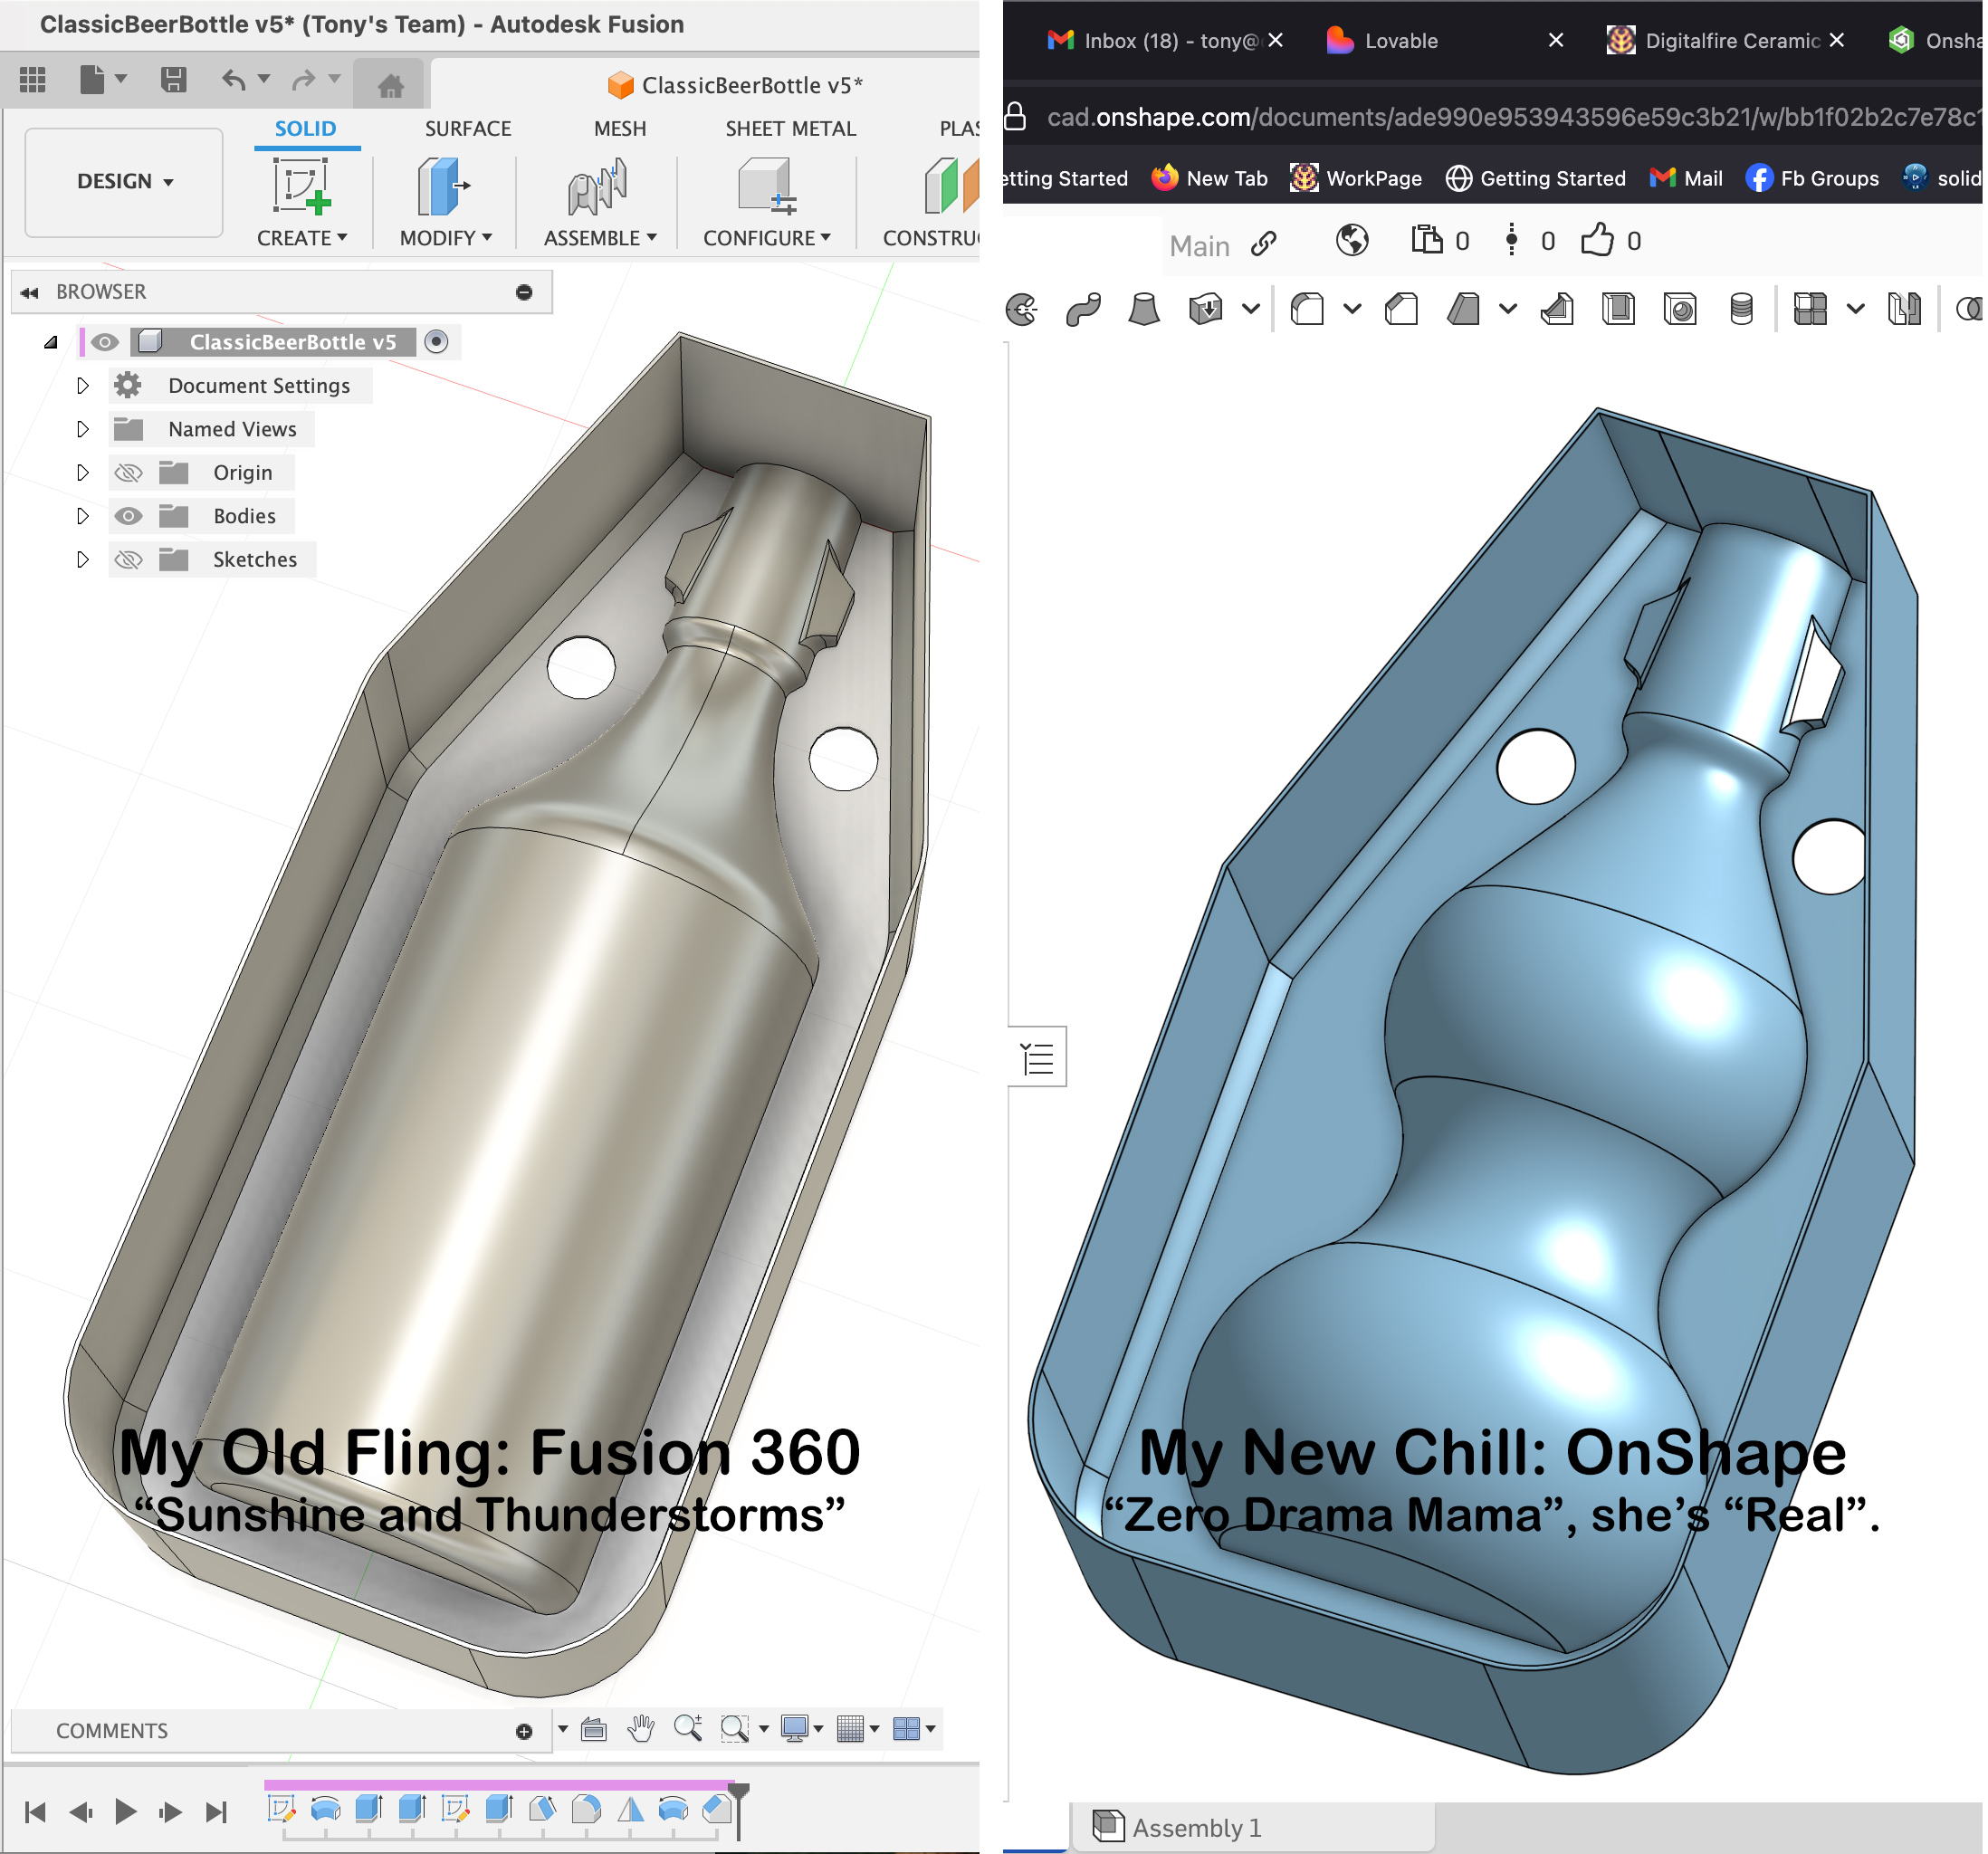
Same Beer Bottle Mold Using Fusion 360 and OnShape CAD
I will make a classic Medalta beer bottle case-mold for 3D printing using OnShape CAD (just pour in plaster and you have a mold to slip cast bottles). I will highlight the differences between OnShape and Fusion 360 as we go.
Click here to watch this at youtube.com or click here to go to our Youtube channel
Transcript/Notes
While running, with nothing open, Fusion 360 gobbles up 1.8gb memory and consumes dozens of processor threads. Its program folder uses 10G bytes of disk space and contains 96,000 files. OnShape does not need installation because it runs in a browser tab that consumes one-fifth the amount of memory.
1
I am launching Fusion Three-Sixty to create a case-mold for a classic beer bottle shape.
After 3D-printing, it can be filled with plaster to create a working slip-casting mold for ceramics.
more..
As you can see, Fusion takes a while to start up, even on a fast computer.While we wait, let's start OnShape 3D from its login page online. I'll click the button now. Wow, that's amazing.
Back in Fusion Three-Sixty, here is a dialog I often get on startup. It costs about $750 per year and I can only use it on one computer at a time!
These things have really been testing my romance with this software lately.
2
Let’s get started. I’ll make sure I am in the Solid workspace. I brought up the Parameters dialog from the Modify menu and am adding four parameters: Shoulder height, body radius, body height and plaster thickness.
3
Now, let's go to OnShape and do the same thing.
First, I'll create a new drawing and open the Variable Table and add them in a similar manner.
It is more convenient here to enter the names first and then the values.
OnShape also makes it easy to create variables while dimensioning. We can learn that later.
4
Create a sketch on the YZ plane.
Start a line from the origin, go left a little, type "13.5" and press the Enter key (while keeping the line horizontal). Notice Fusion has constrained it horizonta by inference. Go down about twice that distance and outward a little, click and then press the Escape key. Hide the data panel and zoom in if needed. Use the Dimension tool from the Create menu to dimension the bottom point from the origin: 15mm left and 36mm down. Finally, move the dimensions out of the way.
5
Now, let's do the same in OnShape.
I'll hide the front and top planes and make a sketch on the right plane. I'll drag the viewcube using the right mouse button, then click on that face.
Using the line tool I'll draw two line segments from the origin as before. This works a little differently than Fusion.
I click, then enter the number 13.5, then press the Enter key. I'll click again and press Enter (because I don't know the linear length). Using the Dimension tool I'll set to bottom point 15mm left of the origin and 36mm vertically down. Like before, I'll move them out of the way.
6
In Fusion Three-Sixty, I finished the sketch after the last step, so now I'll find it in the browser and edit it again.
I'll zoom out and then draw lines for the body vertical and base (it wants to constrain them to vertical and horizontal so I'll follow its lead) and then finish at the origin to form the center line.
Then, I'll constrain that center line to vertical.
Next, I am going to use the "point-tool" and create a point a little down and to the right of the bottom of the neck.
Finally, I'll round that bottom corner using the fillet-tool, I'll click on it, type "6" and press Enter.
7
I am back in OnShape the next day. I had to sign back in and open this drawing.
Next, I'll right-click the sketch and choose "Edit", then hide the right plane.
Then draw lines for the body vertical and base.
And finish at the origin to form the center line.
Then I'll constrain them to vertical or horizontal (since that was not inferred while I was drawing).
Next, I am going to use the "point-tool" and create a point a little down and to the right of the bottom of the neck.
Finally, I'll round that bottom corner using the fillet-tool, I'll click on it, then off it, then type "6" and press Enter.
8
Now, let’s do some dimensioning, starting in Fusion Three-Sixty.
First, the point. 5 mm down from the neck bottom and 12.5mm in from center. In each case I use the dimensioning tool, click on the items, type the amount and press the Enter key.
Next, the shoulder height, using the parameter already created. For these, I begin typing part of the parameter name and press Enter twice when it is the only one left in the list.
Next, the body radius, again using its parameter. But first, notice I can press the Escape key and move the bottom down. This is possible because that part is blue (meaning it is not yet defined) The "D" key then restores the dimension tool.
Then I'll dimension the body height, doing the same. In each case, the existing constraints enable choosing points, lines or both.
Finally, I’ll connect the neck and shoulder through the point using a spline (finishing with a double-click on the lower point).
And then tangent both ends manually.
9
Let’s switch to OnShape and do the same. "D" is also the shortcut for the dimensioning tool.
Let's dimension the point 5 mm down from the neck bottom and 12.5mm in from center. Like Fusion, I click on the items (being careful not to move while doing so), then type the amount and press the Enter key.
Next the shoulder height, using the parameter already created. For parameters the procedure is the same as Fusion.
OnShape uses the same blue color to signal this part is undefined. As before, I can press the Escape key and move the bottom down. Then set the body radius using its parameter.
Then I'll dimension the body height, doing the same. In each case, the existing constraints enable choosing points, lines or both when dimensioning.
Finally, I’ll connect the neck and shoulder through the point using a spline (finishing with a double-click on the lower point).
And then tangent both ends manually.
10
Back in Fusion, I'll add a natch hole 13.5mm in diameter.
And then fine-tune the shoulder contour by dragging the handle that controls the curve.
Then I'll use the line tool to start drawing the inner mold wall, starting at the bottom centre line.
I'll use the plasterThickness parameter to set the distance of the base from the bottom of the bottle.
I'll let it infer the horizontal base vertical wall and then angle up toward to top and join at its corner. Then I'll set that top line horizontal.
To finish, I'll bevel the bottom corner by 20mm.
And then constrain the shoulder points of the bottle and mold horizontal to each other.
11
Let's do the same in OnShape. I'll add the 13.5mm natch hole by clicking, dragging, clicking, entering the number and pressing the Enter key.
And then press the Escape key and fine-tune the shoulder contour by dragging the curve handle.
Then, I'll use the line tool to start drawing the inside wall of the mold, starting at the bottom center line.
I'll let it infer the horizontal base and vertical walls and then angle up toward to top and join at its corner. Then I'll set that top line horizontal.
Next, I'll use the dimension tool to set the distance of the base from the bottom of the bottle to the plasterThickness parameter.
To finish I'll bevel the bottom corner by 20mm.
And then constrain the shoulder points of the bottle and mold horizontal to each other.
12
Back in Fusion Three-Sixty I am dimensioning the gap between the side wall of the mold and the bottle to the plaster thickness parameter.
And then the width of the top edge against the neck to 25mm.
Now, I'll reposition the natch.
Next, we need to draw the containment wall of the mold. Let's do that by offsetting the outer edge, all the way around, outward by 0.8mm.
We'll finish by closing in the two ends, being sure they are vertical.
At the bottom there is a little piece I need to remove, I'll do that using the scissor tool.
Finally, I'll finish the sketch.
13
Back in OnShape, I'll dimension the side wall gap, setting it to the plaster-thickness parameter.
And then the width of the top edge against the neck to 25mm.
And I'll reposition the natch.
To draw the containment wall of the mold I'll use the Offset tool also. I'll select the chain of lines all around the outside, move to offset outward, press the Enter key, then type in 0.8mm.
We'll finish by closing in the two ends, being sure they are vertical.
Finally, I'll finish the sketch.
14
Back in Fusion, I'll pick the Extrude tool. I'll select everything except the natch hole. I'll type "-0.8" and press the Enter key.
The same technique works to extrude the walls upward. But, the sketch has been turned off.
I'll turn it back on. This time, I'll enter parameters: body radius plus plaster thickness.
I'll check to make sure the "join operation" is set and then confirm.
Finally, I'll use the "revolve tool" to revolve the bottle by 90 degrees, around the center axis, again using the "join operation".
15
Back in OnShape, I'll pick the Extrude tool and the extrude dialog will appear.
I'll select everything except the natch hole. Begin dragging backwards to select the direction, and then set the depth at "0.8", and confirm by clicking the check mark.
The same technique works to extrude the walls upward. Like Fusion, the sketch was turned off. So I'll turn it back on.
This time, instead of entering a number, I'll enter parameters into the depth field: body radius plus plaster thickness.
I'll check to make sure the "add operation" is set, so this combines with the base already extruded, and then confirm.
Finally, I'll use the "revolve tool" to revolve the bottle by 90 degrees.
I'll select the bottle, then the axis, then set it to revolve in one direction, at 90 degrees, again using the "add operation", a finally, confirm.
16
Back in Fusion Three-Sixty, I'll make a sketch, on the vertical face, to draw the lug.
I'll begin by creating a corner rectangle of 5x10mm.
And then make it vertical with the origin (not the bottom of the part I already extruded).
I'll dimension it to be 17mm down.
And then finish the sketch, turn it on, and extrude it 18mm through the bottle (using the join operation).
17
Back in OnShape, let's do that same thing.
I'll make a sketch, on the vertical face and create a corner rectangle of 5x10mm.
And then make it vertical with the origin.
And dimension it to be 17mm down.
And then finish the sketch, and extrude it 18mm through the bottle (using the add operation).
18
In Fusion Three-Sixty I'll choose the Draft-tool and then select top face of the lug as the pull direction.
It then wants me to select the draft-faces.
I'll choose all three.
Next, I'll set the angle at 30 degrees and finish.
Finally, I'll choose the Fillet-tool, then select the 8 concave and convex corners, set it to 2mm and finish.
19
In OnShape I'll choose the Draft-tool and then select top face of the lug as the neutral plane.
It then wants me to select the entities to draft.
I'll choose all three.
Next, I'll set the angle at 30 degrees and finish.
Finally, I'll choose the Fillet-tool, then select the 8 concave and convex corners, set it to 2mm, and finish.
20
Back in Fusion Three-Sixty, I'll select the Shell-tool. Then I'll select the two flat faces of the body of the bottle.
Then enter a wall thickness of 1.2mm and finish.
Next, I'll choose the Mirror tool and then select the mold.
I'll tell it I want to set the the mirror-plane, and do it.
Finally, I'll make sure the join-operation is set, and then finish.
21
In OnShape, I'll choose the Shell-tool. Then I'll select the two flat faces.
Then enter a wall thickness of 1.2mm and finish.
Next, I'll choose the Mirror tool and then select the mold.
And then the mirror-plane.
Finally, I'll make sure the add-operation is set, and then finish.
22
Back in Fusion Three-Sixty, I notice that I forgot to chamfer the inside bottom perimiter.
To do that I will first roll the timeline marker back one step.
Then choose the Chamfer-tool, select the inside corners, but not the top.
I'll set it at 4mm and finish.
When I move the timeline marker back to the end, the mirrored half will also have the chamfer.
Lastly, I'll edit the first sketch, and move the hole a little.
When I save it, that change will ripple all the way to the last step.
23
In OnShape, I'll do the same.
I'll roll the timeline marker by right-clicking on the previous step.
Then choose the Chamfer-tool, select the inside corners.
I'll set it at 4mm and finish.
Then I'll roll back to the end.
Lastly, I'll edit the first sketch, and move the hole a little and save.
Like Fusion, the change ripples all the way to the last step.
24
Now, let's admire what we just made.
In Fusion Three-Sixty, I'll choose the perspective camera and rotate the drawing.
Lets do the same in OnShape.
Here, I'll choose the isometric view.
I hope you are as amazed as I am that such a complex drawing can be done in so few simple steps.
Links
| URLs |
https://www.onshape.com
OnShape parametric cloud-native CAD software This is looking like my new favorite 3D CAD package. It is free for hobby makers, runs in a browser so it works on almost any computer. And it works on iPad. If you have Fusion 360 experience you will hit the ground running, most of the tools and functionality needed for mold making are very similar. |
| Typecodes |
Mold making using 3D printing
An ordinary consumer 3D printer has many exciting possibilities for making many types of molds, it is a place where people having both artistic and mechanical abilities can get a double the dopamine! |
3D Printed Pour-spout Forms a Rounded Lip
First date with OnShape went great!
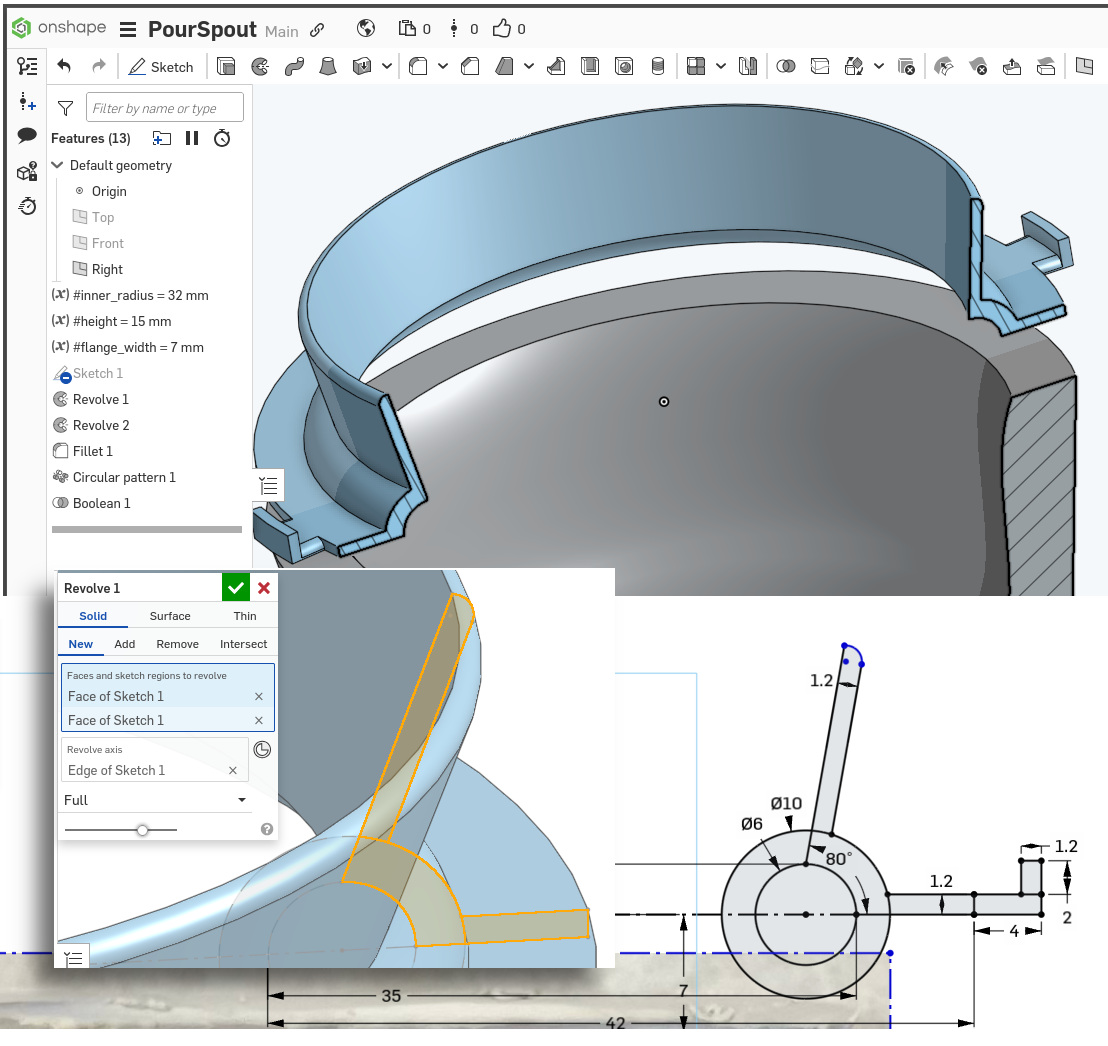
This picture has its own page with more detail, click here to see it.
This 3D-printed PLA pour spout potentially increases the utility of this one-piece plaster mold. As can be seen on the upper section analysis, the spout is designed to form the lip of this small Medalta Potteries bowl (and provide a guide for cutting its inside edge). It has lugs that extend outward to enable holding it down using rubber bands. I intend that it will be cleanly removable after the piece begins to pull away from the mold, leaving a high-quality lip that only needs a little trimming. This spout also permits precise monitoring of when to pour out the slip and it prevents most of the mess made using traditional molds having a spare.
This is the first piece I have made wholly using OnShape CAD. Experience with Fusion 360 gives me expectations of how this should work and those expectations are generally being met. Cost is no longer an obstacle to adopting professional 3D CAD for mold making. I am using OnShape on my 2014 Mac Mini running Ubuntu Linux (on 16gb RAM). And Prusa Slicer, OctoPrint, GIMP, Kdenlive, InkScape and productivity software are all running smoothly on it.
3D mechanical design software 2025:
Which is the best for mold making in ceramics?

This picture has its own page with more detail, click here to see it.
CAD software and 3D printing are a potential revolution in vessel mold-making for ceramics (3D modelling is another topic). But there are two big problems: There is no way a potter, hobbyist or even small manufacturer can afford the typical software cost. While it is true most have free or low-cost trial or hobby versions, the strings attached are deal breakers. The second problem is the complexity of learning - that can be a bigger obstacle than cost.
Until the recent price increase, Fusion 360 seemed to be exactly what was needed. A great way to on-board the CAD world, using the free version and its great learning resources and best-in-class user interface. It is new and modern, a YouTube star. It is fully parametric, supporting constraints and a timeline. True, it can choke on more complex drawings on consumer computers, but we don’t need to do those. But, for commercial use, it costs $700/yr. But that is cheap compared to some others! Upon discovery of the capability, the cost might be doable for you.
Here are the ones you likely cannot afford (and maybe don't want):
-OnShape runs in your browser and on iPad; in our testing, it looks really good. Free-version drawings are public (but no other restrictions). Going private costs $1500/yr.
-Rhino is usable for CAD but is polygonal and targeted at modelling. It is not fully parametric and does not have a traditional timeline (however, Rhino+Grasshopper is life-changing for geeks, both for CAD and modelling). $1000 to buy, but upgrading is $500+.
-Solidworks is a long-time proven product, it is fully parametric with editable history. Runs on Windows only (or the xDesign product runs in a browser like OnShape). It is low cost for hobby use (but the restriction of not being able to save or open the commercial SolidWorks file format is a potential deal-breaker for hobbyists). For commercial use: $2600/yr in 2025.
Some upcoming possibilities:
-FreeCAD is becoming more viable. It is parametric, has constraints and exports and imports popular formats (but with lots of issues). Its model tree is equivalent to the Fusion 360 timeline, but more clunky and depends on careful setting of constraints. The learning curve right now puts it out of reach of most. But a capital injection, like Blender got, is coming.
-Shapr 3D costs $299/yr, also works on iPad (which Fusion 360 does not), and uses the Parasolid engine like OnShape and SolidWorks. But it seems to be targeted at being intuitive for conceptual modelling and quick prototyping for drawings that are finalized in other products (limited support for accurate feature placement, constraints, parametrics and boolean operations).
My Breakup with Fusion 360
I had a "Little Dictator", now I have a "Partner"
This picture has its own page with more detail, click here to see it.
I am just a simple guy, a hobby 3D printing "Maker", I focus on making molds for ceramic slip casting. I don't need a "high maintenance" CAD partner.
Fusion 360 and I were not a good match. It was her world, Windows and Mac only - I had to live in it. She was the “Queen of Complicated”, always on the drama channel of new features far beyond what I needed, rather than refining the simple ones I did need. And she was expensive to take out, costing way more than what I needed ($750/year).
OnShape is my new chill. She will go out, at full power, to Linux and iPad. She's a keeper. I don’t need a user manual for her. She's not a princess but a partner, social not a snob. I don't feel like I am on a roller coaster without a seatbelt, rather I am with someone that is easy to be around and way more powerful than she looks.
Classic Medalta Potteries Beer Bottle
Make this mold using OnShape and Fusion 360

This picture has its own page with more detail, click here to see it.
The original bottles were hand-thrown and very thick and heavy. These are perfect candidates for slip casting.
Drawing and 3D printing a case mold became my first success using OnShape. CAD is difficult, I really needed a tutorial that explained OnShape in terms of Fusion 360 I already knew. There wasn’t one! Now there is. This new procedure I have developed supersedes all of what I have done so far with beer bottle molds.
This is a test mold. This mold weighs 87g and the walls are printed to only 0.8mm thickness. We just pour in the plaster and remove this PLA print using a heat gun. Two natches are sufficient to keep the halves aligned perfectly. Pieces will shrink about 12%, thus this larger size. We will use a cone 6 casting body, tissue transfers for the decorations, the GA6-B glaze for the inside and shoulder and G2926B transparent for the body.
 PayPal | No tracking, No ads, No paywall, No transient content! Just organized, concise information constantly updated and improved. Was this helpful? Consider supporting me. |
| By Tony Hansen Follow me on        |  |
Got a Question?
Buy me a coffee and we can talk 

https://digitalfire.com, All Rights Reserved
Privacy Policy