CDRY - Drying Factor/Water Content/Solubles Test
This test is suitable for keeping a record of drying performance, firing specks, and soluble salt deposit trends in a production body at a ceramic ware manufacturing facility (i.e. at a porcelain insulator manufacturer). It enables combining the DFAC and SOLU tests into one (since the disk specimen is used for both).
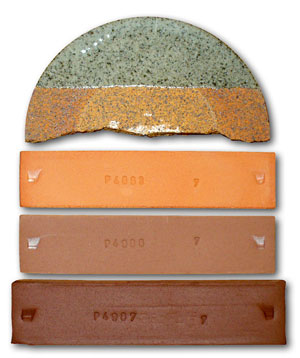
Test bars of different terra cotta clays fired at different temperatures
This picture has its own page with more detail, click here to see it.
Bottom: cone 2, next up: cone 02, next up: cone 04. You can see varying levels of maturity (or vitrification). It is common for terra cotta clays to fire like this, from a light red at cone 06 and then darkening progressively as the temperature rises. Typical materials develop deep red color around cone 02 and then turn brown and begin to expand as the temperature continues to rise past that (the bottom bar appears stable but it has expanded alot, this is a precursor to looming rapid melting). The top disk is a cone 10R clay. It shares an attribute with the cone 02 terra cotta. Its variegated brown and red coloration actually depends on it not being mature, having a 4-5% porosity. If it were fired higher it would turn solid chocolate brown like the over-fired terra cotta at the bottom.
Variables
WWGT - Wet Weight (V)
Weight in grams of wet disk.
DWGT - Dry Weight (V)
Weight in grams of disk which has been thoroughly dried at greater than
boiling temperature of water.
Average thickness of dry disk.
CWID - Width of Main Crack (V)
Width of main crack on dried disk at its widest point. Measure this by
sighting with a caliper.
Total number of cracks over number of cracks from edge inward.
ODIA - Outside Diameter (V)
Outside diameter of disk in mm (take an average if disk is oval in shape).
SOLU - Fired Solubles (V)
The amount of solubles on the fired disk according to the following objective observations comparing the color of the protected part of the disk to the color of the exposed section: NIL, LIGHT, MEDIUM, HEAVY, VHVY).
SPEC - Specking (V)
The amount of specking on the disk according to the following observations:
NIL, LIGHT, MEDIUM, HEAVY, VHVY).
Procedure
1. Purpose of Test
Drying cracks are a major source of ware loss. A production facility must tread a fine line between two extremes: High plasticity with its associated superior workability and poorer drying performance; or low plasticity with its better drying and poor workability.
This test is designed to measure a clays drying performance by placing enough stress on a sample to cause most normal clays to crack. The resulting crack pattern, characteristics, and severity are assigned a value which accounts for shifts in clay mineral types, particle size, plasticity, particle size, etc. Note that water content of a clay sample can have a significant effect on its performance in this test. Thus, it is important that the weight fields in this test be recorded so that shifts in performance can be related to possible variations in water content.
This test also measures efflourescense. All raw clays contain a certain amount of water soluble salts (e.g. calcium/potassium sulfate). The water in a pugged clay body will slowly dissolve some of these. As the piece dries, the water brings the salt with it to the surface and leaves it behind during evaporation. On firing, these salts cause surface discoloration to unglazed areas. It ranges from a shiny, almost glaze-like sheen to an unsightly dry scummy appearance. In production, these salts can be removed by water processing of the raw materials or finished body. Another method of removal is the addition of up to 0.5% barium carbonate to precipitate these salts from solution. This occurs by a chemical reaction that produces insoluble barium sulfate, and calcium/potassium carbonate from the slightly soluble
barium carbonate, and calcium/potassium sulfate.
Shifts in the quality of barium blending, amount of soluble materials in the clay, and the barium's effectiveness in precipitating the salts are all common. On one hand, it is possible to test this factor by decanting some water from a thin clay/water slurry that has been allowed to settle overnight. A few drops of added barium chloride will result in immediate precipitation of any remaining solubles, causing the water to go cloudy. On the other hand, the dried disk in the CDRY test is more effective, since it shows directly what happens to the actual fired surface in a worst case of surface salt concentration. In addition, observation of the fired scummed surface can give clues to the cause of the problem and allow judgements of its severity that are more applicable to the final product.
2. Scope
Test disks are made from a representative sample of each batch of clay produced.
5. Procedure
5.1 Phase 1: Pugmill Operator
5.1.1 Cut a 2-3 cm (1 inch) slice from the extrusion at right angles to its flow using a tight fine cutting wire. Lay this slice on a non-stick board and lay two 5 mm thickness guage rods on either wide. Pull a tight cutting wire over the guides to produce a 5mm thick section. Alternatively, a piece of extrusion can be kneaded to remove particle orientation differences introduced by the die, then rolled to thickness and die cut.
5.1.2 Center a 12 cm round template on the sample and use a thin blade knife to trim the clay to match. Do not deform the disk during this process.
5.1.3 Choose the next available identification number and stamp it on two places in clear easily readable letters (if a crack goes through the number, it cannot be read in the final phase of the test where one piece of the sample is fired).
5.1.5 Carefully peel up the clay, being careful to minimize distortion. Weigh it to the nearest tenth of a gram, and write the weight on the sample.
5.1.6 If multiple disks are being made to assess drying performance for various water contents, draft conditions, or for averaging, assign successive specimen numbers to each, and stamp or write these on the sample.
5.1.7 Lay each disk on the fan table prepared for this test. Put a 7 cm diameter metal can (i.e. soup can) filled with sand or plaster on the center of the sample, leaving an even ring of exposed clay all around. Turn the fan on and leave it till the samples are dry.
5.2 Phase 2: QC
5.2.1 When the samples are dry: weigh each disk; using the metal rule measure the width of the major crack, the outside diameter, the thickness of the disk; and count the total number of cracks. Record all of this information on a new line on the CDRY log sheet, write it on the sample, or key it directly into the computer in the Testdata Collector dialog.
5.2.2 Break each sample to produce a wedge shape containing the ID# and areas of both fan-exposed and fan-nonexposed surface. Discard the remainder.
5.2.3 Give these samples to the firing department.
5.3 Phase 3: Firing Department
5.3.1 Fire the disks to production temperature beside a set of cones in the kiln.
5.3.2 Write the cone number reached by the sample(s) on the back of the disk and return to QC.
5.3.2.1 The cone number should be in the following format:
c - Cone number
n - Clock reading from 1 to 6 oclock or "t".
1 - Cone just starting
2-5 - Cone position
6 - Almost touching
t - Cone tip is touching.
5.4 Phase 4: QC
5.4.1 Note any evidence of surface discoloration on the outer section of the disk that was exposed to the fan during drying. This discoloration is due to soluble salts within the clay which migrate to, and are left on the surface during drying. Note whether the discoloration is NIL, LIGHT (barely noticeable), HVY (very pronounced) or MED (medium) by comparing to the standard calibration samples. Make an entry on the log sheet.
5.4.2 Turn the sample and study all surfaces, and record a judgment on the log sheet concerning speckle development as NIL, LIGHT, MED or HVY according to the calibration samples.
5.4.3 With a pair of pliers, break off a small piece for pressure porosity testing (if applicable), mark its ring diameter, and ID# and set it aside.
5.4.4 Consult the database for location of storage board to which immediately previous tests were last glued and retrieve the board.
5.4.5 Glue new samples to empty space left on the board, or number and start a new board if necessary. Write the cone and ring diameter beside each, and the ID# if it has been broken off. For each sample, record in the database the board number to which it is being glued.
5.4.6 One per week, enter the data from the log sheet into the computer using the Testdata Collector dialog. Create a new list of valid ID numbers for the pugmill operator if needed.
5.4.7 Print reports, compare data, report to management on trends and general results. Make recommendations to improve the process based on results.
5.5 Equipment
5.5.1 Wire cutting device to slice from production extrusion.
5.5.2 Needle tool or sharp pencil to write on sample.
5.5.3 Vernier Calipers
5.5.4 Pliers
5.5.5 Metal rule
5.5.6 Scale capable of 1/10 gram accuracy
5.5.7 Drying fan and table assembly
5.5.8 Two metal rods (round or square) with a 5 mm thickness or diameter.
5.5.9 12 cm diameter round metal cutting template.
5.6 Safety
5.6.1 If you are firing the test kiln, do not look into it without a dark visor and make sure it is in a well ventilated room. When working with dried samples, take measures to minimize the buildup of dust on tables and floors.
5.7 Workmanship
5.7.1 It is important that the disk be deformed as little as possible during marking or weighing (deformation causes internal discontinuities and stresses that affect its drying).
5.7.2 Keep the fan table clean and free of dust or oil. This aids in getting accurate weights and does not impair the drying process.
5.7.3 The disks must be completely dry before initial weighing.
5.7.4 Write on the sample carefully with a sharp pencil or needle tool so that it is legible for later data entry. Write in small letters to minimize the chance that a crack will initiate at the writing.
Related Information
Videos
Links
| Tests |
Dry Strenth (Round Bars)
|
| Tests |
Drying Factor
The DFAC Drying Factor test visually displays a plastic clay's response to very uneven drying. It is beneficial to show the relative drying performance of different clays. |
| Tests |
Clay Water Content - Powder, Plastic
|
| Tests |
Moisture Content - Powder
|
| Tests |
Soluble Salts
Evaluate and compare the solubles salts content in clay bodies and materials |
| Typecodes |
Body Tests
Tests conducted on bodies made from materials, as opposed to the materials themselves. |
| Articles |
Formulating a Porcelain
The principles behind formulating a porcelain are quite simple. You just need to know the purpose of each material, a starting recipe and a testing regimen. |
| Glossary |
Efflorescence
A common problem with dry and fired ceramic. It is evident by the presence of a light or dark colored scum on the dry or fired surface. |
 PayPal | No tracking, No ads, No paywall, No transient content! Just organized, concise information constantly updated and improved. Was this helpful? Consider supporting me. |
| By Tony Hansen Follow me on        |  |
Got a Question?
Buy me a coffee and we can talk 

https://digitalfire.com, All Rights Reserved
Privacy Policy