04DSDH - Low Temperature Drop-and-Hold
BQ1000 - Plainsman Electric Bisque Firing Schedule
BRTF05 - Bartlett Fast Glaze Cone 05
BRTF6 - Bartlett Fast Glaze Cone 6
BRTS6 - Bartlett Slow Glaze Cone 6
BTFB04 - Bartlett Fast Bisque Cone 04
BTSB04 - Bartlett Slow Bisque Cone 04
BTSG05 - Bartlett Slow Glaze Cone 05
C04PLTP - Plainsman Low Temperature Drop-and-hold
C10RPL - Plainsman Cone 10R Firing
C5DHSC - Plainsman Cone 5 Drop-and-Hold Slow-Cool
C6DHSC - Plainsman Cone 6 Drop-and-hold, Slow Cool
C6IRED - Cone 6 Iron Reds
C6MSGL1 - Mastering Glazes Cone 6
C6PLST - Plainsman Cone 6 Electric Standard
FSCG1 - Shimbo Crystal Schedule 1
FSCGB1 - Shimbo Crystal Holding Pattern 2
FSCGCL - Shimbo Crystal Celestite Schedule
FSCGWM - Wollast-O-Matte Fara Shimbo Crystalline Glaze
FSCRGL - GC106 Base for Crystalline Glazes
FSHP1 - Shimbo Crystal Holding Pattern 1
FSHP3 - Shimbo Crystal Holding Pattern 3
FSNM5 - Fa's Number Five
MDDCL - Medalta Decal Firing
PLC6CR - Cone 6 Crystal Glaze Plainsman
PLC6DS - Cone 6 Drop-and-Soak Firing Schedule
QICA - Quartz Inversion Cracking Avoider
"BQ1000" Firing Schedule
Plainsman Electric Bisque Firing Schedule
This is for potters firing periodic electric kilns.
Hold at the first step as long as you need to to make sure all water is expelled. This could be an hour for light ware or ten hours for heavy ware. Turning your ventilation fan on will create some draft in the kiln to carry away the water vapor (if you do not have a ventilation system, then you can prop the lid during early stages for heavy loads). Although 250F is higher than the boiling point and we approach it quickly, this has not been found to fracture ware. Holding it at any temperature lower than that will not expel all the water.
Good ventilation is important up to, or even well past red heat, to maintain an oxidation atmosphere to remove crystal water and organics and avoid reducing any iron present (which could black core and flux the clay in the next firing). If you do not have a ventilation system consider slowing down the rate of climb for step 2 if bisque ware shows variation in colors (indicating incomplete oxidation).
Step 3 slows the climb during the last 100F approach to final temperature (about cone 05). This is a good idea to help even out temperature. Fire hotter if your ware is absorbent enough to glaze without difficulty (higher is always better because it burns out more carbon and crystal water). If ware is not strong enough to withstand handling during glazing you need to bisque hotter. If glazes are not going on thick enough it could be because ware is too dense (bisque fired too hot, e.g. dense terra cotta or fritware). But, consider whether its specific gravity and thixotropy are right. If they are the glaze will go on thick enough even if bisque ware is dense.
Hold the temperature longer if the kiln is densely packed.
When ware is thin and of even cross-section (and leaves step one completely dry), the rate of climb from 120C to 945C can be quite fast (up to 500F/hr should be fine). If ware is thicker, slow it down.
Many people slow down the climb around 550C to avoid quartz inversion failures, but we have found this is not an issue in bisque firings. Others slow down the cool through this range also, but since bisque ware is porous we have not found cracking an issue with free-falling temperature.
| Step | °C | °F | Hold | Time | |
|---|---|---|---|---|---|
| 1 | 170°C/hr to 120C | 306°F/hr to 248F | 60min | 1:43 | |
| 2 | 170°C/hr to 945C | 306°F/hr to 1733F | 6:34 | ||
| 3 | 60°C/hr to 1000C | 108°F/hr to 1832F | 15min | 7:44 | |
| 4 | 0°C/hr to 30C | 0°F/hr to 86F | 7:44 |
"Fahrenheit degrees" is not the same as "degrees Fahrenheit". A 100° reading on a Fahrenheit thermometer is equal to a 37° reading on a Celcius thermometer. But "100 Fahrenheit degrees of temperature change" is equivalent "55 Celsius degrees of change". That is an important distinction to understand the above temperature conversions.
Related Information
Program your firings manually
Calibrate the final temperature using cones
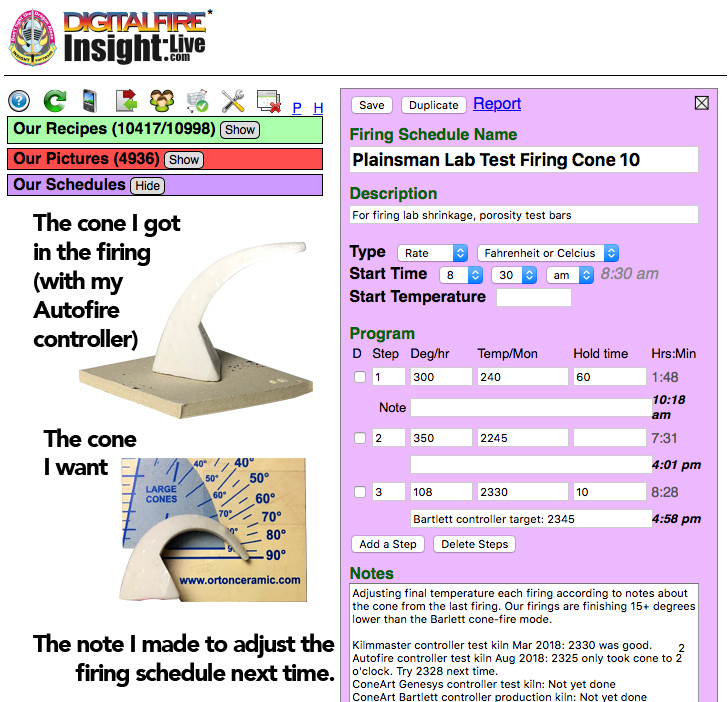
This picture has its own page with more detail, click here to see it.
Here is an example of our lab firing schedule for cone 10 oxidation (which the cone-fire mode does not do correctly). To actually go to cone 10 we need to manually create a program that fires higher than the built-in cone-fire one. Determining how high to go is a matter of repeated firings verified using a self-supporting cone (regular cones are not accurate). I keep notes in the schedule record in an account at insight-live.com. And we have a chart on the wall showing the latest temperature for each of the cones we fire to. What about cone 6? Controllers fire it to 2235, we put down a cone at 2200!
Clay cracking often happens because of uneven drying, not lack of grog

This picture has its own page with more detail, click here to see it.
Using a grogged body for making functional pottery is misguided. Unless very large pieces are being made it makes little sense to add the inconveniences of having a gritty material in your clay. Any normal smooth commercial pottery clay will dry without cracking if ware is dried evenly.
A dried terra cotta mug on the left, bisque fired to cone 06 on the right

This picture has its own page with more detail, click here to see it.
These were fired to cone 06, about 1800F. Of course, there is normally some shrinkage so the bisque piece would be a little smaller. Even though the matrix is very porous and is under developed, the iron in the body is already beginning to impose its color.
How much gas escapes firing from cone 03 & 04?
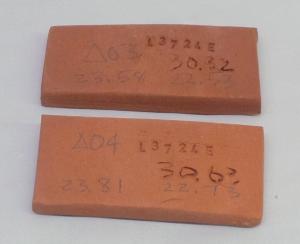
This picture has its own page with more detail, click here to see it.
These were fired to cone 03 (upper) and 04 (lower). At cone 03 the loss in weight is 4.54%, at 04 it is 4.45%. That is 0.08% difference. If a mug weighs 250 grams, that is only 0.21 grams. Does not sound like much. But wait. Air weighs 0.001225g/cc. While this is not the exact weight of the gases escaping during firing it suggests that around 170cc of gases need to bubble up through the glaze if the piece was bisque fired at cone 04 and glaze fired to cone 03.
How much does the size of a piece change when it is bisque fired? Glaze fired?

This picture has its own page with more detail, click here to see it.
Three mugs. Dry. Bisque fired. Glaze fired. Notice the shrinkage at each stage (these were the same size in the dry state).
Bisque-glazing vs. green-glazing in medium temperature porcelain

This picture has its own page with more detail, click here to see it.
The mug on the left was bisque fired and then glazed, the one on the right was glazed in the green (dry) state. The glazes are the same inside and out but the porcelain one the right is based on New Zealand kaolin (vs. American kaolin on the left). Three secrets for success for the one on the right were: It was glazed inside and out in two operations with a drying phase between, it was heated to about 150F before each application and it was fired with a soaking period (at about 1900F) on the way up to top temperature (cone 6).
A once-fire mug vs. a bisque-fired mug

This picture has its own page with more detail, click here to see it.
The mug on the right was bisque fired and then glazed, the one on the left was glazed in the green (dry) state using our standard meet-two-colors-at-the-rim glazing method. This method lends itself well to single fire glazing. Notice the glaze did not go on as thick on the once-fired piece (extra attention is needed to make sure it gets on thick enough without cracking the piece). In addition, there are a few pinholes whereas the bisqued piece is flawless. Single firing ware requires extra attention to firing, climbing to a point just before the glaze begins to melt and soaking there to enable hydrates and carbon to escape.
How much does clay shrink when bisque fired?

This picture has its own page with more detail, click here to see it.
Not much. These mugs were exactly the same height before a bisque firing to cone 06. The clay is a porcelain made from kaolin, feldspar and silica.
Can you bisque fire at cone 02? Yes. But why? How?

This picture has its own page with more detail, click here to see it.
The buff stoneware mug on the right was bisque fired at cone 02, the one on the left at cone 06. The cone 02 mug was immersed in the clear glaze for 1 second and allowed to dry. The other was glazed on the inside first, allowed to dry, then glazed on the outside with a 1 second dip. Of course, the cone 02 one took longer to dry. In spite of this, the glaze is thicker and more even on the one bisque fired to cone 02. How is the possible? The secret is the thixotropy of the glaze. When that is right, a one second dip will give the same thickness and evenness whether dry or bisque, 06 or 02. Why bisque fire to cone 02? To get a glazed surface free of pinholes on some stoneware clays.
Bisque temperature can be lower than you think
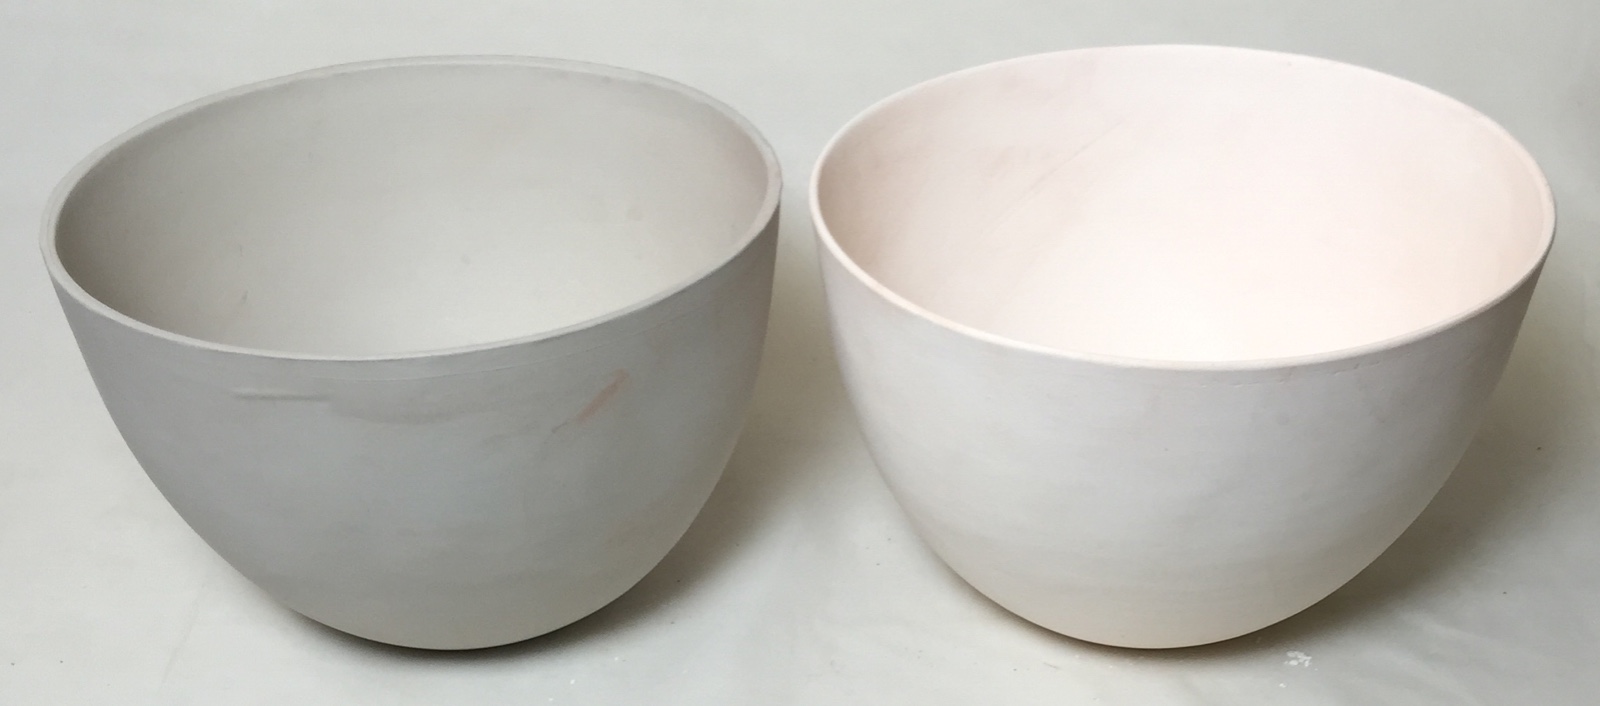
This picture has its own page with more detail, click here to see it.
These bowls are made from a talc:ball clay mix, they are used for calcining Alberta and Ravenscrag Slips (each holds about one pound of powder). The one on the right was bisque fired to cone 04 (about 1950F). The one on the left was fired to only 1000F (540C, barely red heat), yet it is sintered and is impervious to water (strong enough to use for our calcining operations). That means that there is potential, in many production situations, to bisque a lot lower (and save energy). Primitive cultures made all their ware a very low temperatures. Tin foil melts at 660C (1220F) yet can be used on campfires for cooking (so the temperatures of primitive wares would have been low indeed).
Links
| Firing Schedules |
Plainsman Cone 10R Firing
Six-step oxidize-at-end schedule to 2372F |
| Firing Schedules |
Plainsman Low Temperature Drop-and-hold
Five-step to 1940F, short hold, drop-and-hold, free-fall |
| Firing Schedules |
Plainsman Cone 6 Electric Standard
Used in the Plainsman lab to fire clay test bars in our small kilns |
| Firing Schedules |
Bartlett Slow Bisque Cone 04
80F/hr to 250F, 200/hr to 1000, 100/hr to 1100, 180/hr to 1676, 80/hr to 1926 |
| Firing Schedules |
Bartlett Slow Glaze Cone 05
Three steps, 400F/hr to 250F below end then 120F/hr to finish |
| Firing Schedules |
Bartlett Fast Bisque Cone 04
120F/hr to 250F, 300/hr to 1000, 150/hr to 1100, 180/hr to 1695, 108/hr to 1945 |
| Typecodes | Bisque Firing |
| Troubles |
Cracking of Clays During Drying
The best way to avoid drying cracks when making ceramics or pottery is to avoid doing the things that cause it. Do not just blame the clay, anything can technically be dried. |
 PayPal | No tracking, No ads, No paywall, No transient content! Just organized, concise information constantly updated and improved. Was this helpful? Consider supporting me. |
| By Tony Hansen Follow me on        |  |
Got a Question?
Buy me a coffee and we can talk 

https://digitalfire.com, All Rights Reserved
Privacy Policy