04DSDH - Low Temperature Drop-and-Hold
BQ1000 - Plainsman Electric Bisque Firing Schedule
BRTF05 - Bartlett Fast Glaze Cone 05
BRTF6 - Bartlett Fast Glaze Cone 6
BRTS6 - Bartlett Slow Glaze Cone 6
BTFB04 - Bartlett Fast Bisque Cone 04
BTSB04 - Bartlett Slow Bisque Cone 04
BTSG05 - Bartlett Slow Glaze Cone 05
C04PLTP - Plainsman Low Temperature Drop-and-hold
C10RPL - Plainsman Cone 10R Firing
C5DHSC - Plainsman Cone 5 Drop-and-Hold Slow-Cool
C6DHSC - Plainsman Cone 6 Drop-and-hold, Slow Cool
C6IRED - Cone 6 Iron Reds
C6MSGL1 - Mastering Glazes Cone 6
C6PLST - Plainsman Cone 6 Electric Standard
FSCG1 - Shimbo Crystal Schedule 1
FSCGB1 - Shimbo Crystal Holding Pattern 2
FSCGCL - Shimbo Crystal Celestite Schedule
FSCGWM - Wollast-O-Matte Fara Shimbo Crystalline Glaze
FSCRGL - GC106 Base for Crystalline Glazes
FSHP1 - Shimbo Crystal Holding Pattern 1
FSHP3 - Shimbo Crystal Holding Pattern 3
FSNM5 - Fa's Number Five
MDDCL - Medalta Decal Firing
PLC6CR - Cone 6 Crystal Glaze Plainsman
PLC6DS - Cone 6 Drop-and-Soak Firing Schedule
QICA - Quartz Inversion Cracking Avoider
"03DSFF" Firing Schedule
Cone 03 Fast Fire
This schedule was used to fire Zero3 thin-walled porcelain mugs do demonstrate a point, it is best to fire slower if possible. The drop-and-hold is important to get a defect-free glaze surface. It is possible to put a piece in the kiln at 8 pm and be drinking out of it by noon! Of course, the condition of your elements, the size of the kiln, and the amount of ware in it will determine if it is able to rise at this rapid rate for step 3 (this firing intentionally has no step 2).
Again, note that the pieces we fast-fire are fairly thin-walled and small. For heavier pieces, fire slower (reduce the rate-of-rise for step 3 and optionally insert a step 2 like the 04DSDH schedule).
To use this same schedule for cone 04, 05, 06 just adjust and calibrate to the top temperature as appropriate.
You must program this into your controller manually. See the link below on how.
| Step | °C | °F | Hold | Time | |
|---|---|---|---|---|---|
| 1 | 194°C/hr to 121C | 350°F/hr to 250F | 30min | 1:00 | Drive out any remaining mechanical water |
| 3 | 666°C/hr to 1065C | 1200°F/hr to 1950F | 15min | 2:40 | Adjust this to your top firing temp |
| 4 | 555°C/hr to 1010C | 999°F/hr to 1850F | 30min | 3:16 | Rapid fall then hold |
| 5 | 83°C/hr to 760C | 150°F/hr to 1400F | 6:16 | Optional to reduce glaze defects |
"Fahrenheit degrees" is not the same as "degrees Fahrenheit". A 100° reading on a Fahrenheit thermometer is equal to a 37° reading on a Celcius thermometer. But "100 Fahrenheit degrees of temperature change" is equivalent "55 Celsius degrees of change". That is an important distinction to understand the above temperature conversions.
Related Information
Manually programming a Bartlett V6-CF hobby kiln controller

This picture has its own page with more detail, click here to see it.
I document programs in my account at insight-live.com, then print them out and enter them into the controller. This controller can hold six, it calls them Users. The one I last edited is the one that runs when I press "Start". When I press the "Enter Program" button it asks which User: I key in "2" (for my cone 6 lab tests). It asks how many segments: I press Enter to accept the 3 (remember, I am editing the program). After that it asks questions about each step (rows 2, 3, 4): the Ramp "rA" (degrees F/hr), the Temperature to go to (°F) to and the Hold time in minutes (HLdx). In this program I am heating at 300F/hr to 240F and holding 60 minutes, then 400/hr to 2095 and holding zero minutes, then at 108/hr to 2195 and holding 10 minutes. The last step is to set a temperature where an alarm should start sounding (I set 9999 so it will never sound). When complete it reads "Idle". Then I press the "Start" button to begin. If I want to change it I press the "Stop" button. Those ten other buttons? Don't use them, automatic firing is not accurate. One more thing: If it is not responding to "Enter Program" press the Stop button first.
Program your firings manually
Calibrate the final temperature using cones
This picture has its own page with more detail, click here to see it.
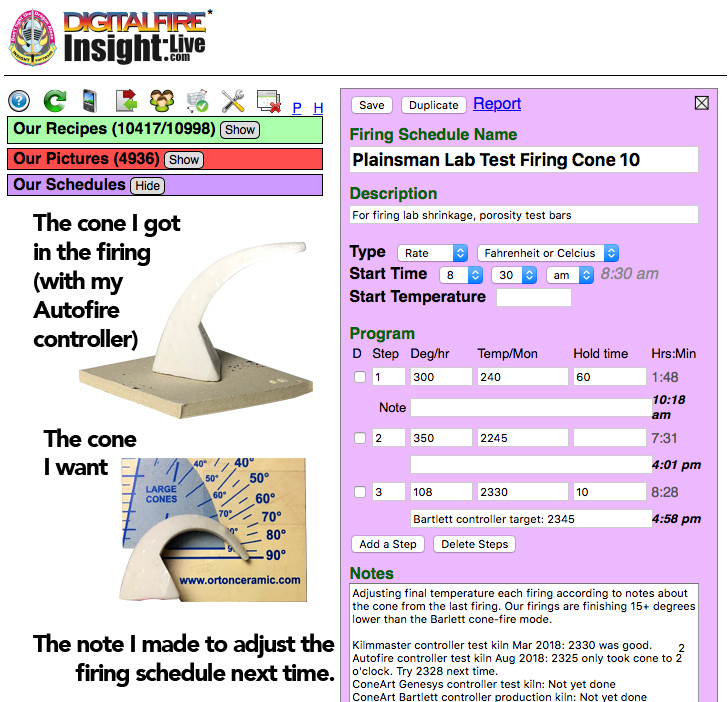
Here is an example of our lab firing schedule for cone 10 oxidation (which the cone-fire mode does not do correctly). To actually go to cone 10 we need to manually create a program that fires higher than the built-in cone-fire one. Determining how high to go is a matter of repeated firings verified using a self-supporting cone (regular cones are not accurate). I keep notes in the schedule record in an account at insight-live.com. And we have a chart on the wall showing the latest temperature for each of the cones we fire to. What about cone 6? Controllers fire it to 2235, we put down a cone at 2200!
How many degrees between these cone positions?

This picture has its own page with more detail, click here to see it.
I was consistently getting the cone on the left when using a custom-programmed firing schedule to 2204F (for cone 6 with ten minute hold). However Orton recommends that the tip of the self supporting cone should be even with the top of the base (they consider the indicating part of the cone to be the part above the base). So I adjusted the program to finish at 2200F and got the cone on the right. But note: This applies to that kiln at that point in time (with that pyrometer and that firing schedule). Our other test kiln bends the cone to 5 o'clock at 2195F. Since kiln controllers fire cone 6 at 2230 (for the built-in one-button firings) your kiln is almost certainly over firing!
Links
| Firing Schedules | Low Temperature Drop-and-Hold |
 PayPal | No tracking, No ads, No paywall, No transient content! Just organized, concise information constantly updated and improved. Was this helpful? Consider supporting me. |
| By Tony Hansen Follow me on        |  |
Got a Question?
Buy me a coffee and we can talk 

https://digitalfire.com, All Rights Reserved
Privacy Policy