| Monthly Tech-Tip | No tracking! No ads! |
A cereal bowl jigger mold made using 3D printing
Beer Bottle Master Mold via 3D Printing
Better Porosity Clay for Brown Sugar Savers
Build a kiln monitoring device
Celebration Project
Coffee Mug Slip Casting Mold via 3D Printing
Comparing the Melt Fluidity of 16 Frits
Cookie Cutting clay with 3D printed cutters
Evaluating a clay's suitability for use in pottery
Make a mold for 4-gallon stackable calciners
Make Your Own Pyrometric Cones
Make your own sieve shaker to process ceramic slurries
Making a high quality ceramic tile
Making a Plaster Table
Making Bricks
Making our own kiln posts using a hand extruder
Medalta Ball Pitcher Slip Casting Mold via 3D Printing
Medalta Jug Master Mold Development
Mold Natches
Mother Nature's Porcelain - Plainsman 3B
Mug Handle Casting
Nursery plant pot mold via 3D printing
Pie-Crust Mug-Making Method
Plainsman 3D, Mother Nature's Porcelain/Stoneware
Project to Document a Shimpo Jiggering Attachment
Roll, Cut, Pull, Attach Handle-making Method
Slurry Mixing and Dewatering Your Own Clay Body
Testing a New Load of EP Kaolin
Using milk as a glaze
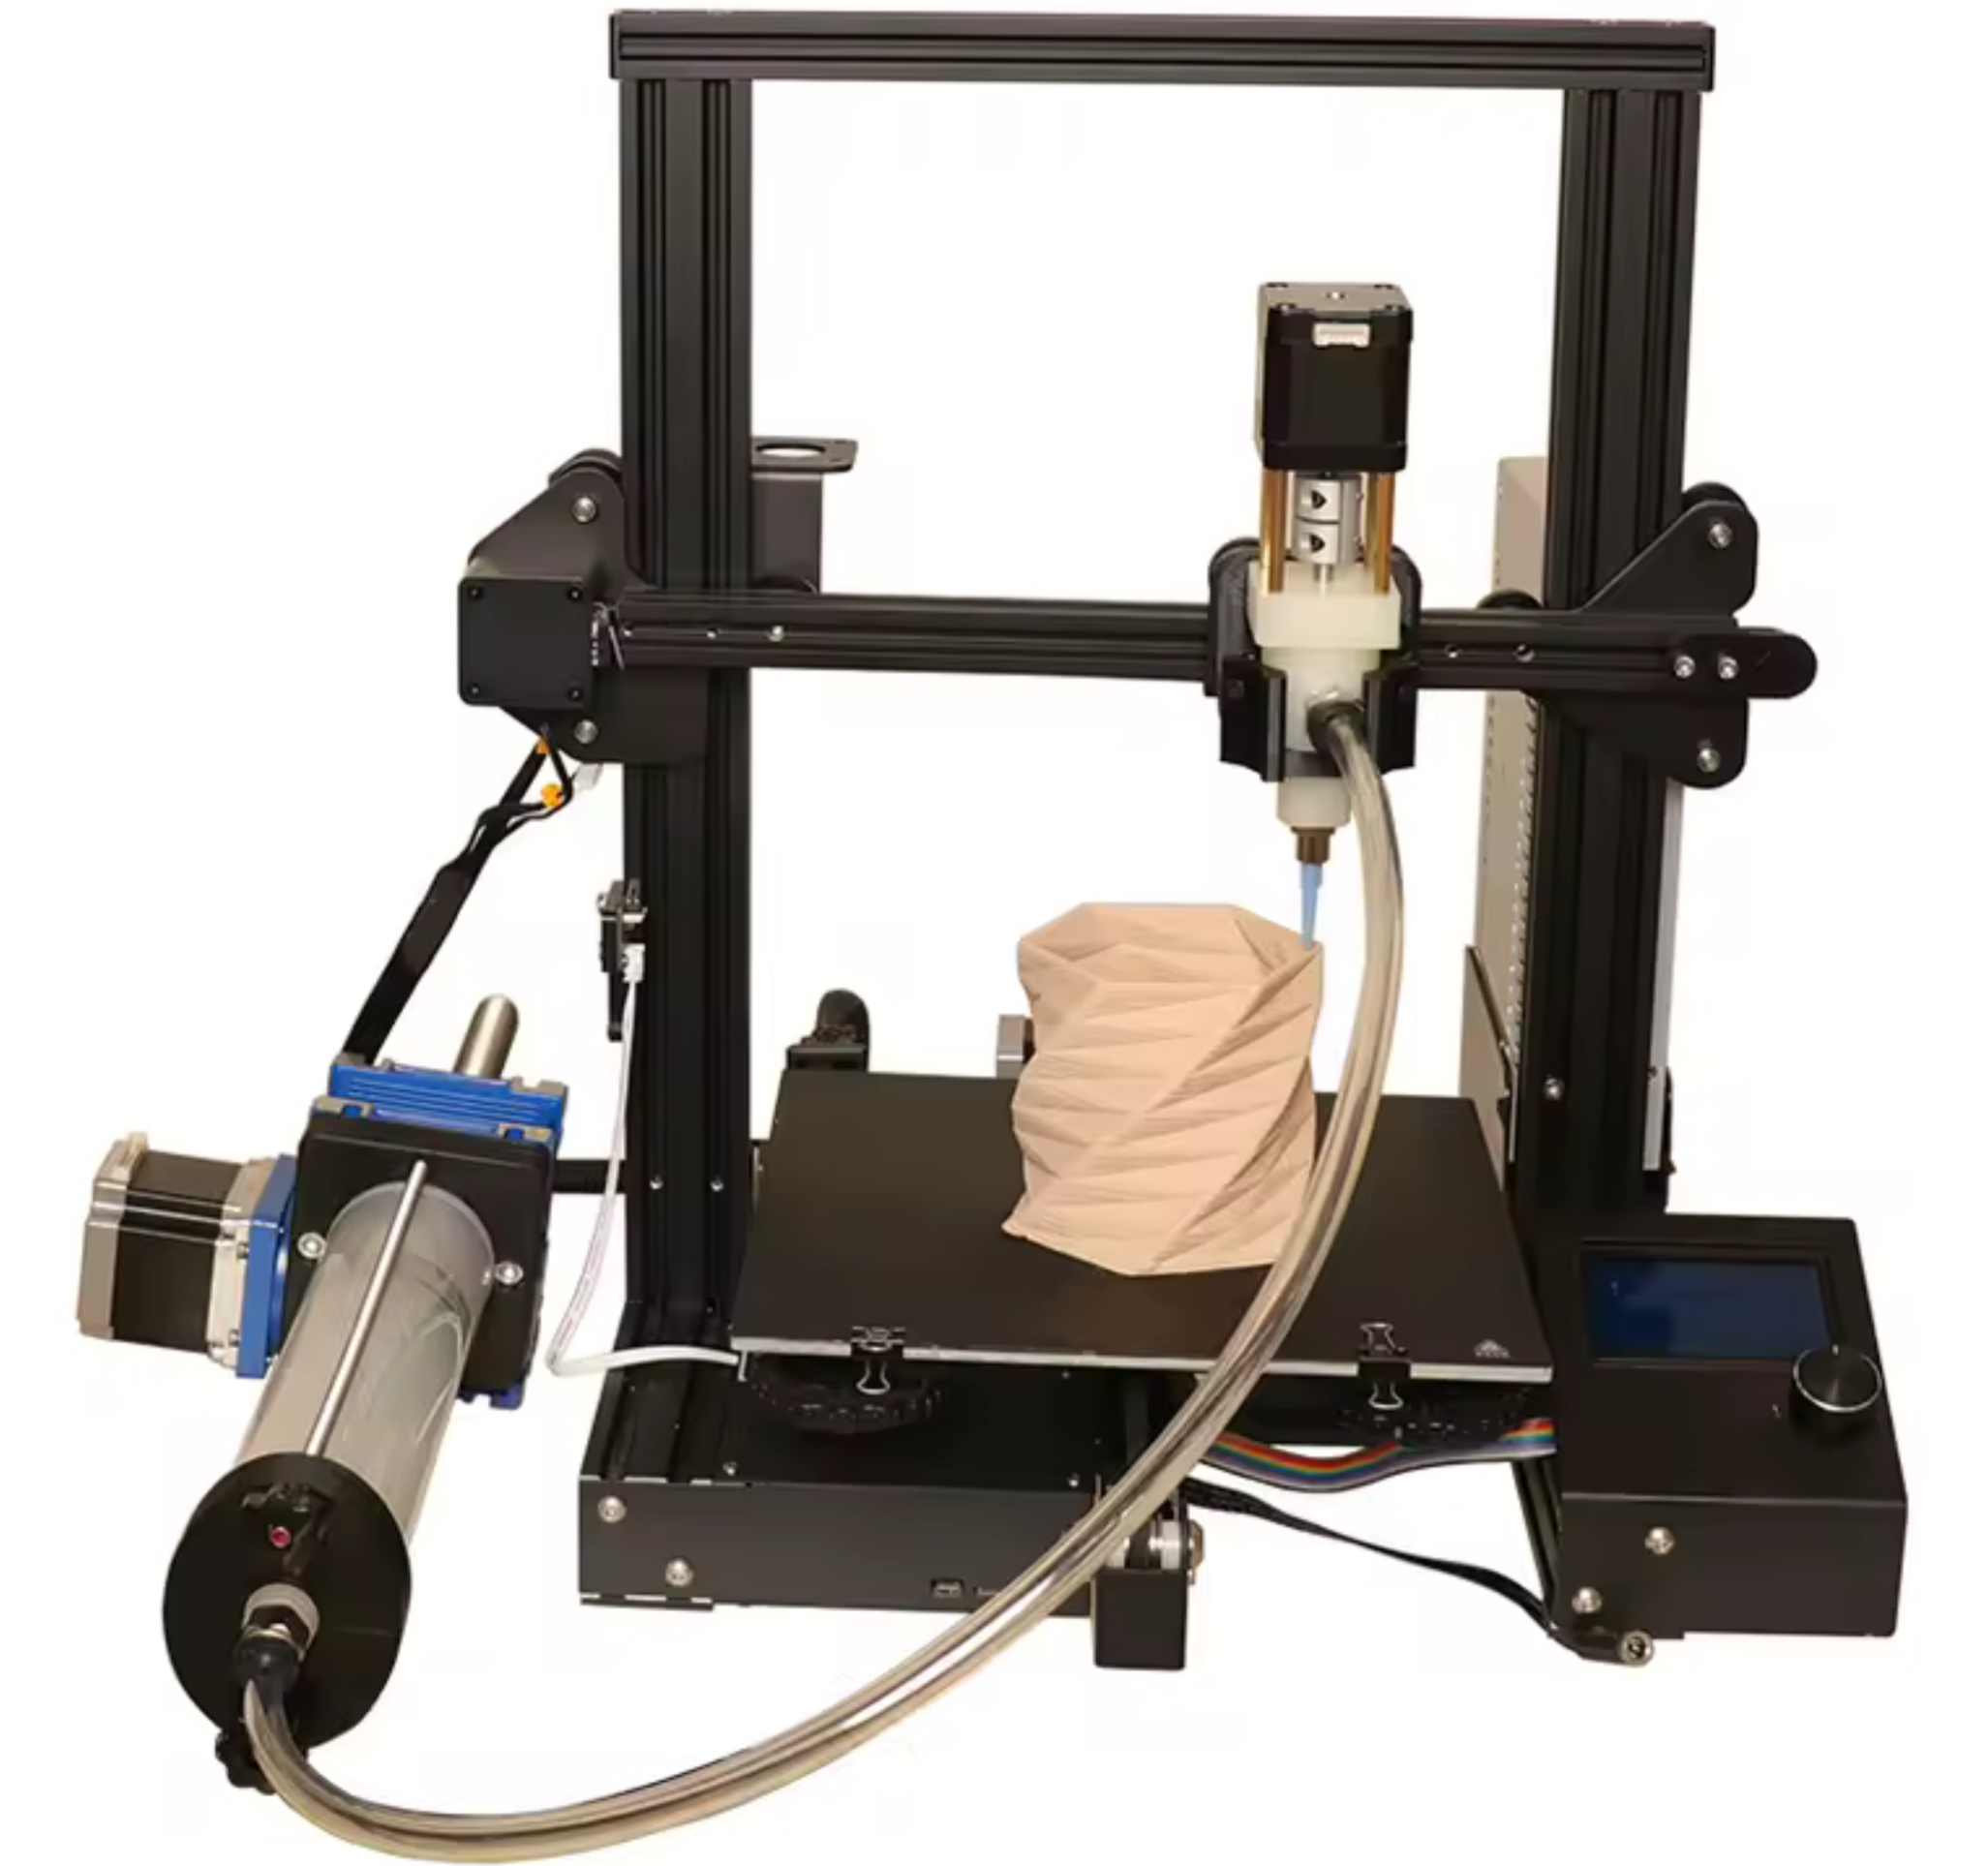
Clay 3D Printing is Within Reach
This project will trace our efforts to retrofit an easy to get consumer 3D FDM printer for printing clay. And to creating a procedure to take 3D drawings from the computer display to reality. And to being able to draw objects in such a way that they are printable. The text below is preliminary, a product of a ChatGPT search. The makers of the conversion kits do not provide support we are going to document a conversion.
1) Best base printers to convert (ranked by “clay-friendliness”)
Top pick (budget & simplicity): Creality Ender-5 / Ender-5 Pro / Ender-5 S1/ Tronxy X5SA, etc
• Rigid cube frame; the bed only moves in Z, so your soft print isn’t shoved back and forth (unlike Ender-3 / Prusa-style bedslingers).
• Open, Marlin-based, lots of community configs and board/firmware options. (Plenty of Klipper configs exist too.)
Good (if you want CoreXY): Tronxy X5SA / TwoTrees Sapphire / RatRig / Voron 2.4
• Stationary bed in XY and strong gantry—great for tall vases and larger coil builds. Requires more tinkering.
Proven “clay” path (delta): Anycubic Kossel / Rostock
• Deltas have light moving parts and smooth motion; widely used in ceramic-printing how-tos (notably Jonathan Keep’s guide to converting a Kossel for clay).  
Avoid as a first build: Bambu / fully locked-down ecosystems (closed firmware and harder I/O for solenoids/aux devices), and bedslingers (Ender-3, Prusa MK3) unless you print very slowly and small.
2) Hardware you’ll need (bill of materials)
• Funssor clay/paste extruder kit (NEMA17 lead-screw “syringe” or screw/auger type; some versions include pneumatic cylinder + regulator + tubing). Check the exact kit you have for: stepper-driven plunger/screw, 2 mm nozzle, M8 quick-connects, 6.5 mm ID × 10 mm OD PU tube, and a pressure regulator if it’s the air-assist version. 
• Air source (if using pressure-assisted cartridges): small compressor + water trap + 0–60 psi regulator and a normally-closed 24 V solenoid you can trigger from the printer board. Many ceramic setups run ~2 bar / ~30 psi for soft bodies. 
• Rigid syringe/cartridge + pistons (310 ml caulk-style or 30–100 ml lab syringes) that match your kit.
• Mounting bracket/plate to swap your hotend for the paste nozzle. (Most Funssor kits show a simple front-plate mount.) 
• Bed surface: plaster bat, bisque tile, or canvas-wrapped board (no heat).
• Moisture management: clay + electronics don’t mix; add drip shields and keep regulators/compressor away from splatter.
3) Mechanical integration (high level)
1. Remove the hotend and bolt the Funssor paste head to the tool plate. Keep the thermistor plugged in and taped aside unless you’re going to configure a dummy sensor (see firmware).
2. Route tubing: short, gentle bends from cartridge to nozzle (kinks cause pressure spikes).
3. Wire the stepper to E0 (your normal extruder driver).
4. If using air-assist or a pneumatic on/off, wire the solenoid to a spare MOSFET output (parts fan, HE fan, or AUX) so you can toggle air with G-code (e.g., M106/M107 on a repurposed fan).
5. Harden Z (tighten eccentrics, slow it down) and reduce vibrations (lower accel/jerk).
For assembly inspiration and cartridge/pressure basics, the RepRap ceramic & paste-extrusion pages and Keep’s guide are gold.   
4) Firmware: two easy paths
You can run Marlin (simplest) or Klipper (powerful macros, easy to tweak).
A) Marlin changes (Ender-5 etc.)
Option 1 – no recompile: Allow “cold” extrusion in start G-code
• Add M302 P1 S0 at the top of every print to allow E-moves at any temperature. (Marlin’s M302 controls cold-extrude safety.) 
Option 2 – recompile once (cleaner for clay):
• In Configuration.h set a dummy thermistor so the hotend always reads room temp (or just leave your real thermistor plugged in). Typical dummy tables are 998 (≈25 °C) or 999 (≈100 °C); also set the dummy value (e.g., 25).
#define TEMP_SENSOR_0 998
// in Configuration_adv.h
#define DUMMY_THERMISTOR_998_VALUE 25
This avoids temp faults with no heater. (Use for development—documented in Marlin/derivative guides.)   
• Make sure cold-extrude protection won’t block you: either keep PREVENT_COLD_EXTRUSION and use M302 S0, or set a very low EXTRUDE_MINTEMP. 
Calibrate the extruder steps (E-steps) for a plunger:
• Command 10 mm of “filament” and measure how far the syringe plunger actually moves.
• Adjust with M92 E
B) Klipper changes
• In [extruder] set min_extrude_temp: 0 (lets you move E cold). This is the Klipper way of what M302 does in Marlin.  
• You still need a temperature section; either leave a thermistor connected or use workarounds (e.g., set very permissive min/max or “fake” sensor). Community threads discuss min_temp, ADC range, and dummy setups when building toolheads without heaters.   
• If you repurpose a fan pin for a solenoid, define it as [fan] or [output_pin] and toggle with macros.
5) Slicer profile (the secret sauce)
Use Cura/PrusaSlicer/SuperSlicer—just remember you’re pushing paste, not filament.
• Start G-code:
M83 ; relative extrusion
M302 P1 S0 ; allow cold extrude (Marlin only)
; (Optional) M106 S255 ; turn on air/solenoid if mapped to a fan
• Disable all heat commands (no M104/M109/M140/M190).
• No retractions. Set retract/deretract = 0.
• Relative extrusion (M83).
• Line width: 1.5–3.0 mm (match your nozzle).
• Layer height: 0.6–1.2 mm to start.
• Speed: 5–20 mm/s (slow!).
• Accel/Jerk: very low (e.g., 200 mm/s² accel; jerk 2–4 mm/s).
• Coast/Wipe/Pressure Advance/Linear Advance: off (clay does not elastically behave like plastic).
• Vase/Spiral mode is fantastic for coils and simple forms.
• If using air-assisted cartridges, map air on/off to M106/M107 so perimeters/pauses behave.
For process/mixture pointers and typical pressures (~2 bar / ~30 psi) see the RepRap ceramic delta and paste-extruder docs.  
6) First-print calibration (15–30 min)
1. Purge & prime: Extrude “50 mm” at 1 mm/s until you get a smooth bead.
2. Flow match: Print a 100 mm straight line at 1 mm bead target. If it’s fat, reduce flow (or E-steps); if skinny, increase.
3. Bridging & corners: Lower speed and acceleration until corners stop bulging.
4. Z-offset on a plaster/bisque bat: Start a hair high; clay settles.
5. Walls test (vase mode): Tune speed and flow for clean, stacked coils.
7) Common pitfalls (and how to dodge them)
• Bed-slinger wobble: If you do use an Ender-3/Prusa style, print very slowly and keep builds short.
• Pressure spikes / blobs: Use the largest radius bends you can, keep tubing short, and avoid sudden start/stop (slow accel).
• Firmware blocks E-moves: Use M302 (Marlin) or set min_extrude_temp: 0 (Klipper).  
• Thermistor faults without a heater: Keep a thermistor plugged in and taped to the carriage, or configure a dummy sensor (Marlin) / permissive min-temp (Klipper).  
• Clay too wet/dry: You’re after toothpaste/peanut-butter consistency. RepRap/Keep’s materials notes give good starting ratios.
Related Information
Our 3D Design Studies Are About to Pay Off
We will be 3D printing clay soon
This picture has its own page with more detail, click here to see it.
The 3D design you have been learning here, for making slip casting molds, is essential to being able to go to the next level: printing the clay. Many people buy expensive clay 3D printers, for $10k or more, only to realize they don’t know how to draw the designs they want to print! Or that they have underestimated the difficulty of learning the CAD software. Or that they got the wrong kind of printer or one that is too small.
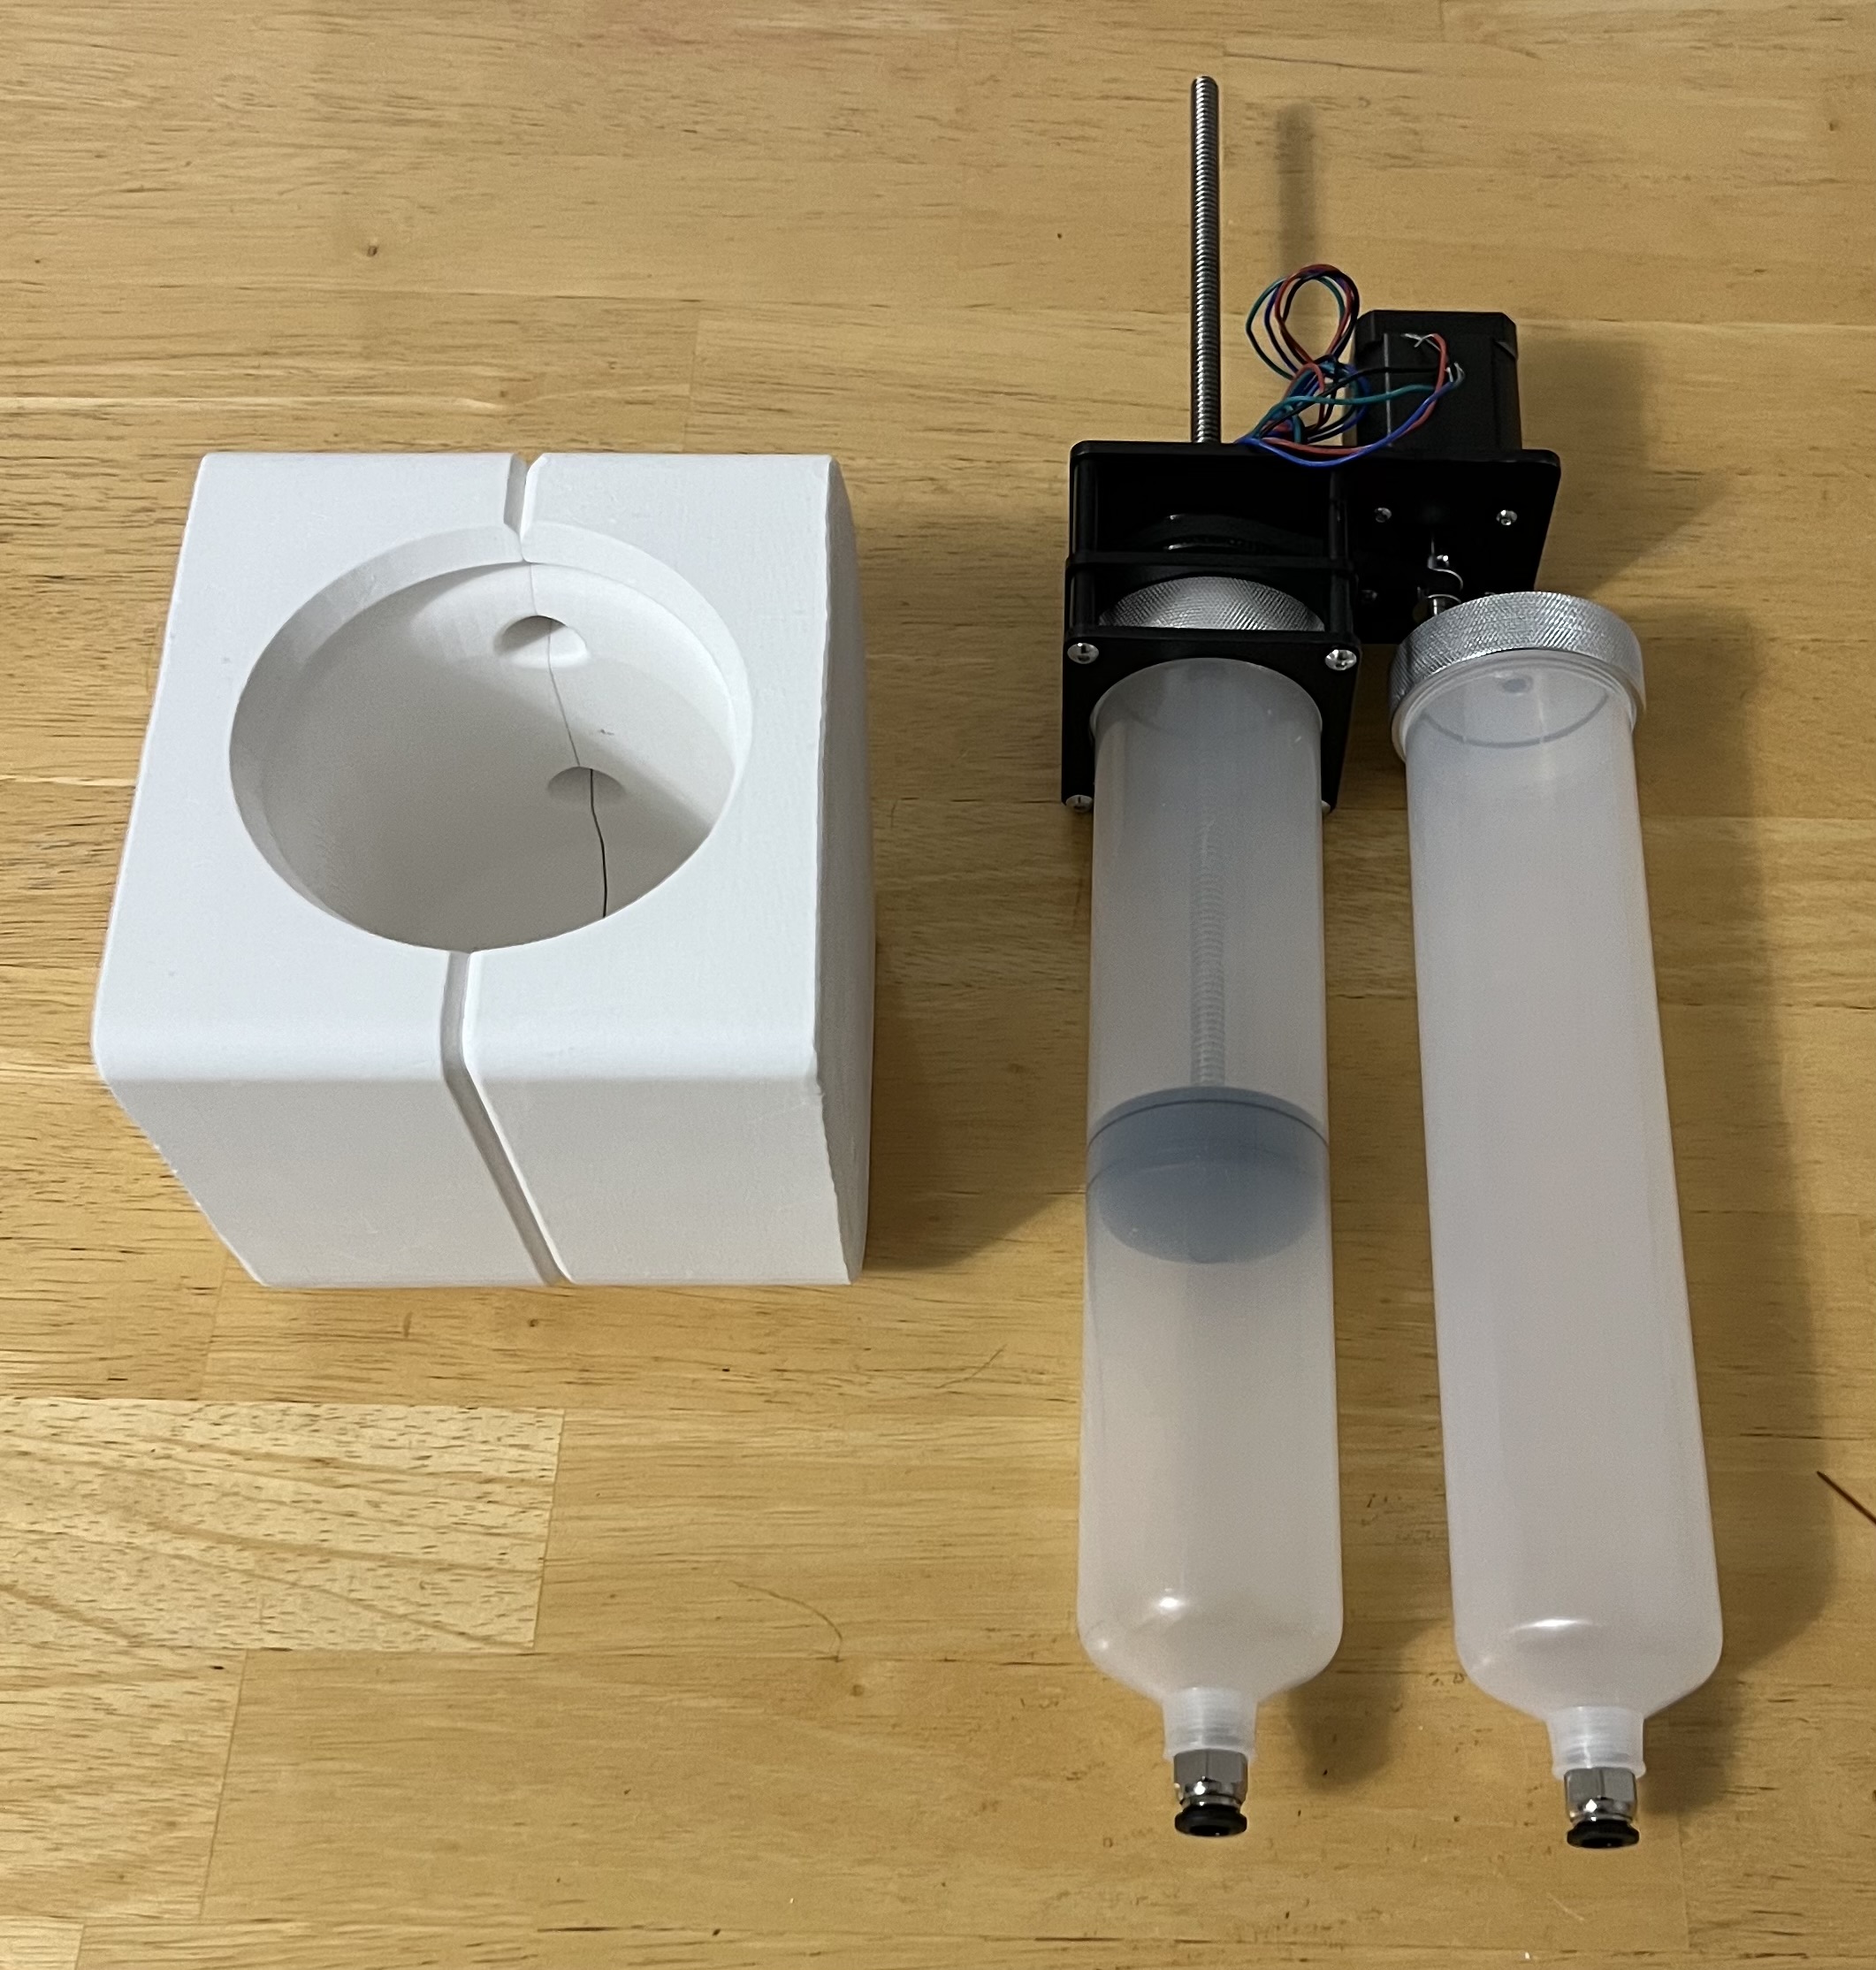
It turns out that an ecoystem of retrofitting 3D printers for clay has evolved. Standard components are now available, like the piston/motor combo shown here. It pumps the clay through a flexible tube to a print head, basically a tiny pugmill that forces it out through a nozzle. But the conversion task is not for the faint hearted. So that’s our next challenge: Make it doable for almost anyone.
Barrel Feeder With Motor and Gearbox
This picture has its own page with more detail, click here to see it.
This 3D printer retrofit feeds the clay paste to the printhead, under pressure, from a 500ml cylinder. A piston is pushed by a threaded rod driven by a stepper motor. That motor’s power is greatly increased by a gearbox. The print head has its own stepper motor and auger to drive the paste out of the nozzle.
| By Tony Hansen Follow me on         |  |
Got a Question?
Buy me a coffee and we can talk 

https://digitalfire.com, All Rights Reserved
Privacy Policy